Introduction
We learned how to retrieve simple data from a single remote endpoint when building the Jokes app:
Retrieving more complex data from multiple endpoints is essentially the same task, but we have to think carefully about which data we actually want to retrieve from a remote endpoint, and how one type of data relates to another type of data.
Example
This is best explained with an example, so let’s consider books.
A book has at least one author.
An author writes one or more works.
A work may be published in one or more editions.
For example, L. Frank Baum is an author.
They wrote a work known as The Wonderful Wizard of Oz.
There were 1029 editions of this work, across many languages!
In this tutorial, we will:
- Create a model, view model, and view that allows the user to search for and select an author.
- Create a model, view model, and view that shows a list of works by that author, from which the user can select a work.
- Create a model, view model, and view that shows the most relevant edition of a work, with the option to browse other editions for that same work.
Here is what the app will look like when it is complete:
<< placeholder for showing video of completed app >>
Endpoints
This example depends on the Open Library application programming interface, or, for short, their API.
TIP
Building an app that uses an API provided by a third party requires careful reading of documentation provided by that third party. In some cases where documentation is not clear, we can use a large language model to help us understand how to use the API.
Authors
To get started, Mr. Gordon has first created an empty project named ComplexEndpointsExample, and then immediately changed the blue folders to grey groups, and set up the usual project structure that supports the MVVM design pattern, to separate concerns:

TIP
If you wish, you can review all the source code for the application developed in this tutorial.
Careful reading of the Open Library API documentation indicates that we can use the Authors API to search for a list of authors:

Let’s review what we see here:
DISCUSSION
- This is the endpoint we must query to find a list of authors that match our search string. Importantly, a search string of J K Rowling must be “URL encoded”, which means, among other things, that spaces must be expressed using the syntax
%20. Here is a reference for how various characters in a string can be URL encoded. This tutorial will build on two existing tutorials to make managing URLs reasonably straightforward.- The response begins with a
{and ends with a}which means we are receiving a JSON object. We need to design a structure in our app’s model that matches the information sent within this JSON object.- The
docsproperty returns an array of matching authors. In this screenshot, there is just one matching author, but we could receive more than one (hence, the array).- The
keyinformation uniquely identifies a given author in the Open Library system.- We can obtain the author’s name from the
nameproperty.- For more information about a given author, we need to visit another endpoint.
Let’s begin working with the Open Library Authors API to set up a search feature in our app.
Model
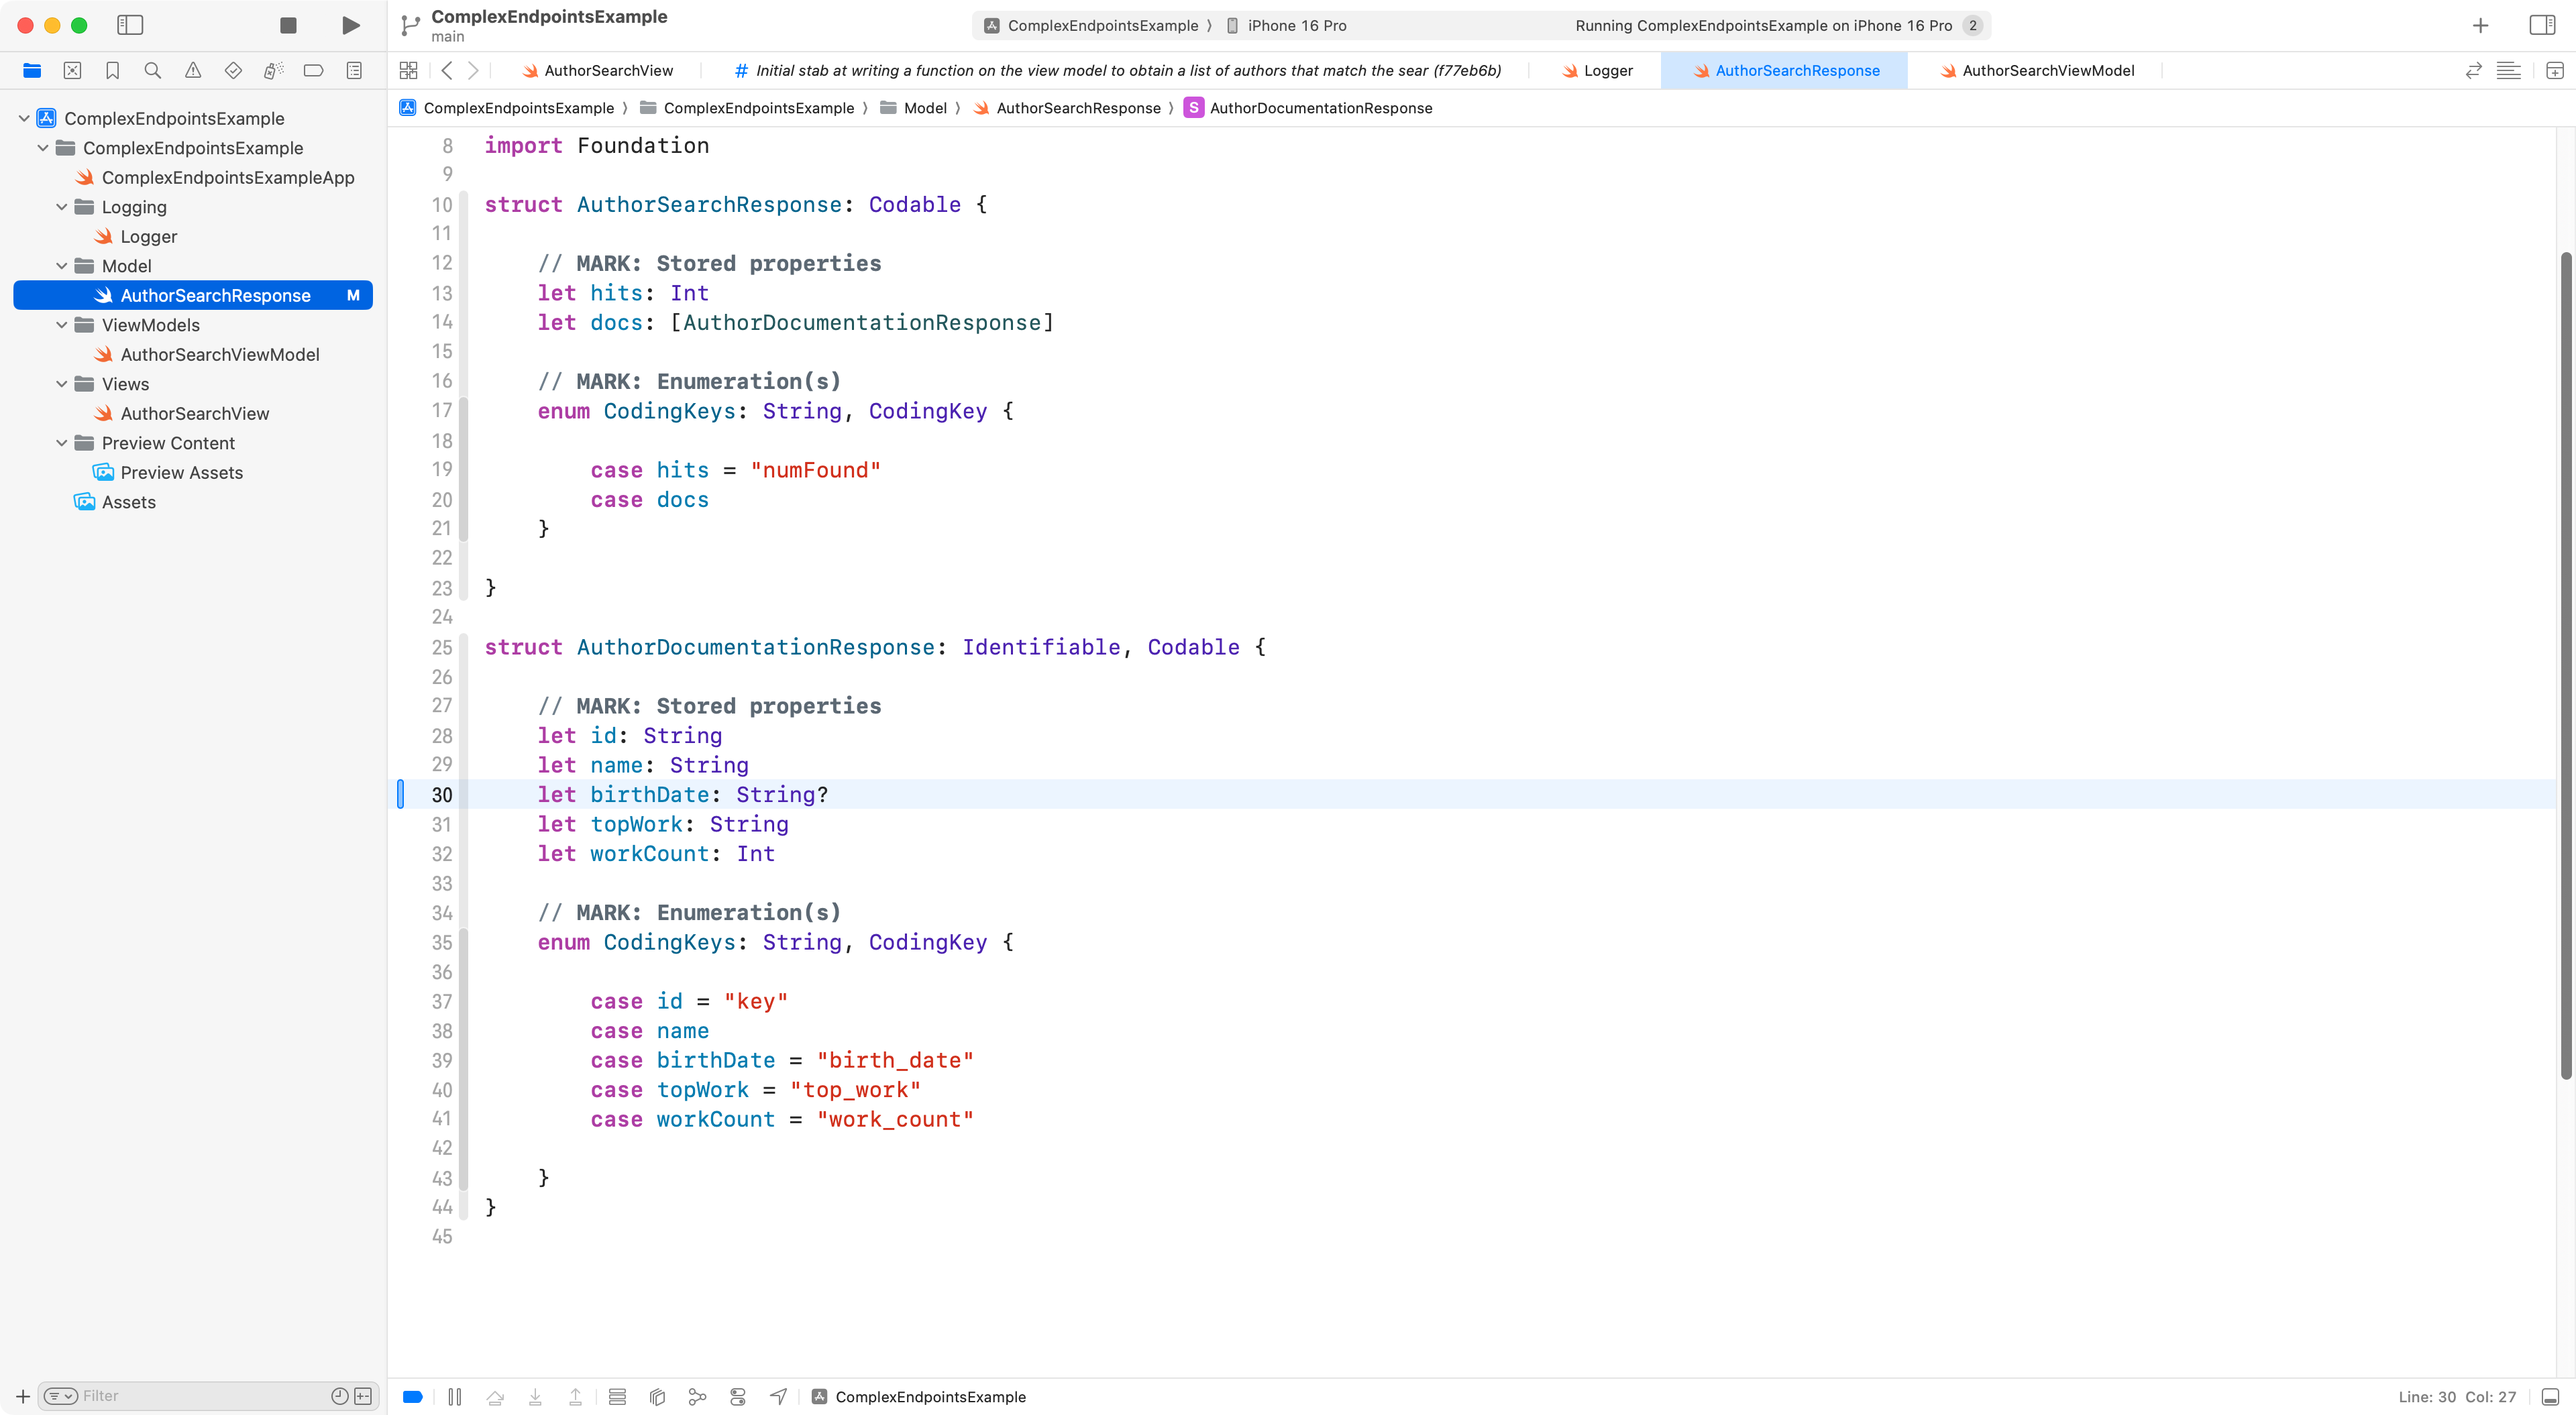
First we need a data structure to match the expected response.
We only need to include properties for information from the response that we care about. Any properties we omit from our data structure will be ignored when data is retrieved from the endpoint and decoded.
We can use an enumeration to rename properties sent to us by the endpoint, in case we prefer to use different names or capitalizations.
Here is what the model might look like:
.png)
Let’s review this:
DISCUSSION
AuthorSearchResponseis the top-level structure we are designing to decode the response that we receive from the endpoint.- In red:
numFoundtells us how many matches there were for our search string; we choose to store the value provided in this property within our app using a property name ofhitsinstead.- The
docsarray in the JSON response will be decoded into a data type namedAuthorDocumentationResponsewhich is defined below.- In green: we choose to decode the unique identifier for an author from the provided property name of
keyto a property name ofidinstead, so we can make our structure conform to theIdentifiableprotocol; this is necessary so that we can iterate over the list of returned authors in our app.- In purple: Swift style conventions are that property names should be defined in
PascalCaseand notsnake_case, so we decode this information into properties with the appropriate capitalization pattern.
Logging
We’re probably going end up debugging some logical errors, so it’s a good idea to add good support for logging to our app.
We can add this code:
import OSLog

extension Logger {

    // Using your bundle identifier is a great way to ensure a unique identifier.
    private static var subsystem = Bundle.main.bundleIdentifier!

    // Logs the view cycles like a view that appeared
    static let viewCycle = Logger(subsystem: subsystem, category: "viewcycle")

    // All logs related to tracking and analytics
    static let statistics = Logger(subsystem: subsystem, category: "statistics")

    // All logs related to obtaining data from remote endpoints
    static let dataRetrieval = Logger(subsystem: subsystem, category: "dataretrieval")

    // All logs related to user authentication
    static let authentication = Logger(subsystem: subsystem, category: "authentication")

}
… to a file named Logger.swift in a group named Logging:
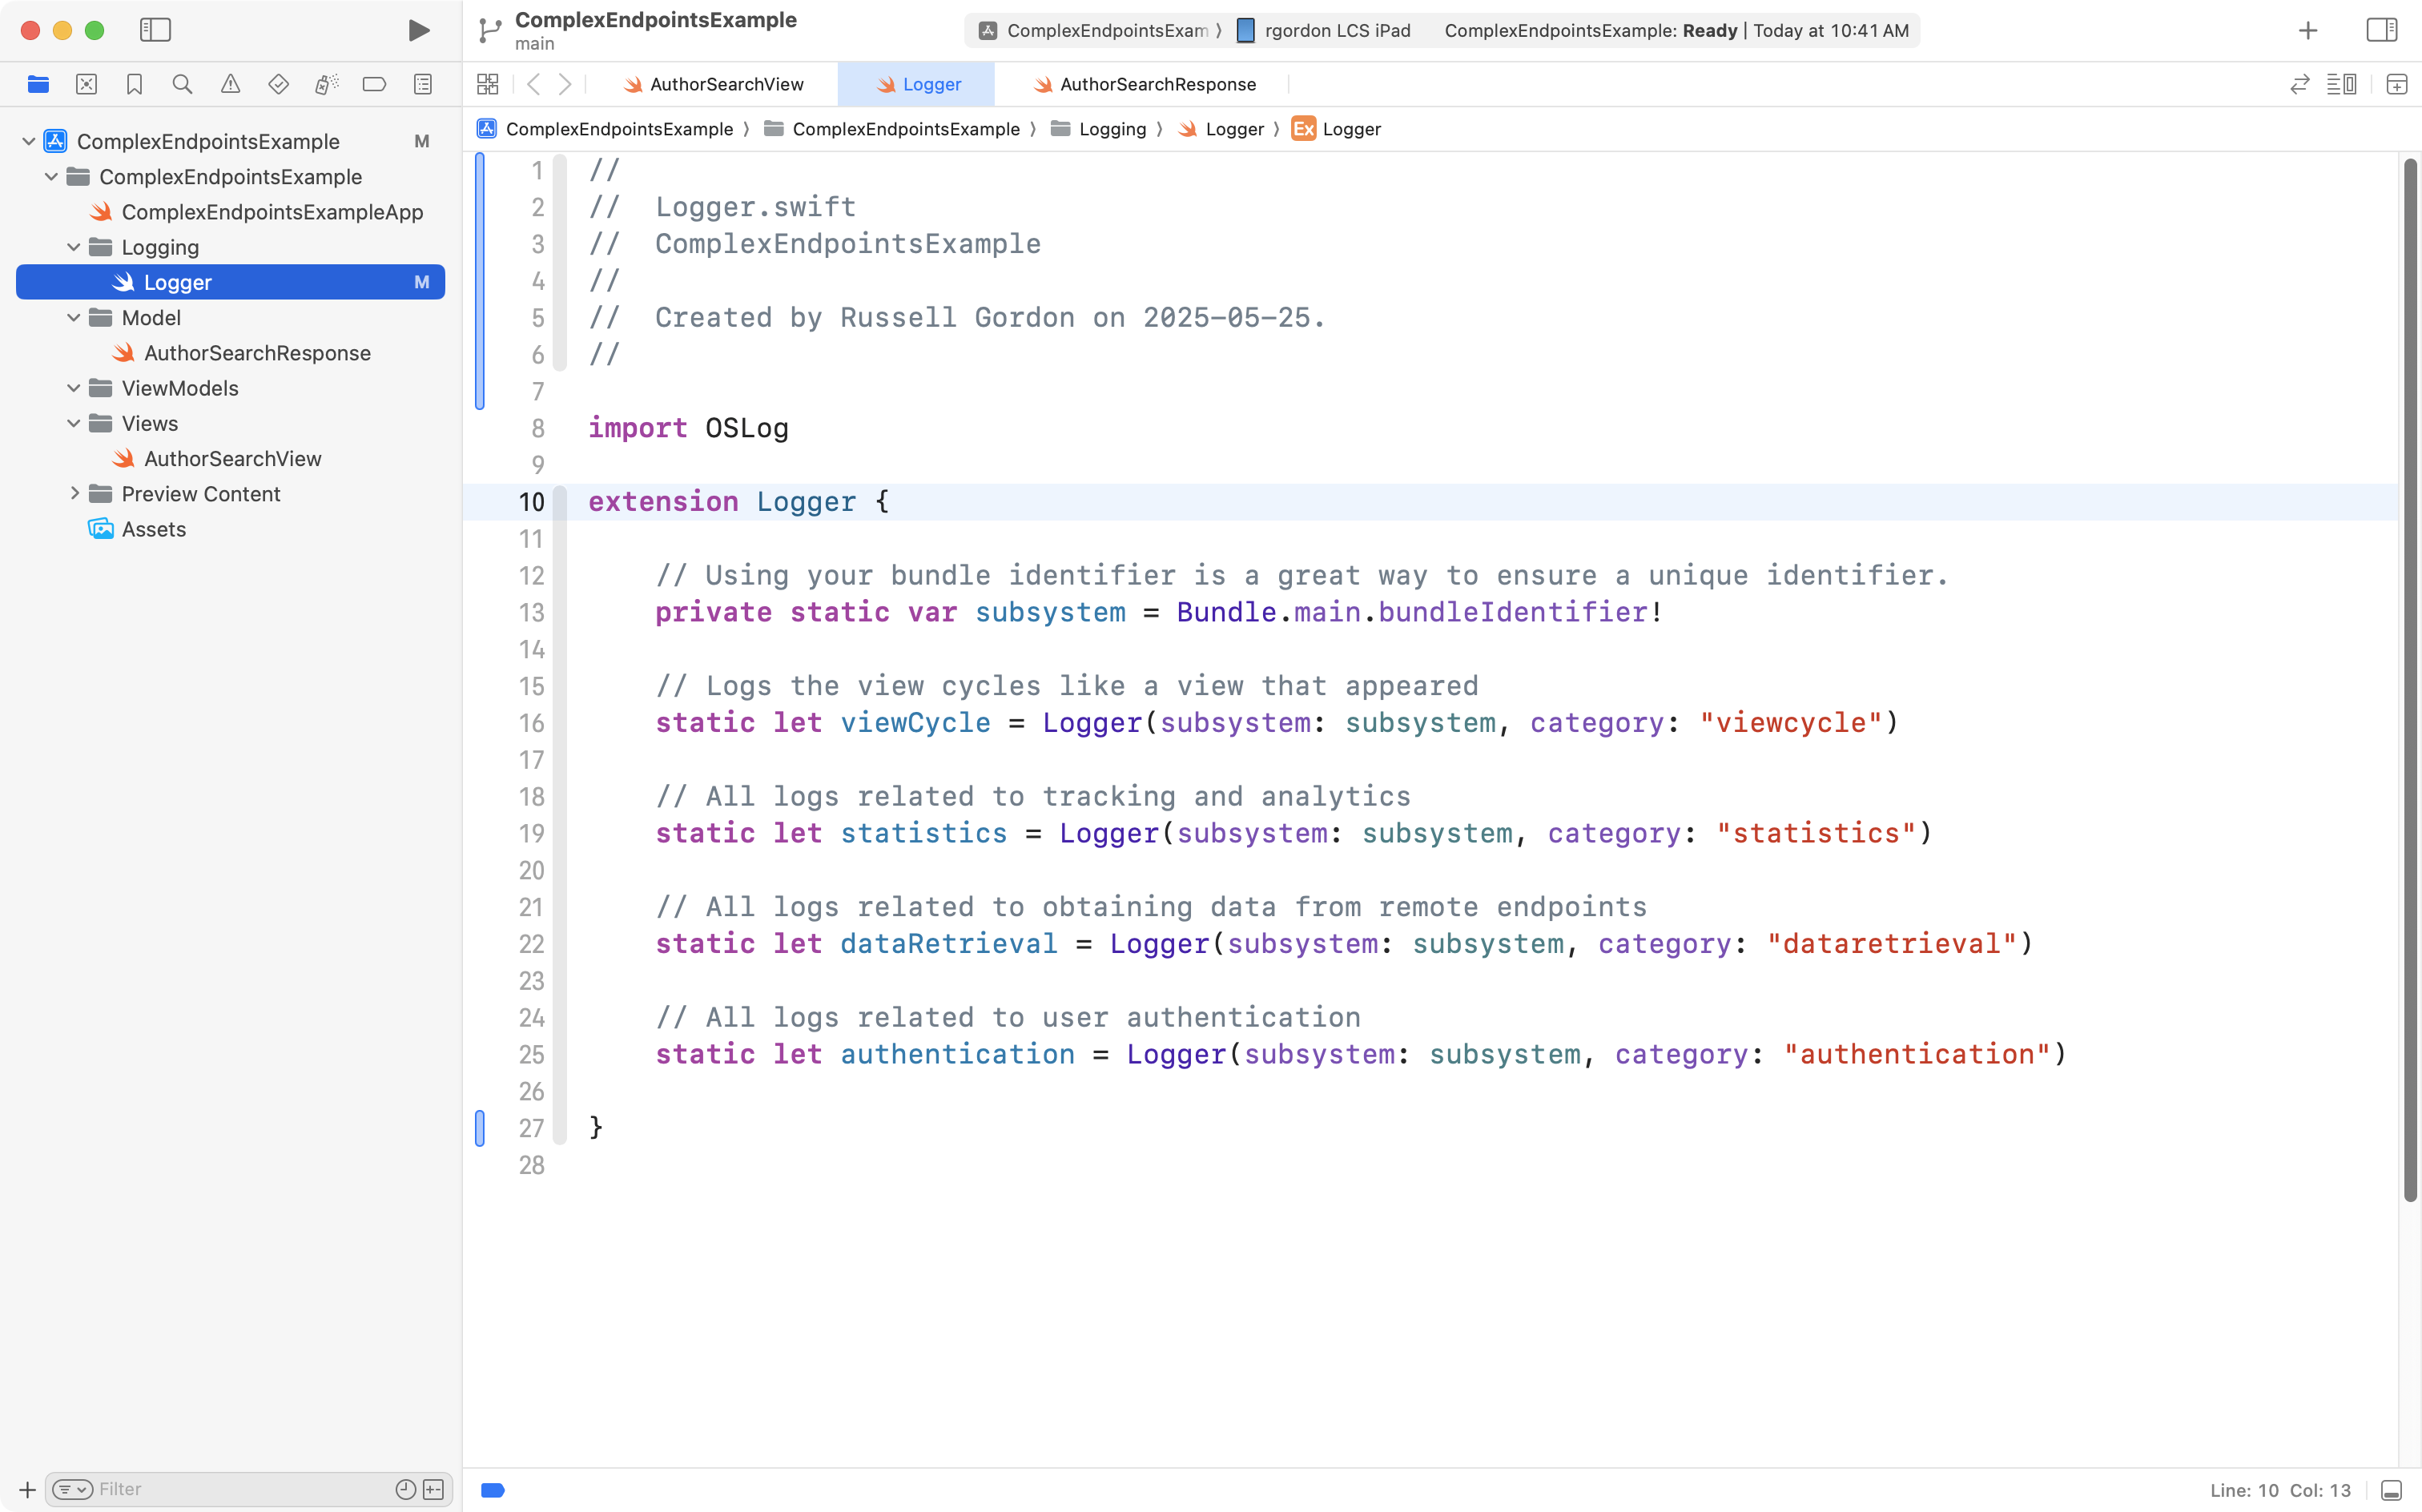
More on how this logging code will be useful later on in this tutorial.
View model
Here is what a view model for working with this endpoint might look like, initially:
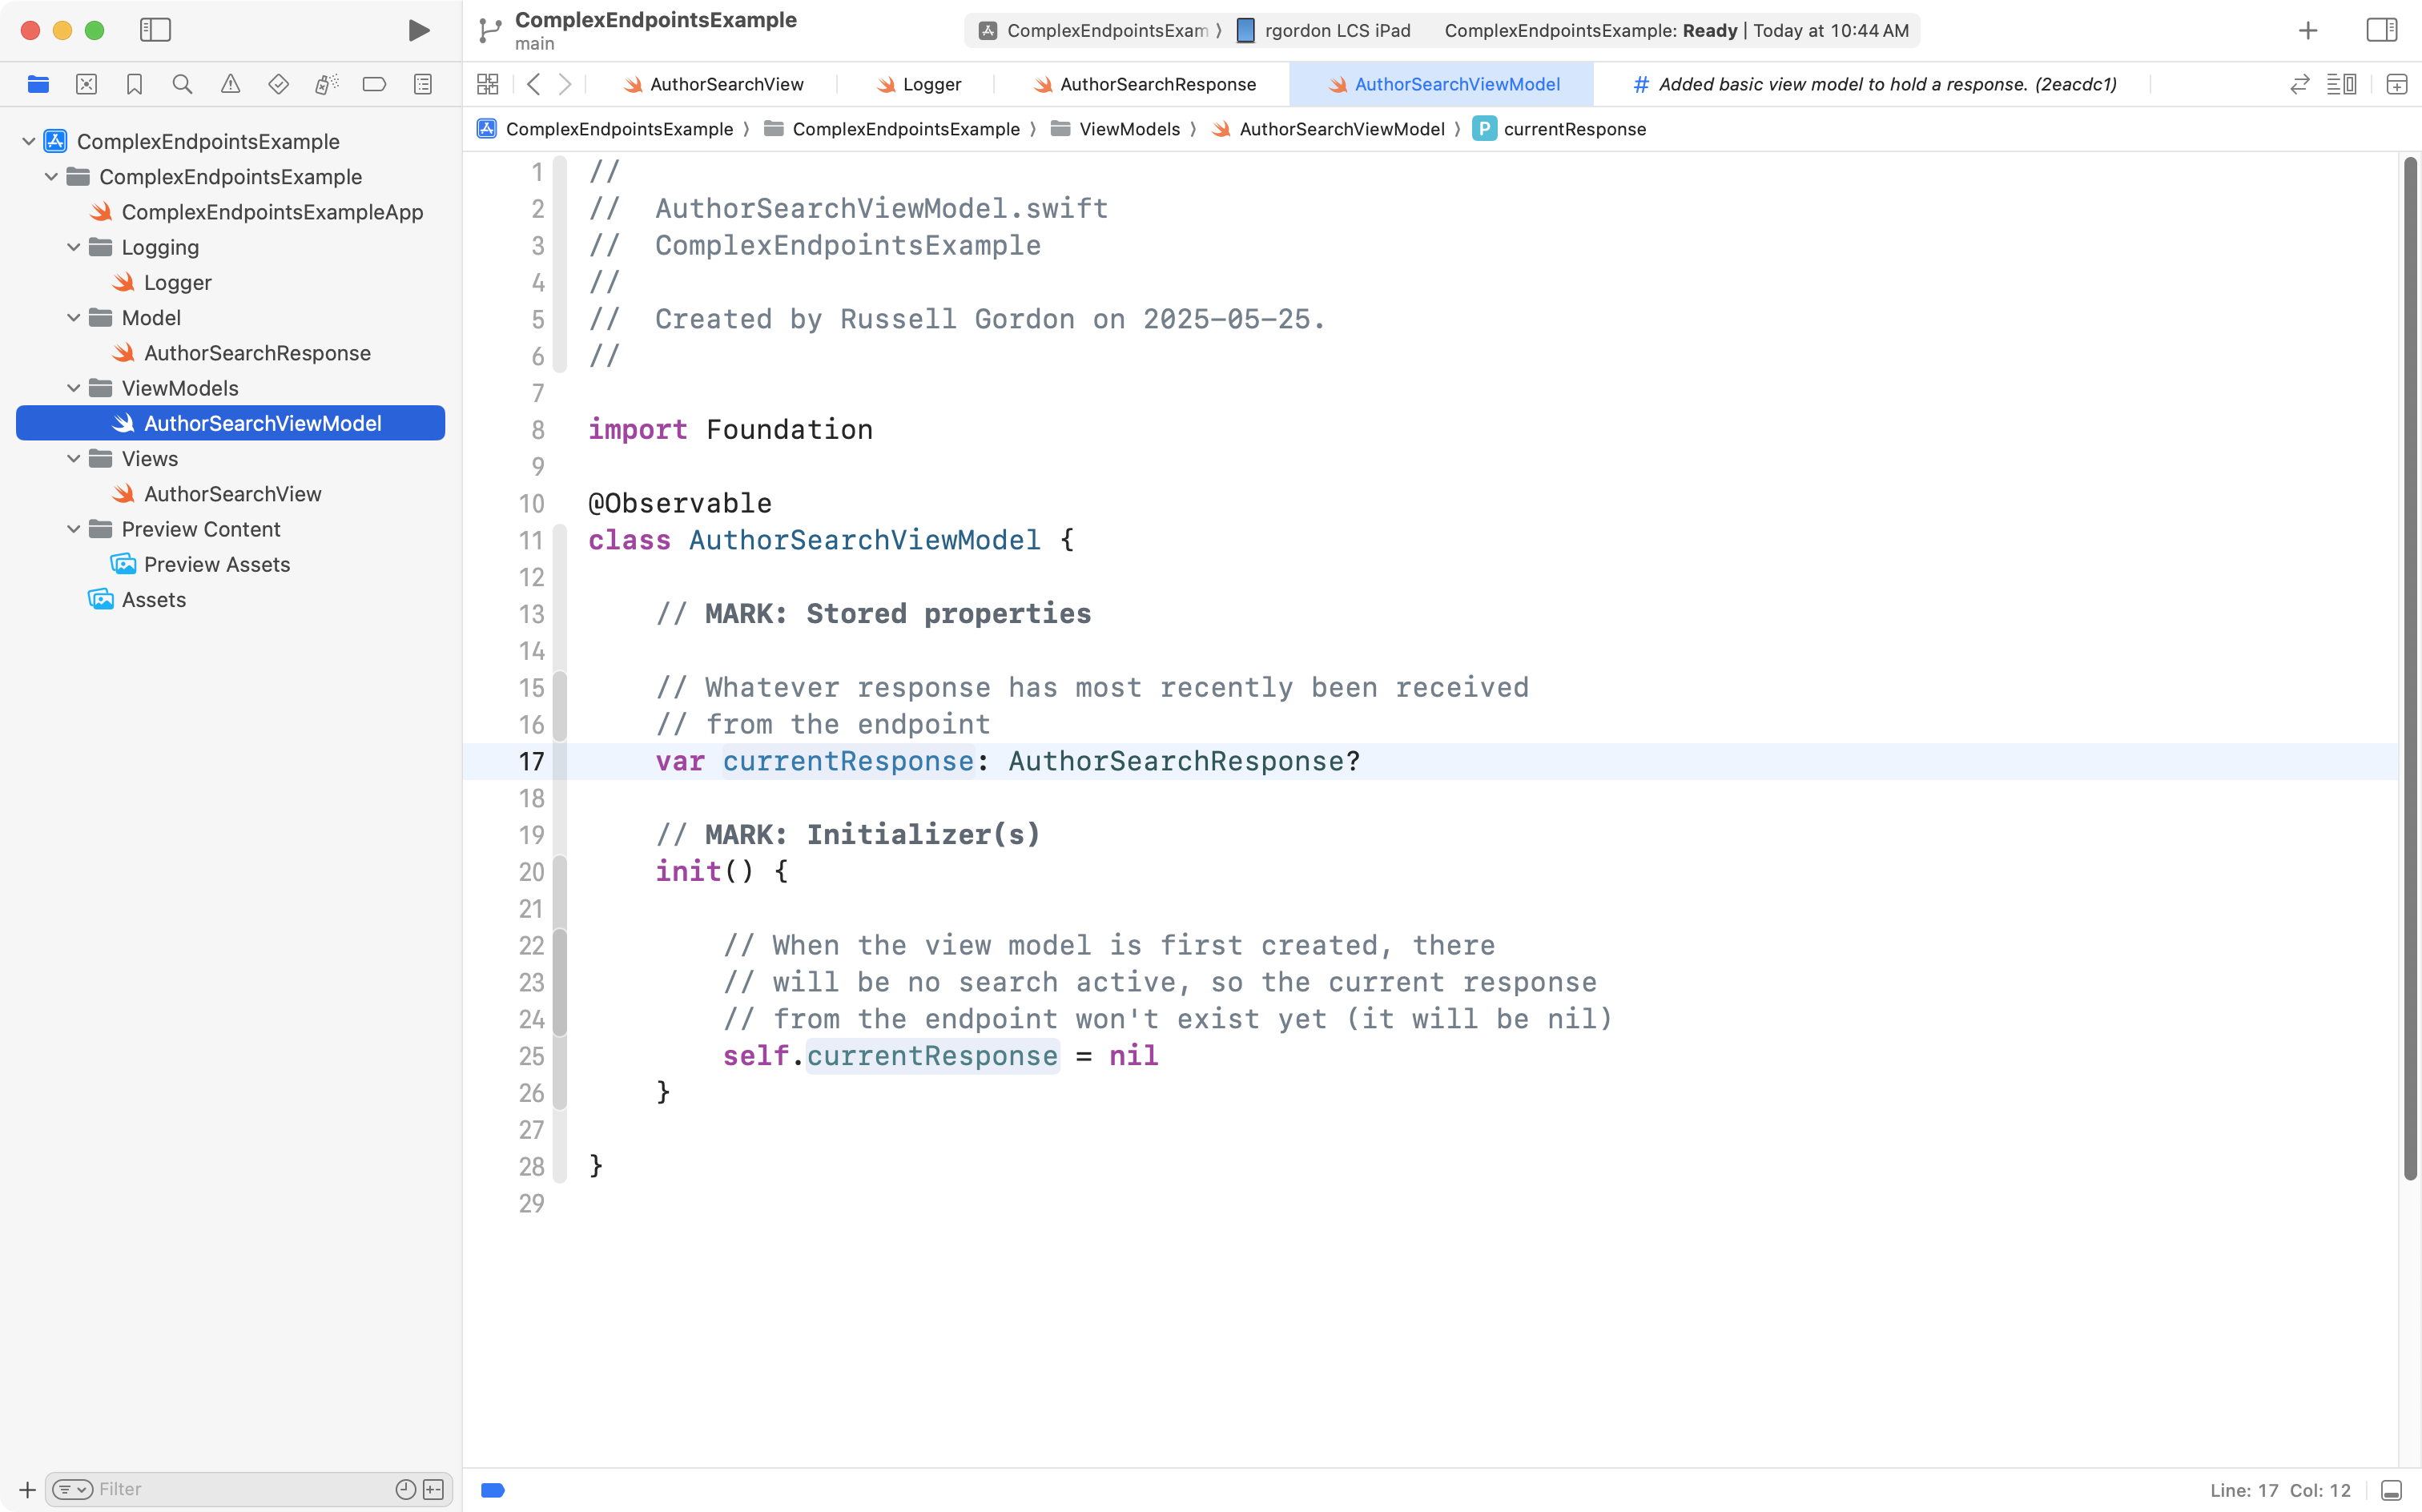
Note that there is no code (yet) to actually retrieve a response from the remote endpoint. We will add that shortly.
View
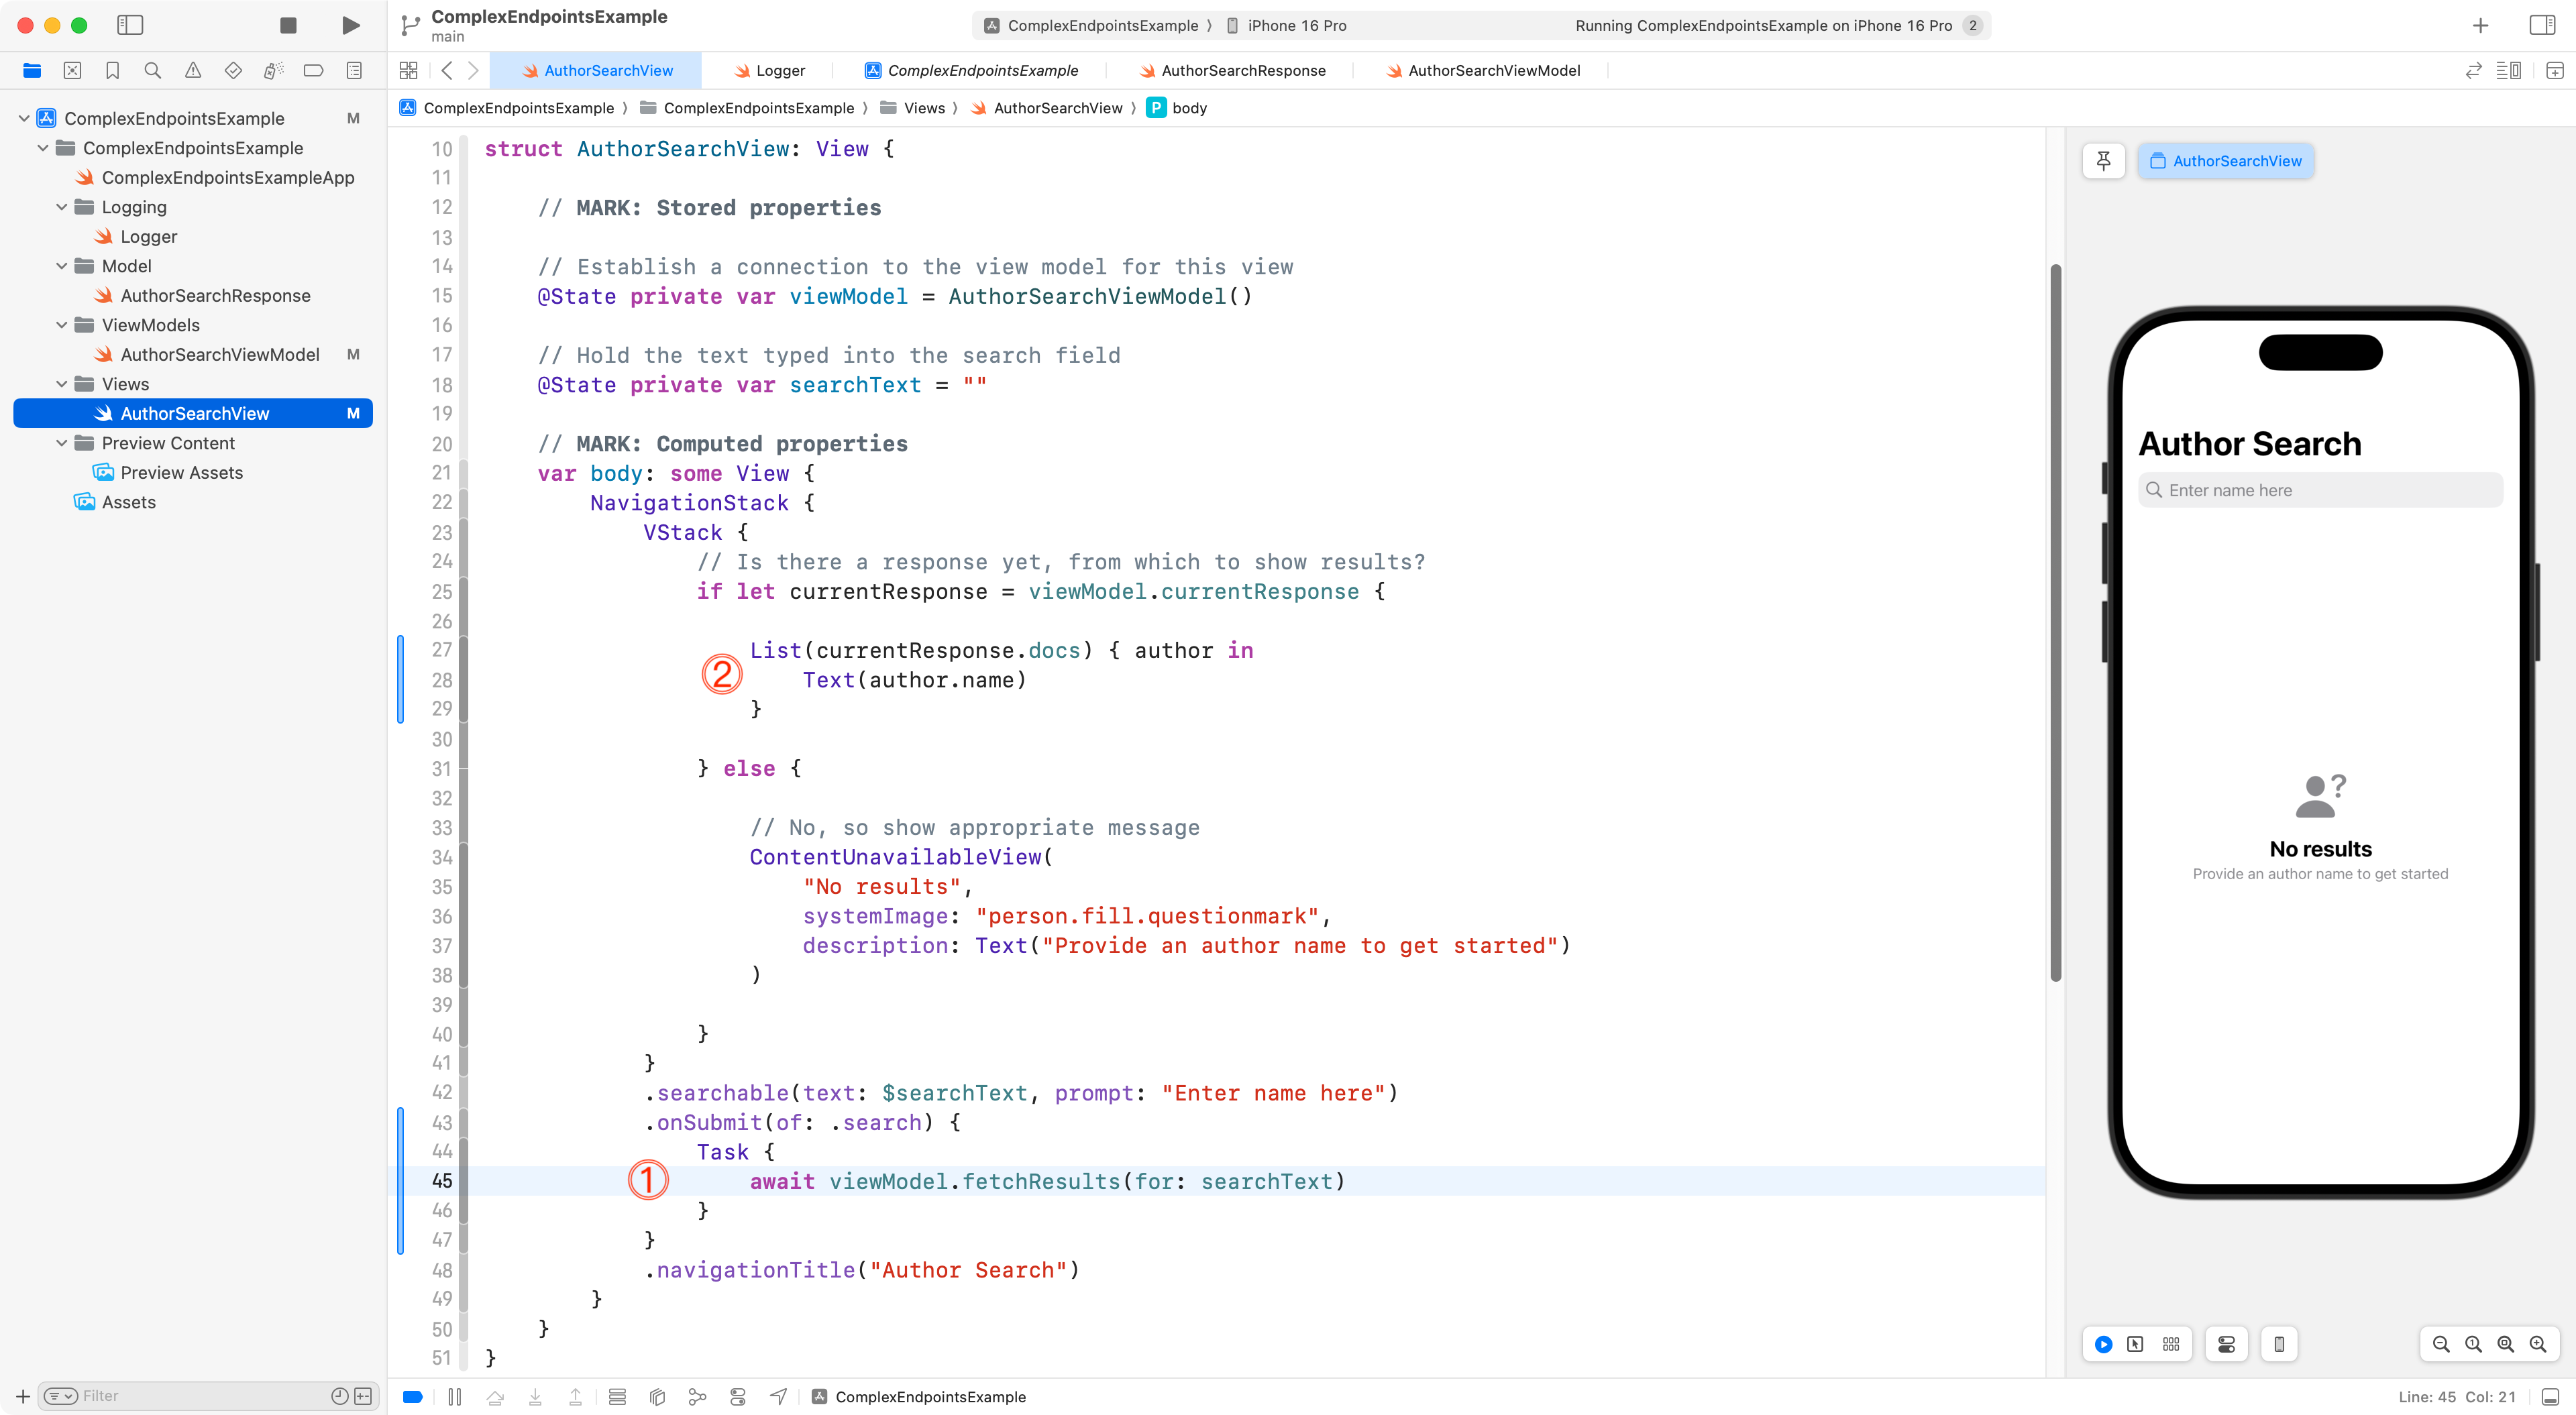
A basic view to get the search interface started might look like this:

In this view:
DISCUSSION
- A instance of the view model is created so that we can (eventually) iterate over the results received from the remote endpoint.
- We write a selection statement that attempts to unwrap the optional property
currentResponsefrom the view model.- When
currentResponsewas notniland was successfully unwrapped we will (eventually) have an array of authors to iterate over here and show to our user.- Right now, our view model doesn’t actually do anything to get results, so this shows instead. Showing a message like this is a good user experience practice, because it tells the user what they need to do to see some results.
- We use the
.searchableview modifier to provide a field into which the user can type a name to begin a search. It is bound to thesearchTextstored property, so whatever the user types in the search field will be placed into this stored property.
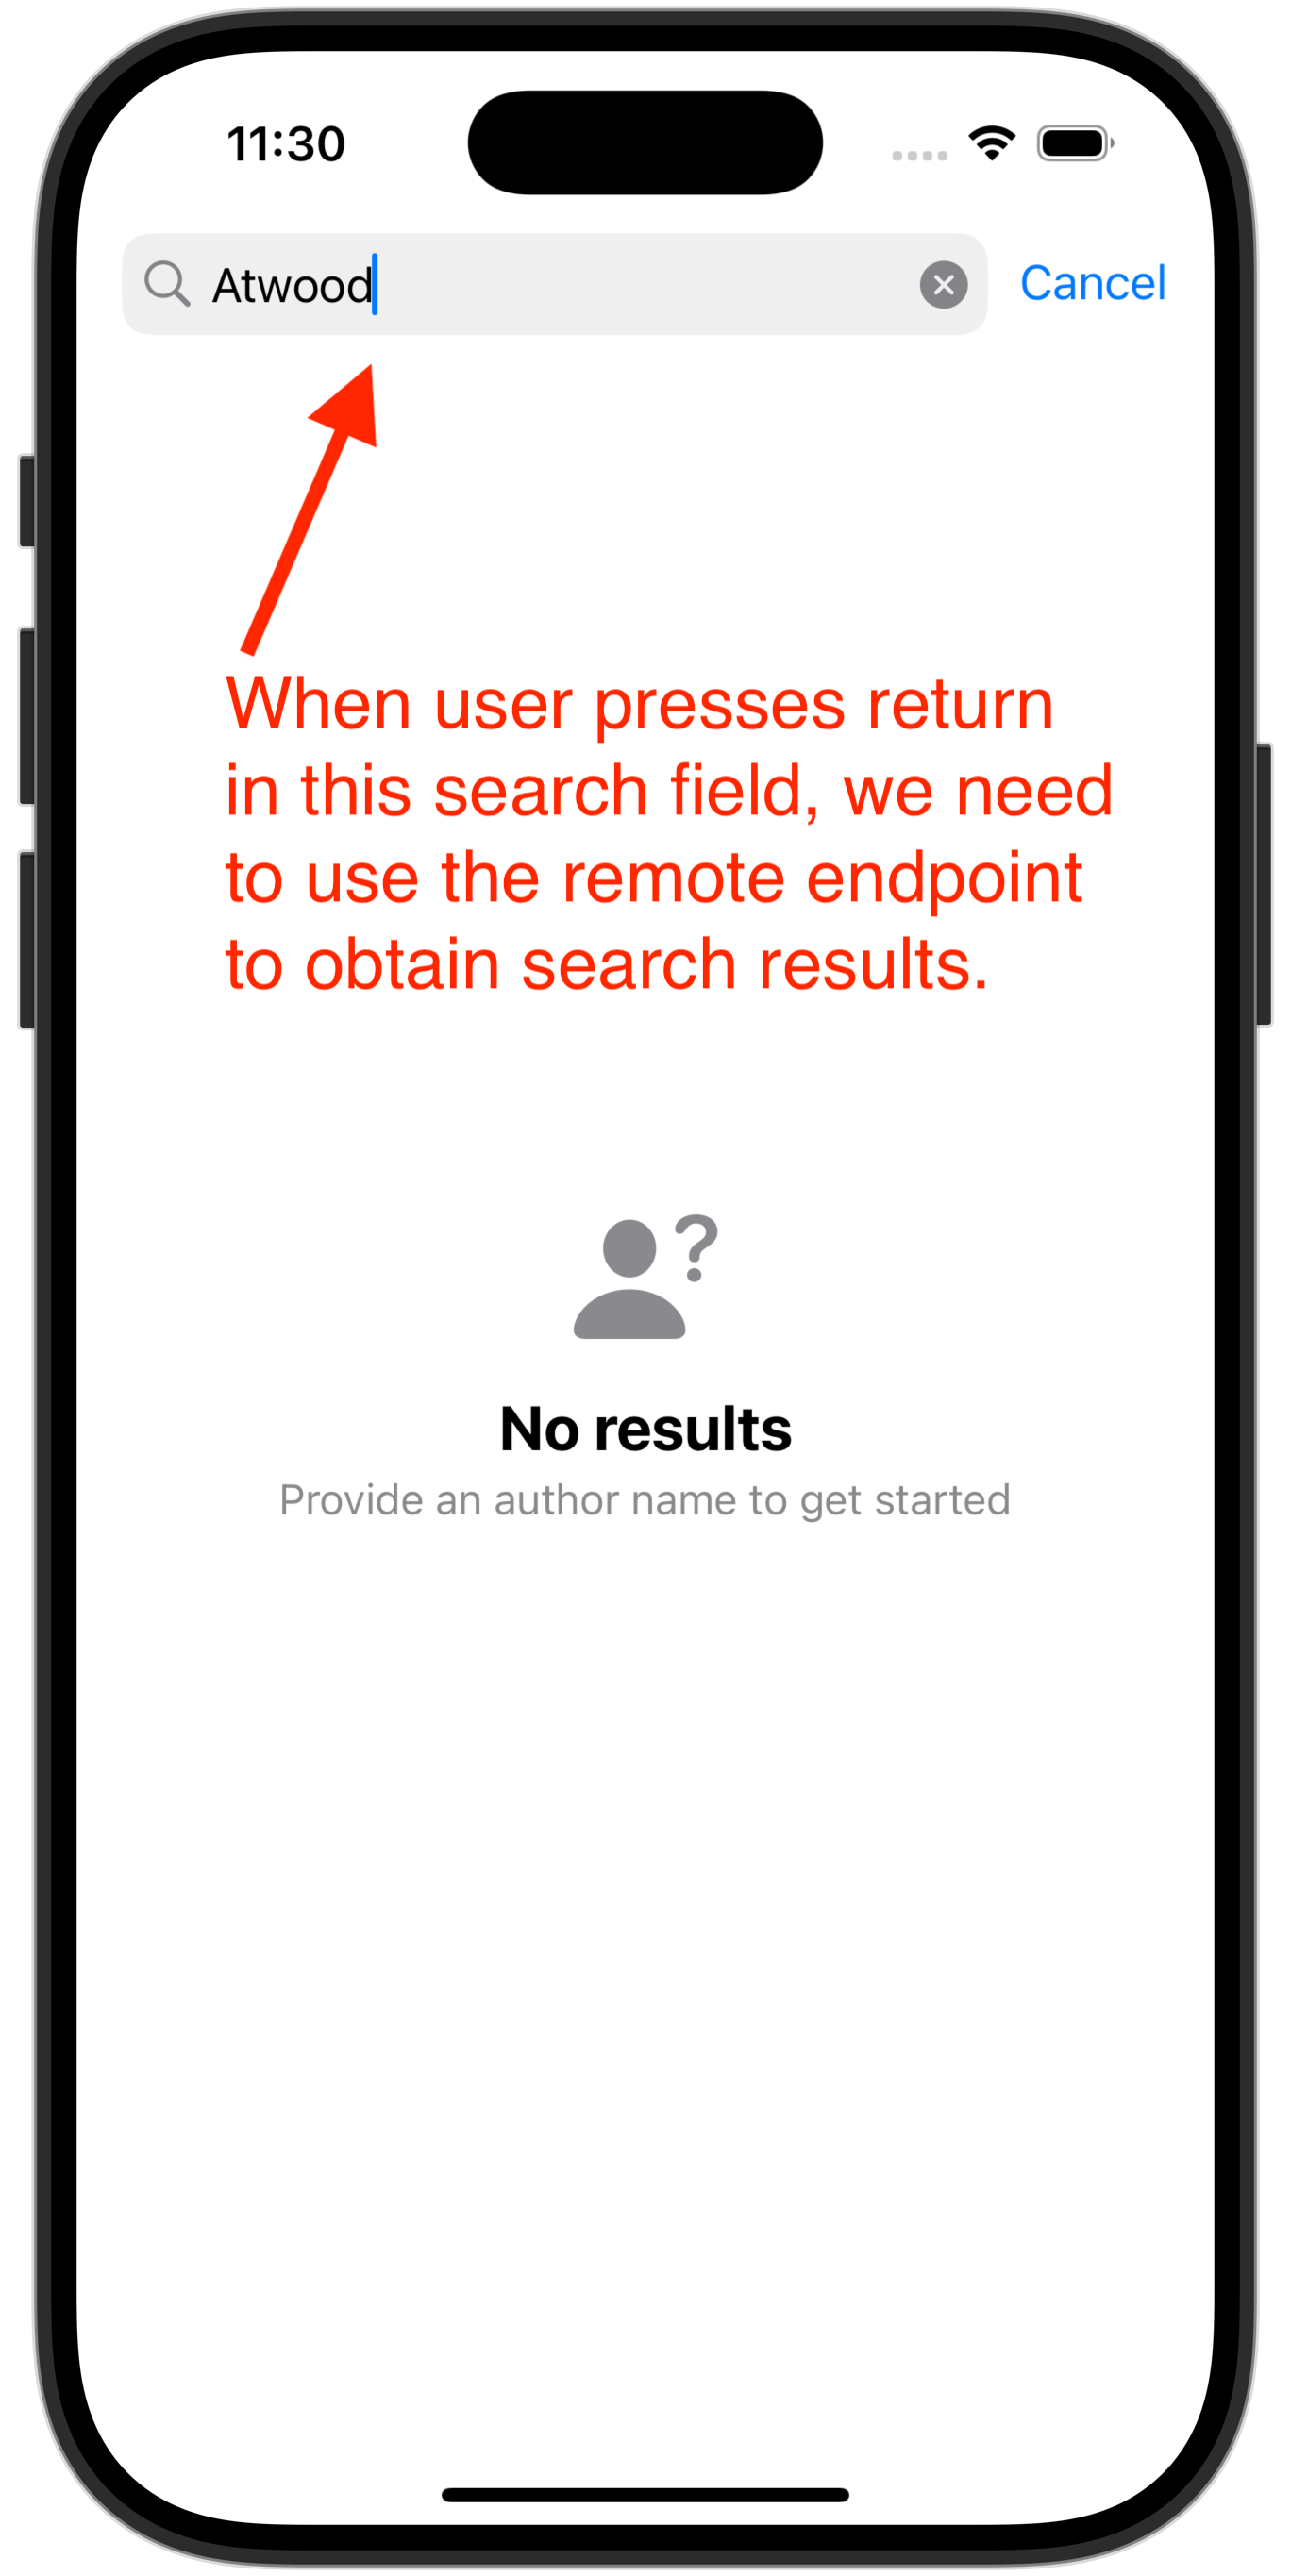
Fetch results
Now we need to adjust the view model so that it has a function we can invoke when the user presses the Return key in the view to begin a search:
That requires the addition of a function to our view model that has a parameter (a question) and receives an argument (an answer) to carry out the search:
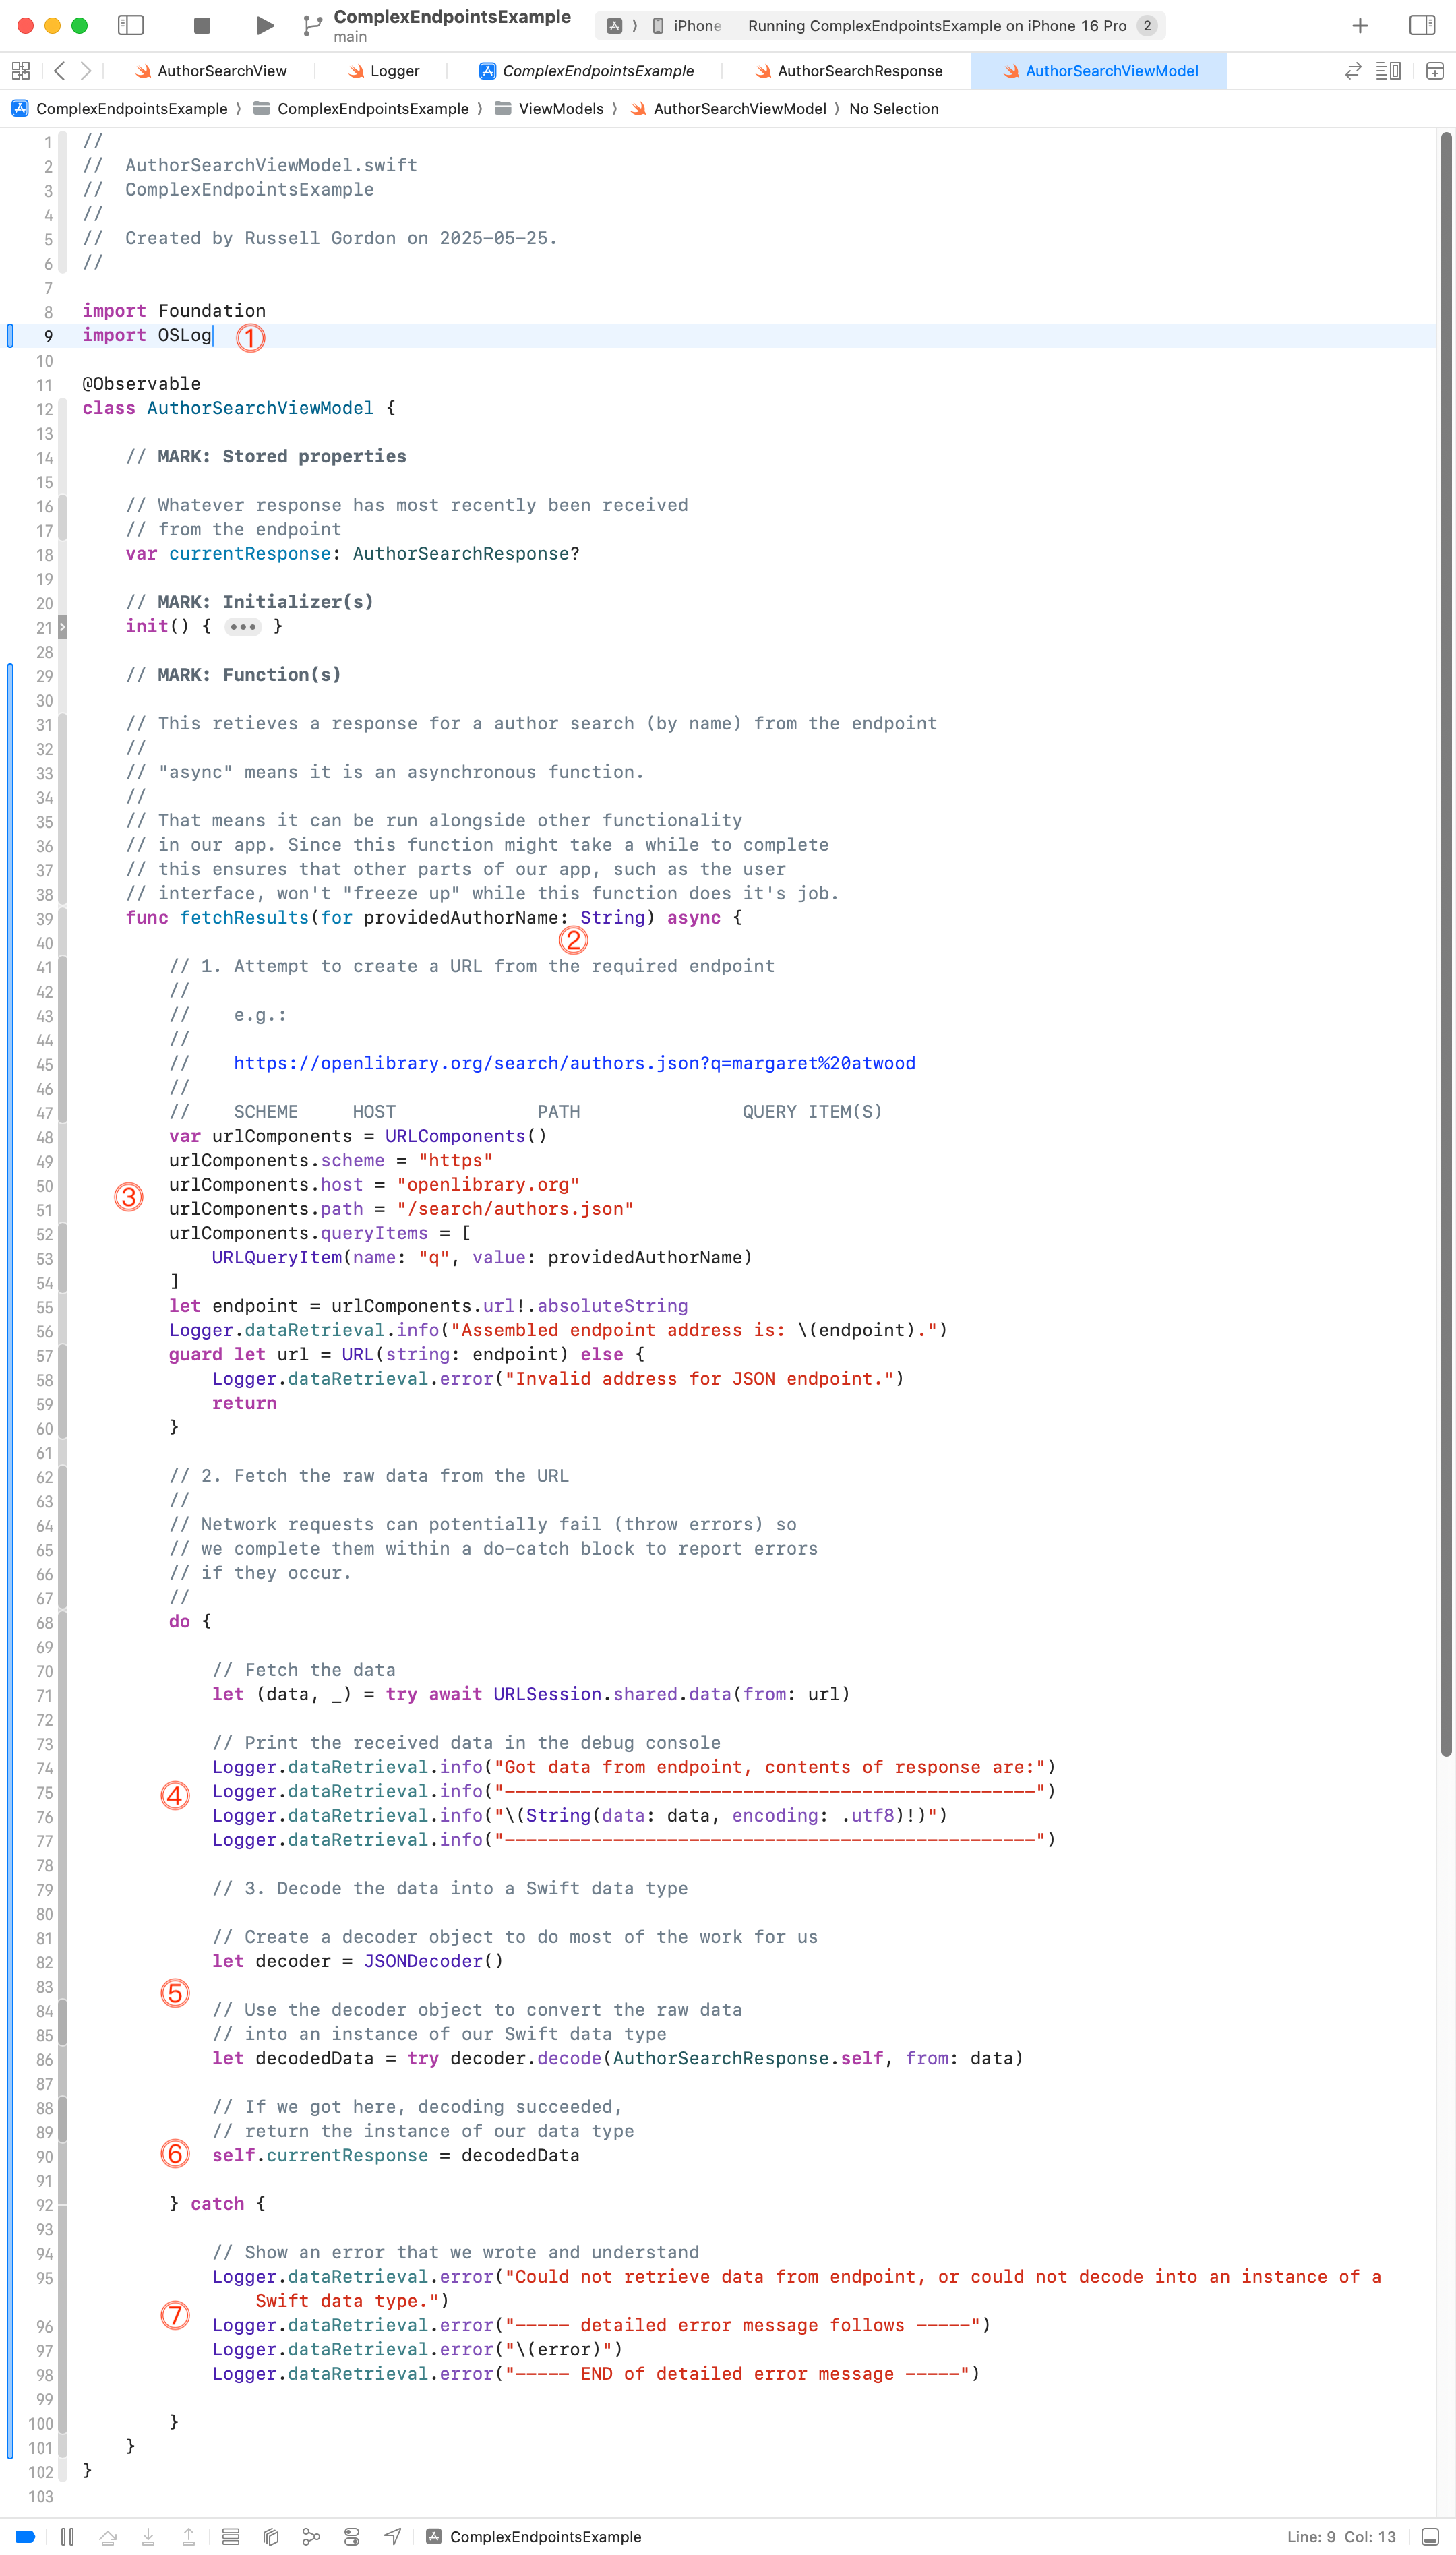
Most of the details of how that code works is described in the comments.
Here is a high-level summary:
DISCUSSION
- We import the
OSLogframework because we need this to record log messages which will help us to debug logical errors.- We define a function named
fetchResultsthat has one parameter with an external name offorand an internal name ofprovidedAuthorNameof type string. This will be invoked from the view to conduct a search by author name.- We assemble a URL. The
URLComponentstype provided by Apple will do the hard work of URL-encoding information in the address of the endpoint. For example, it will convert the search stringmargaret atwoodintomargaret%20atwood.- After fetching the actual raw data from the endpoint on line 71, we convert that data into a string and print it to the debug console. This will help us to resolve logical errors.
- On line 82 an instance of the
JSONDecodertype is created to do the work of decoding the response from the endpoint into an instance of a native Swift data type. Line 86 is where we attempt to actually decode the response into an instance ofAuthorSearchResponse, which we defined earlier.- If we made it here, the decoded data, placed into a local instance of
AuthorSearchResponsenameddecodedDatais in turn assigned to the stored property of this view model,currentResponse.- If anything went wrong with either retrieving data or decoding the data, this catch block will print results to the console for us to examine.
Next we need to make two minor adjustments to the view, so that we can use the newly defined function on the view model, and then show the results to the user:
Looking at those changes:
DISCUSSION
- We use the
.onSubmitview modifier, which will run the code between lines 43 and 47 when the user presses the Return key while in the search field. This block of code invokes thefetchResultsfunction that we just defined on the view model, answering the question offorby providing an argument (answer) of “whatever the user typed into the search field” – that is – the contents of thesearchTextstored property.- Once the
fetchResultsfunction has done its job,currentResponseshould no longer beniland we will have an array of matching authors in thedocsproperty. So, we iterate over that array and show a scrollable list of just the author names, for now.
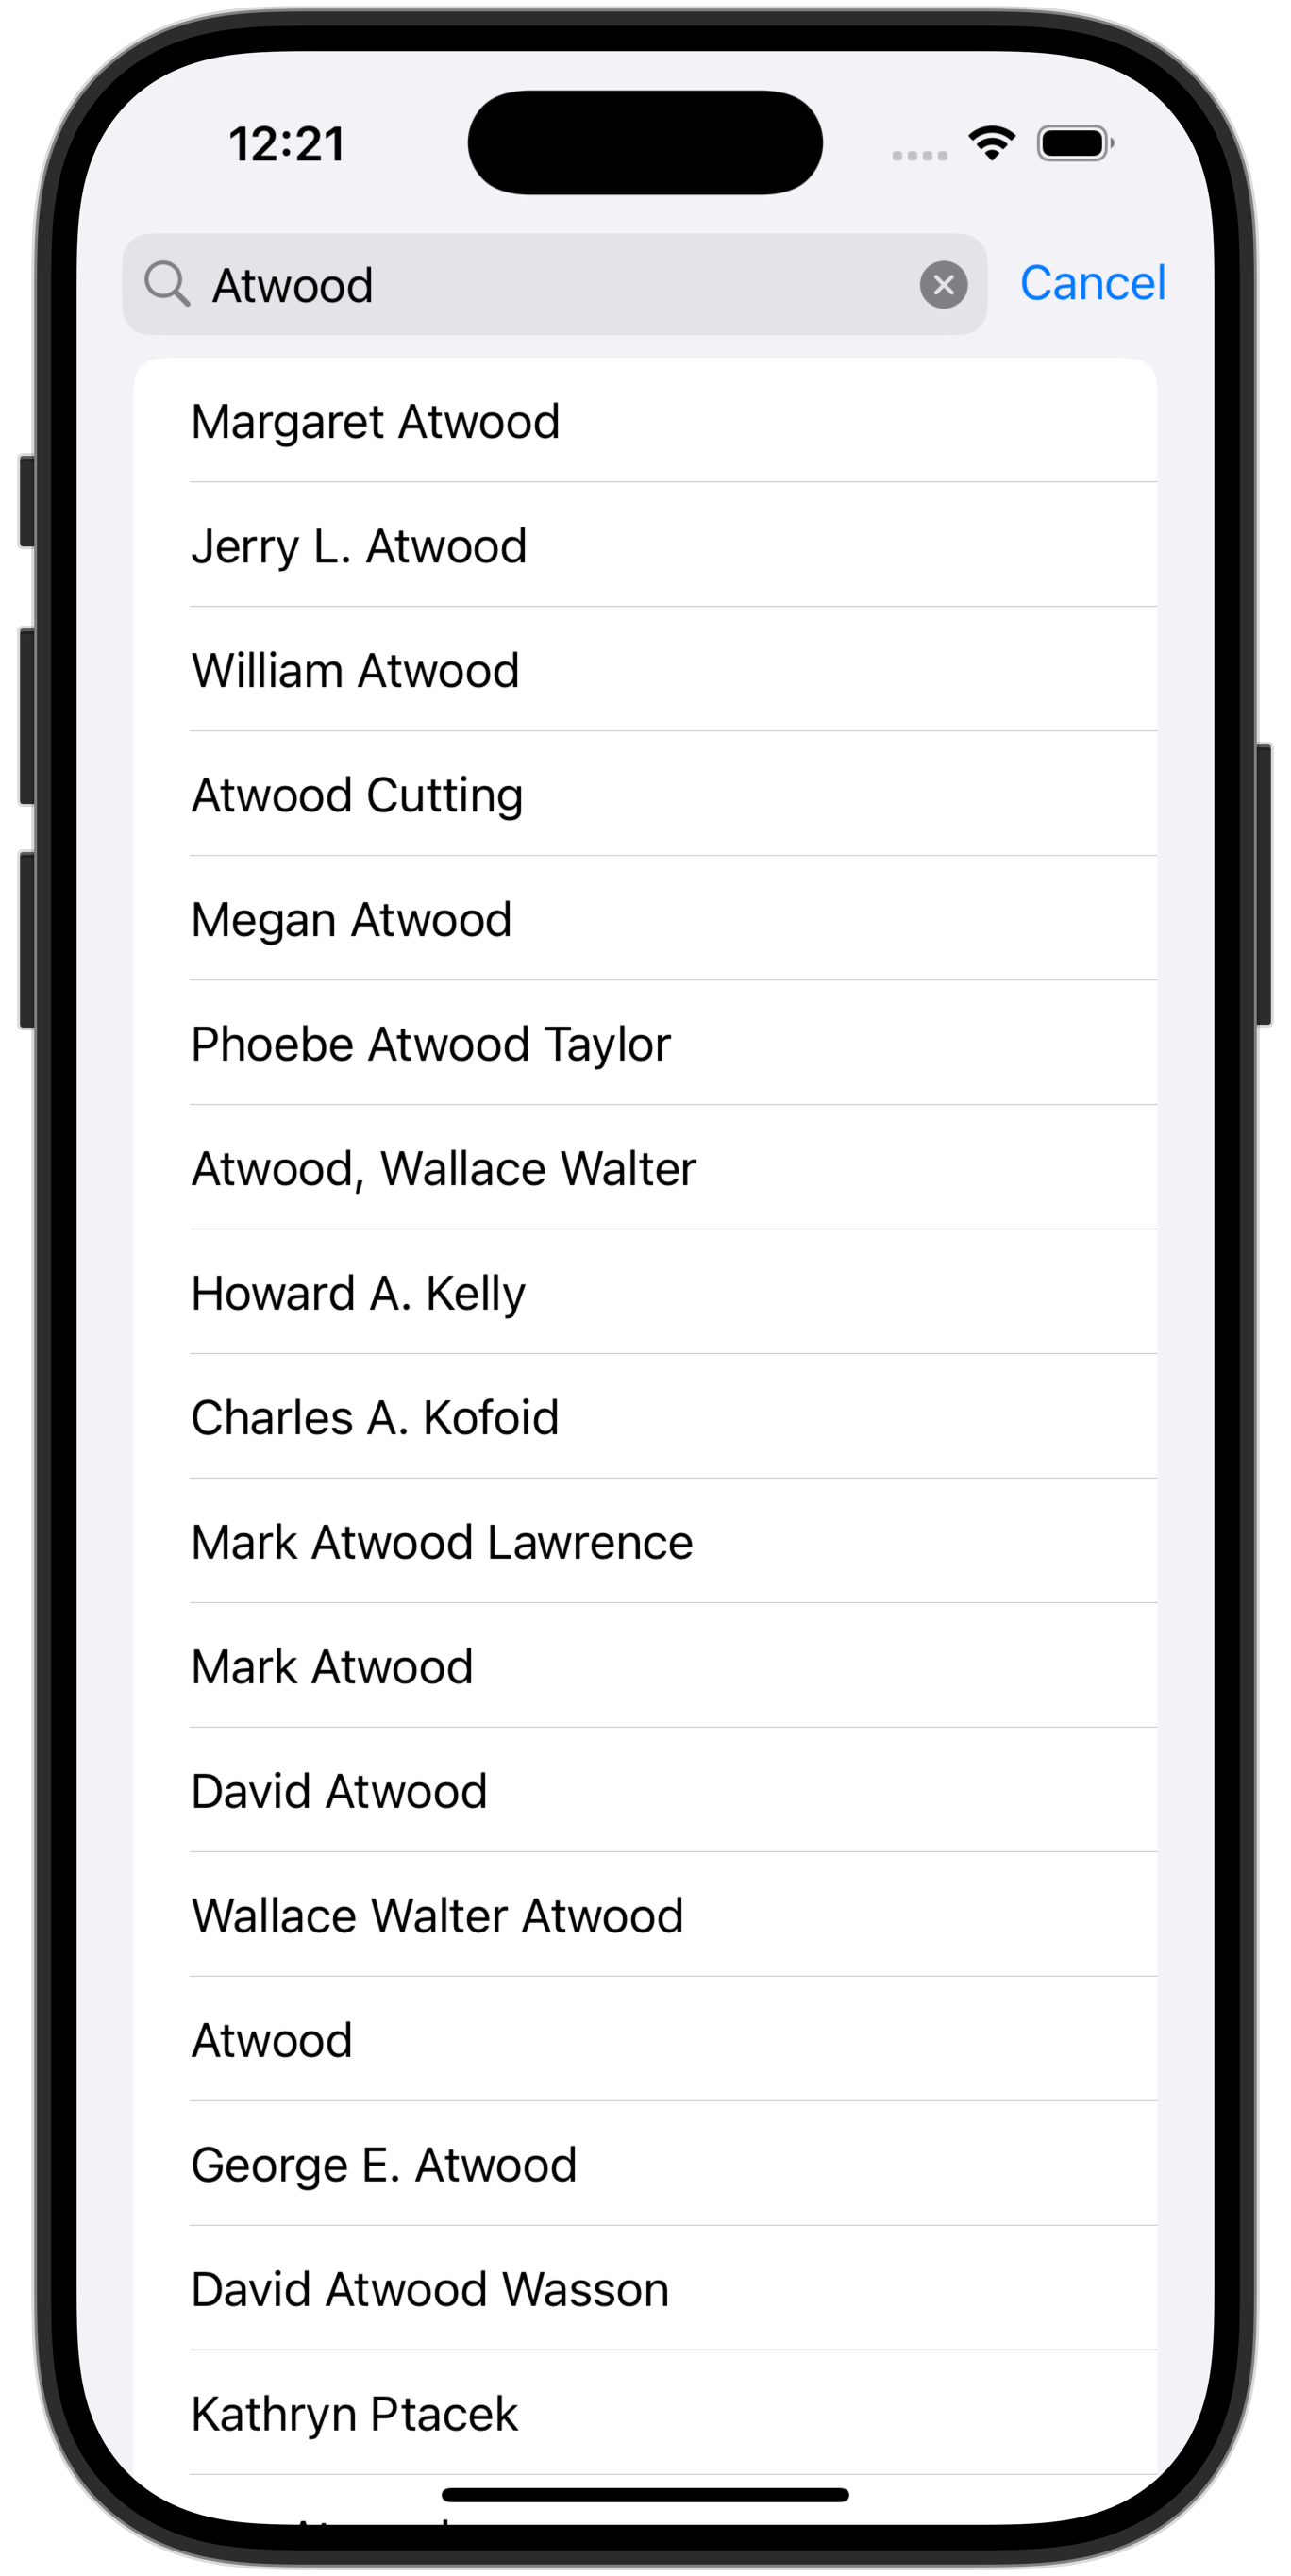
We’re ready to test the code now, and (most likely) correct some logical errors.
Let’s try out the code and see what happens:
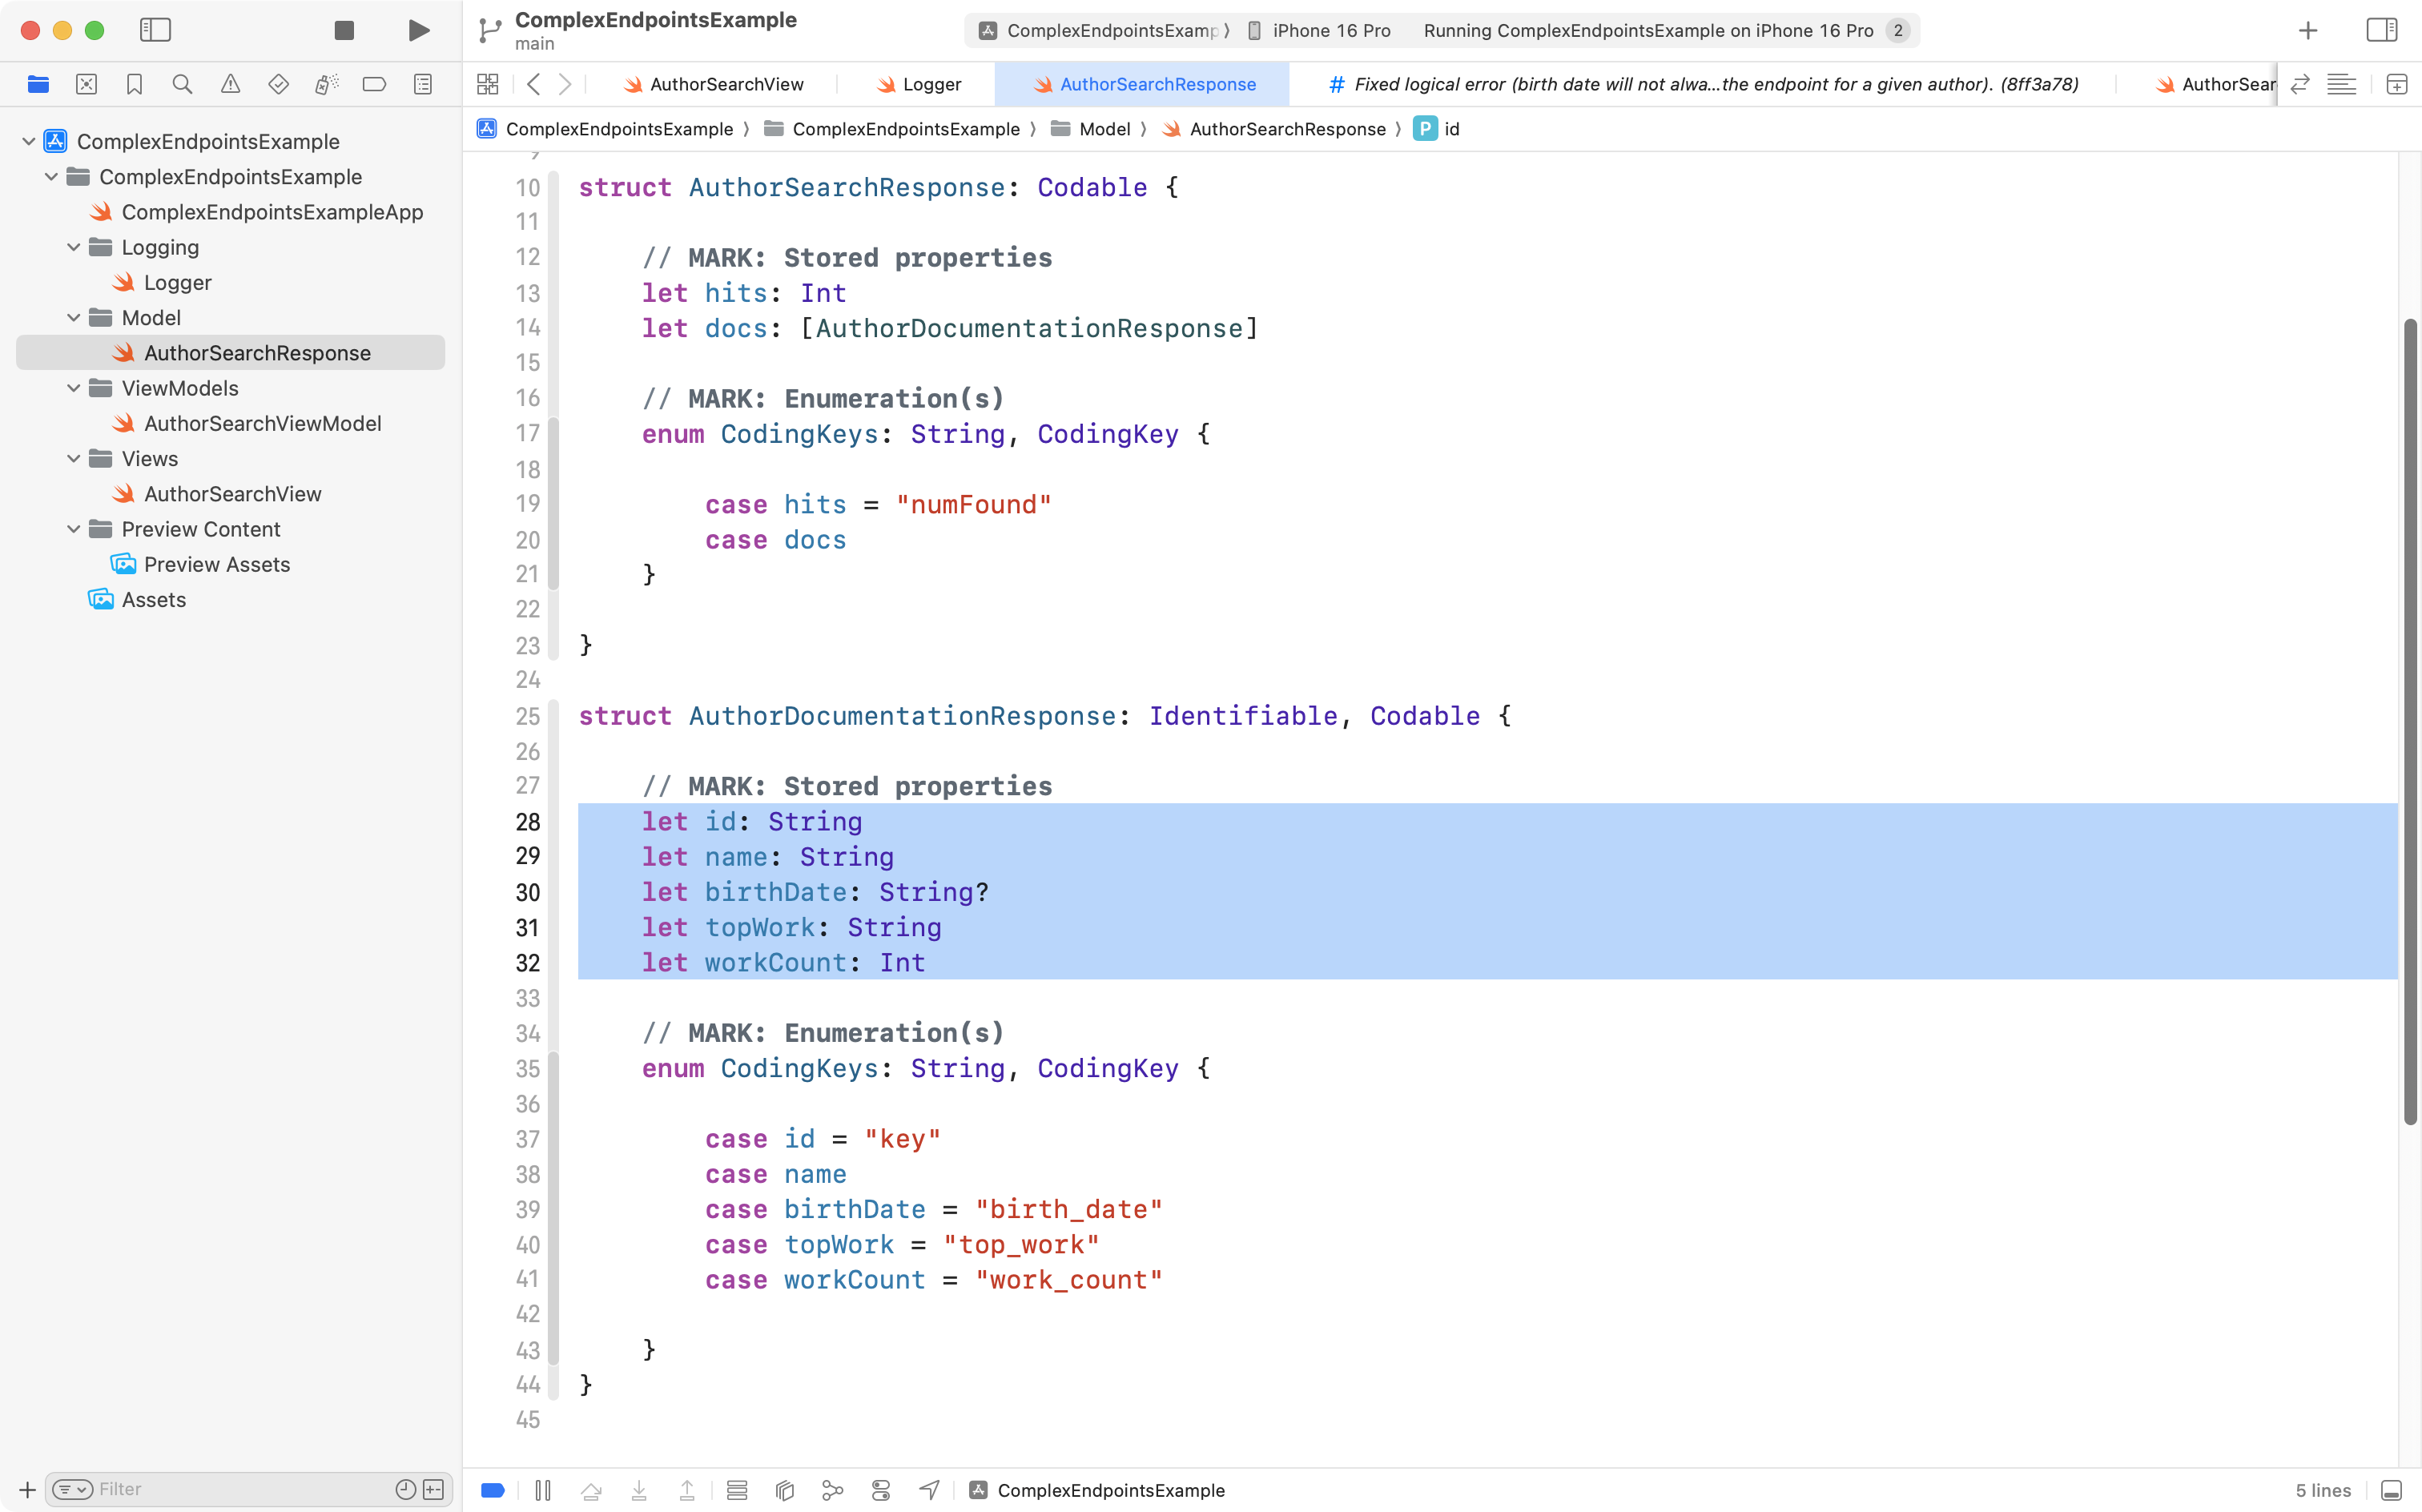
As explained in the video above, we found that sometimes, information about a given author may not always contain a birth date.
As a result, we chose to make that property in the model optional, so that if a birth date is not provided for an author, the property will contain nil:
Add a helper view
Right now, when a response is received, we see a simple list of author names:
There’s more information that we could be displaying for each author that matches a search:
So, let’s display that by building a helper view.
First, we define some example data to use with the preview of the helper view:
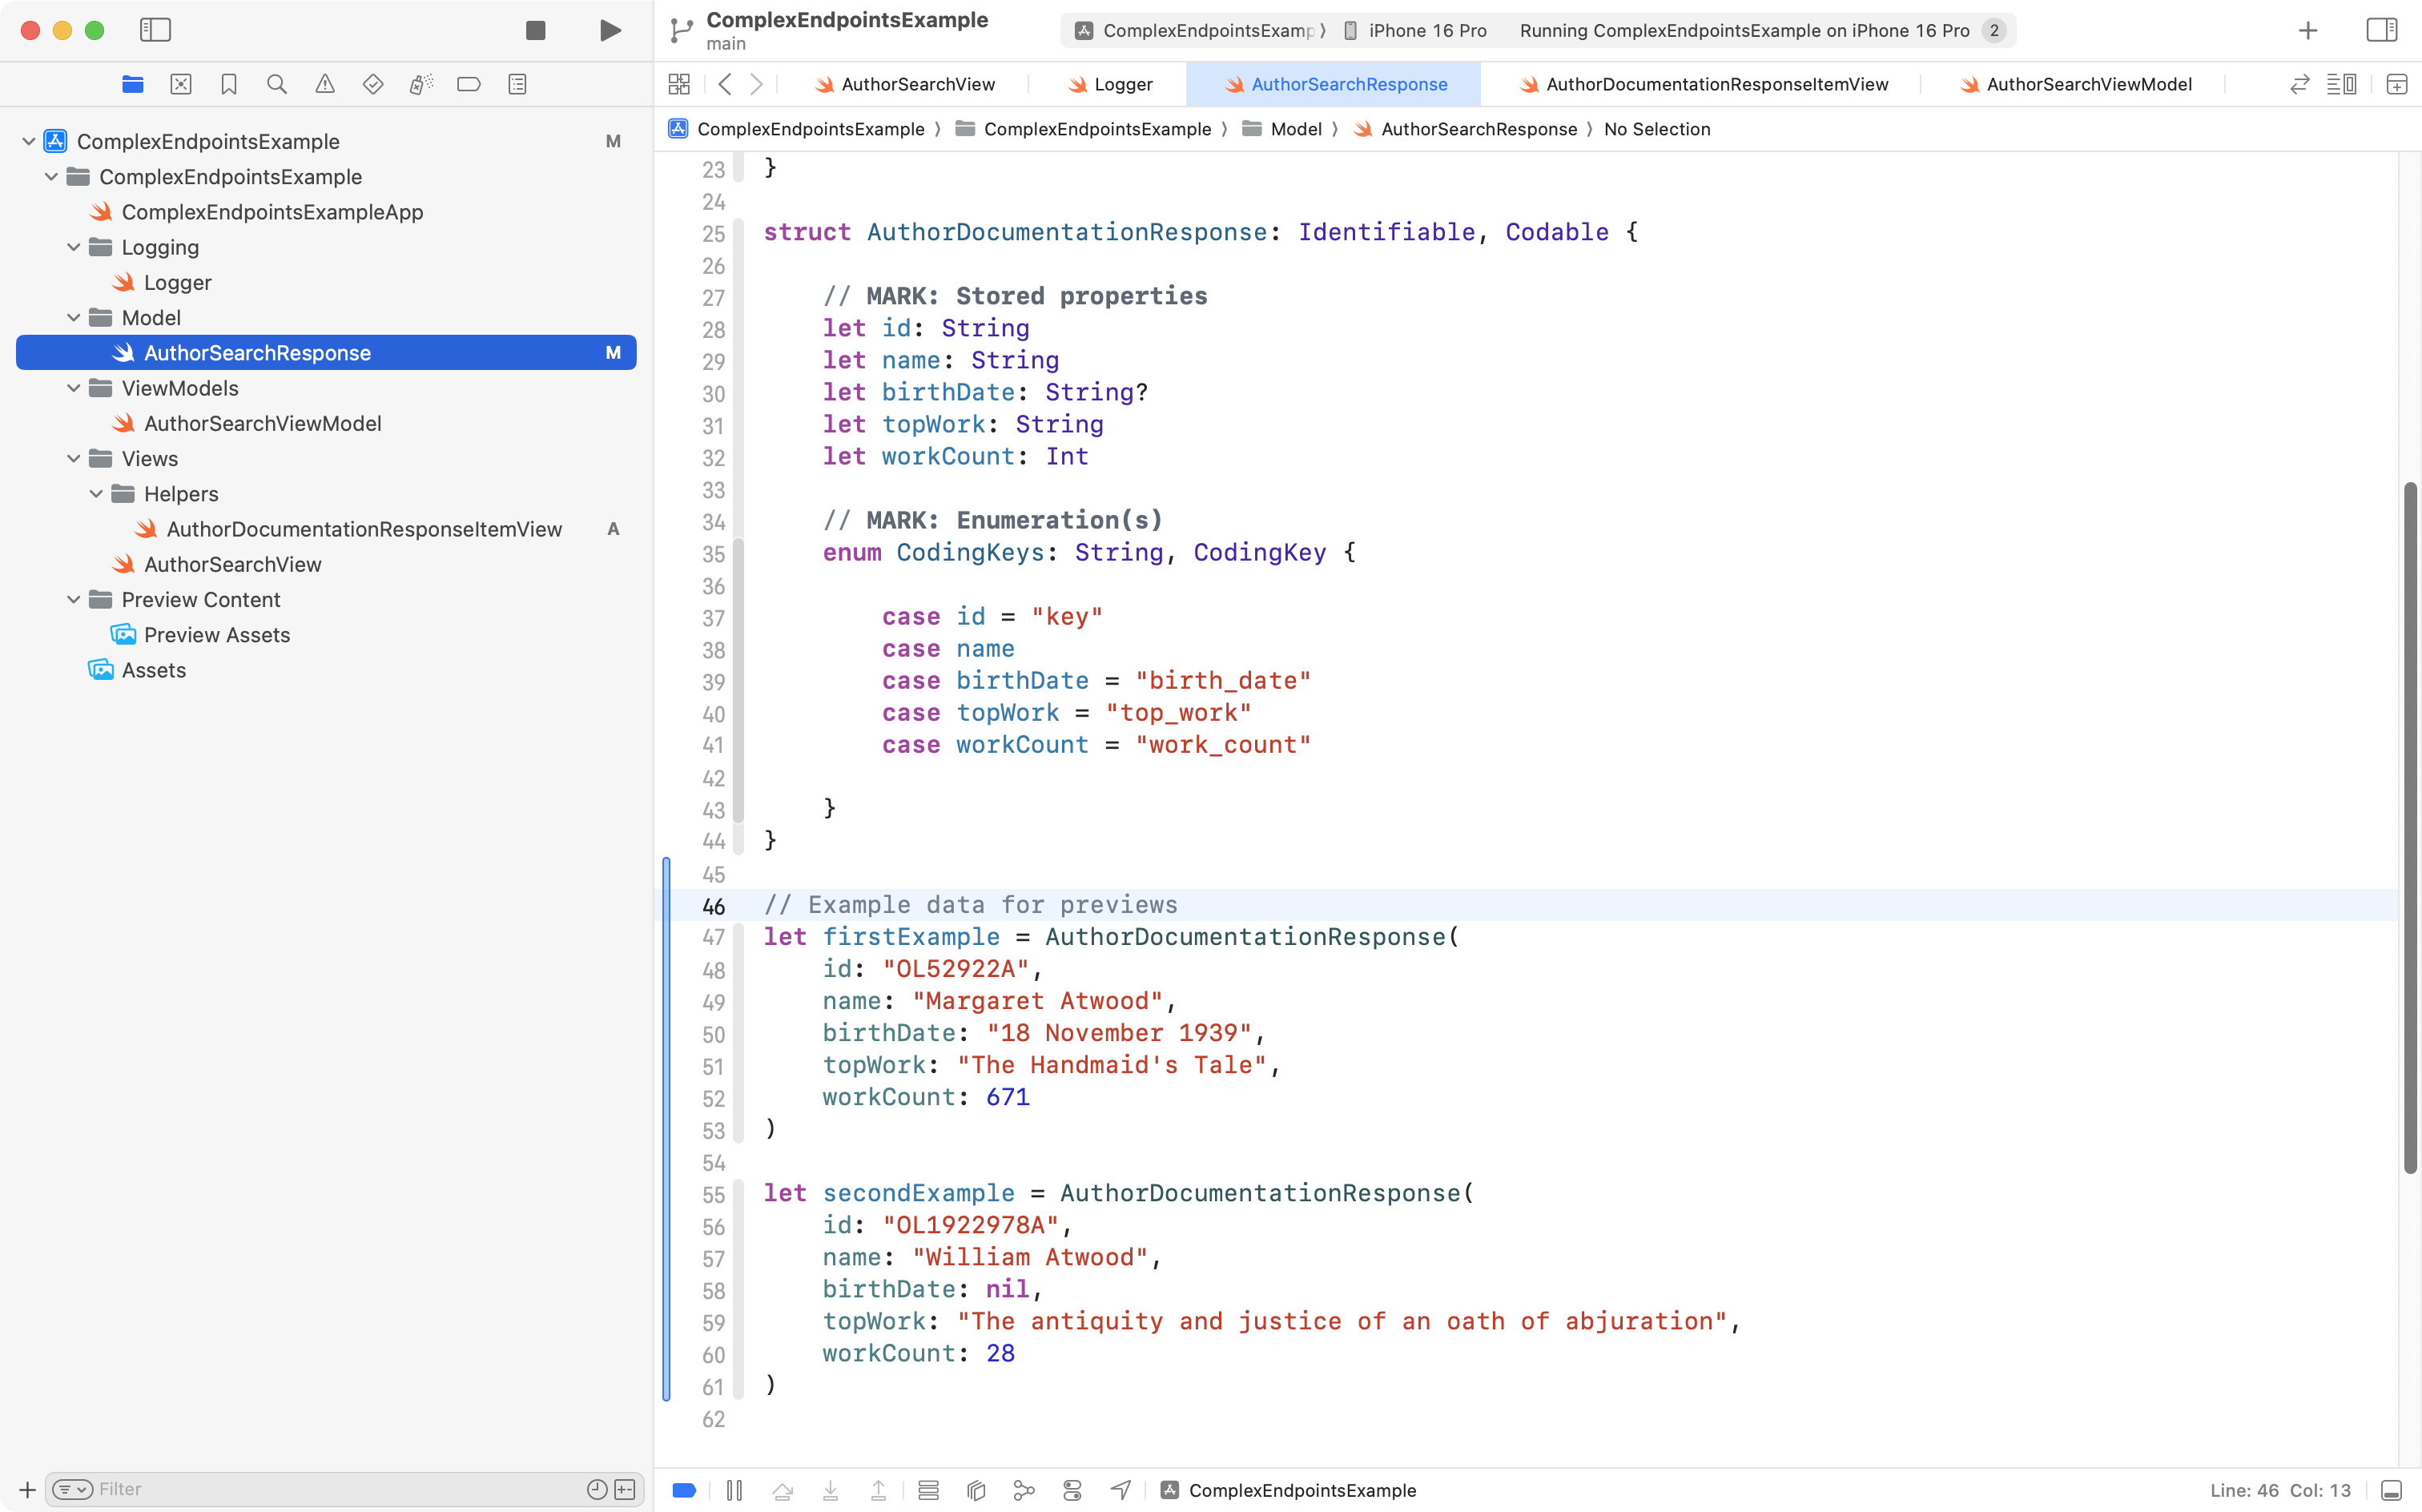
Then, we define the helper view itself:
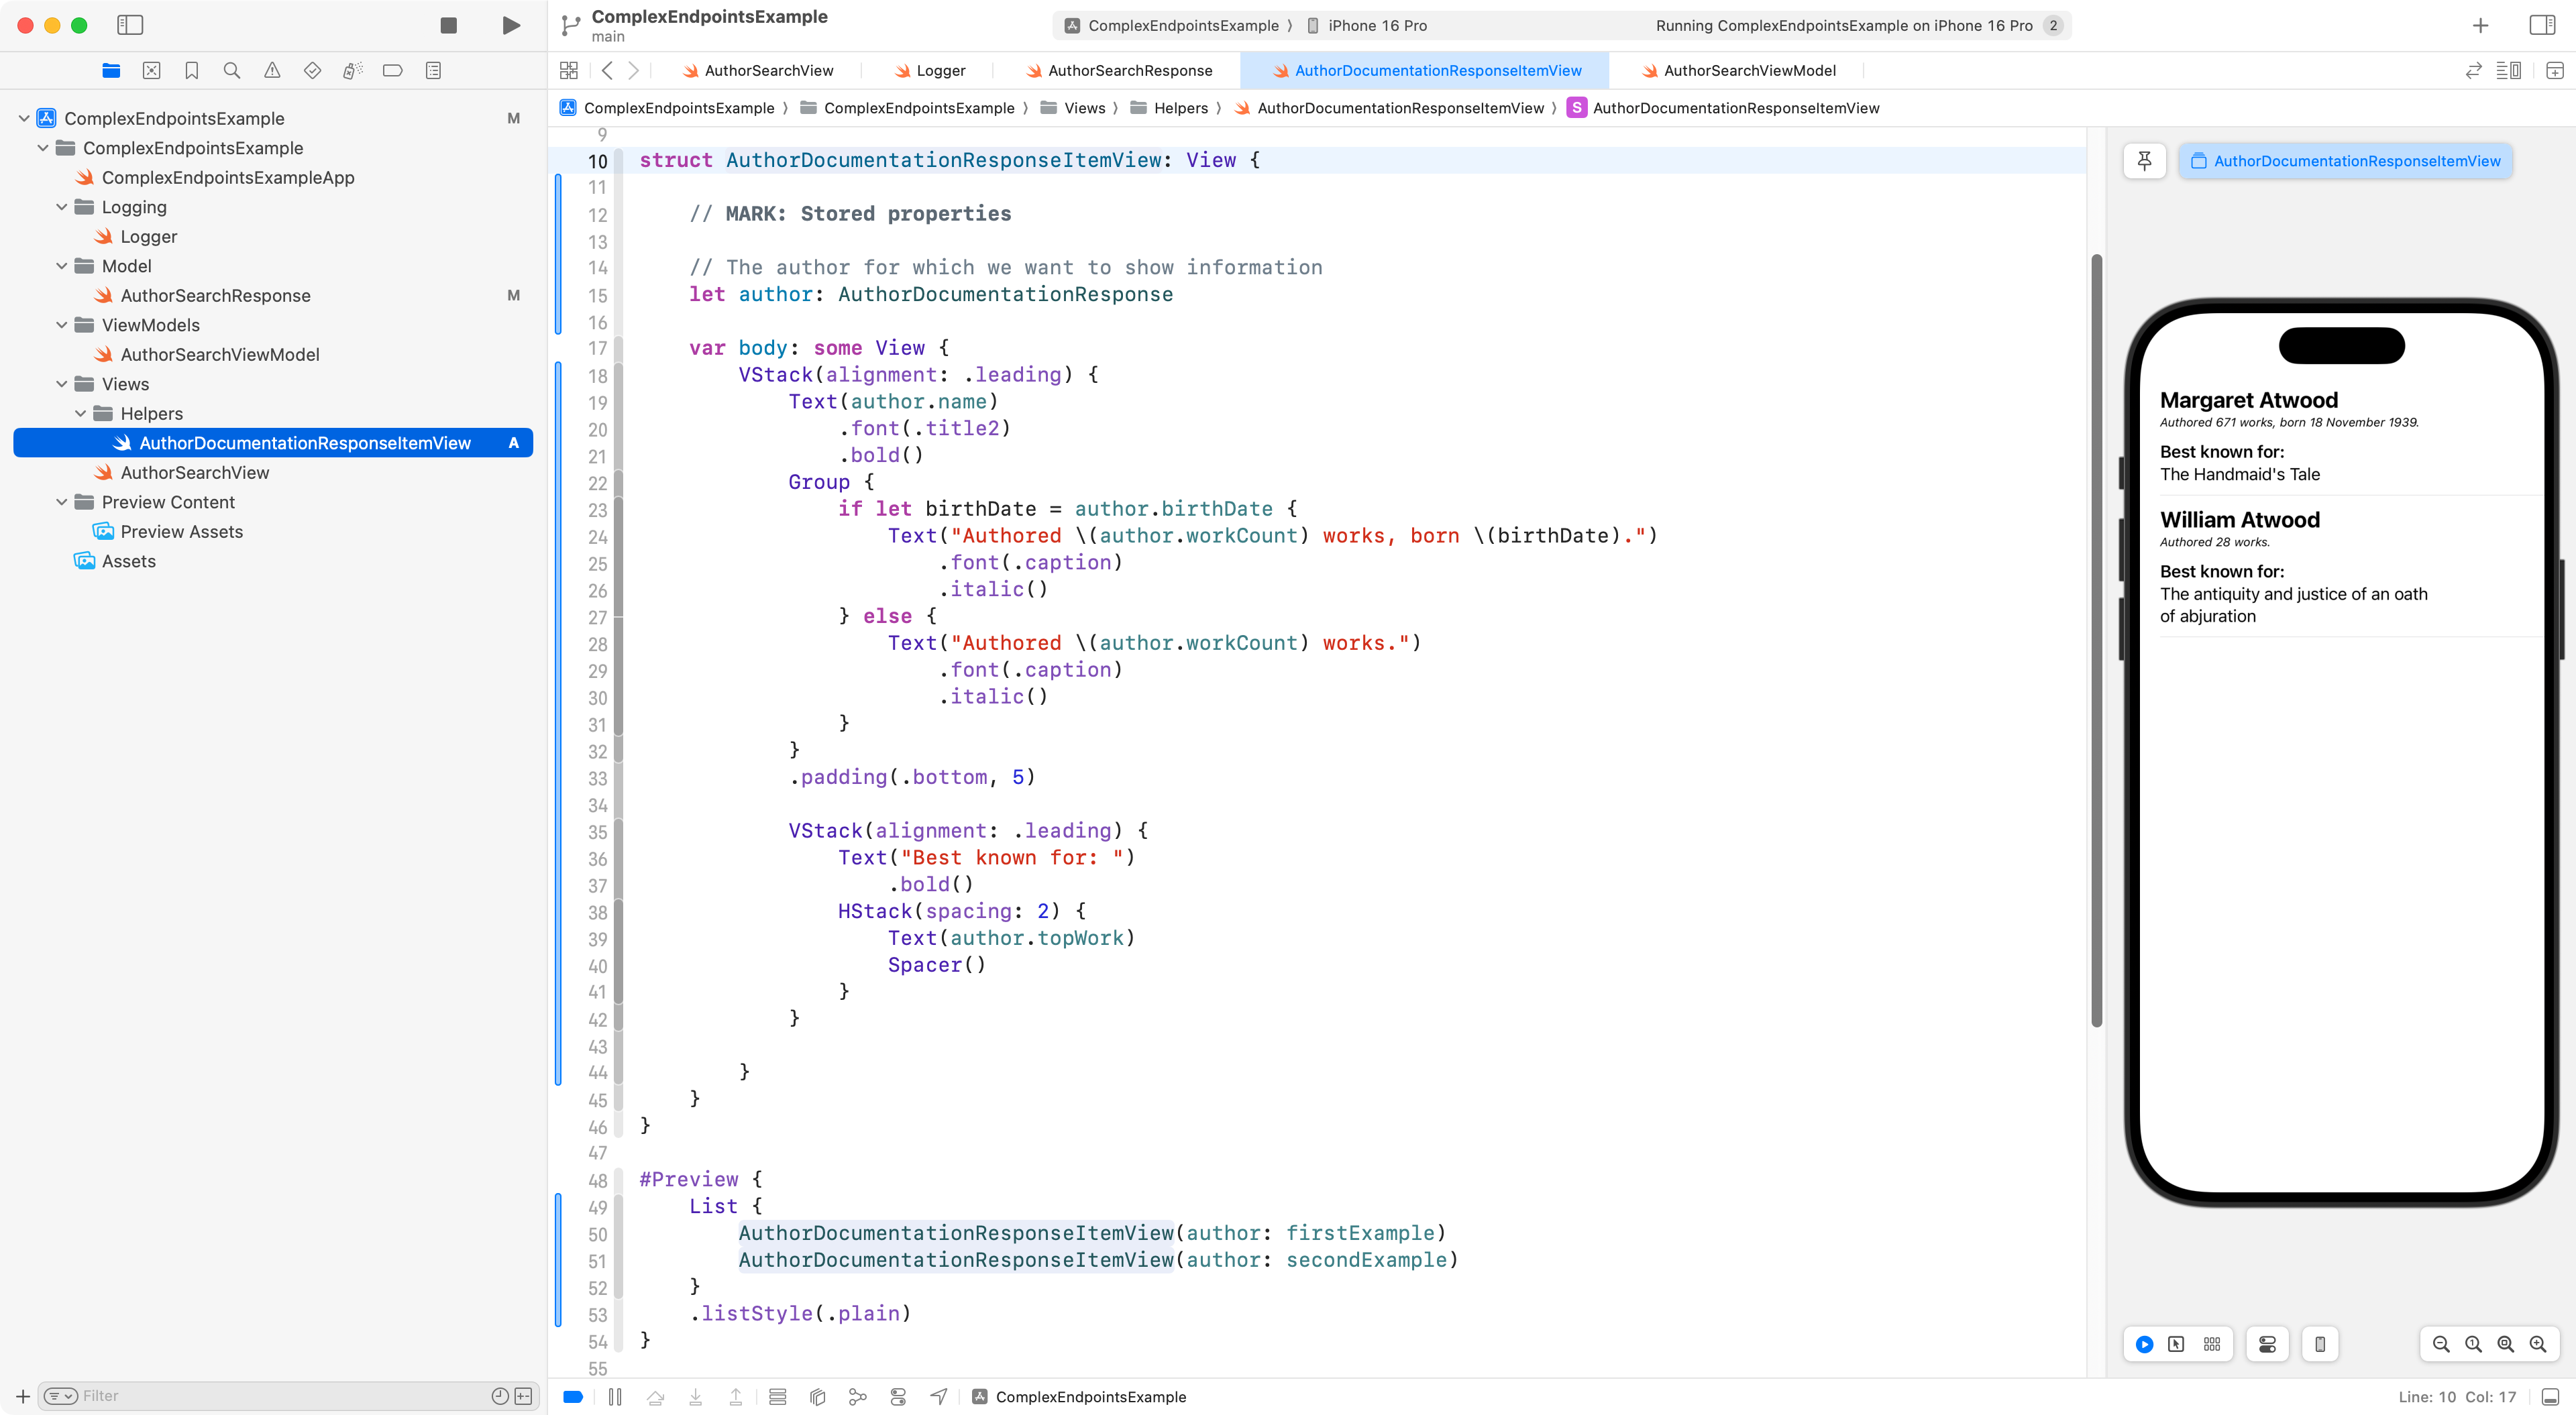
Now, we can use that helper view in the main view that shows our list of fetched results:

Author details
The next logical progression is that once a list of authors has been retrieved, our user could navigate into a detail view for that author to see more information about that author, and then perhaps see a list of their most famous works.
According to the Open Library API for authors:
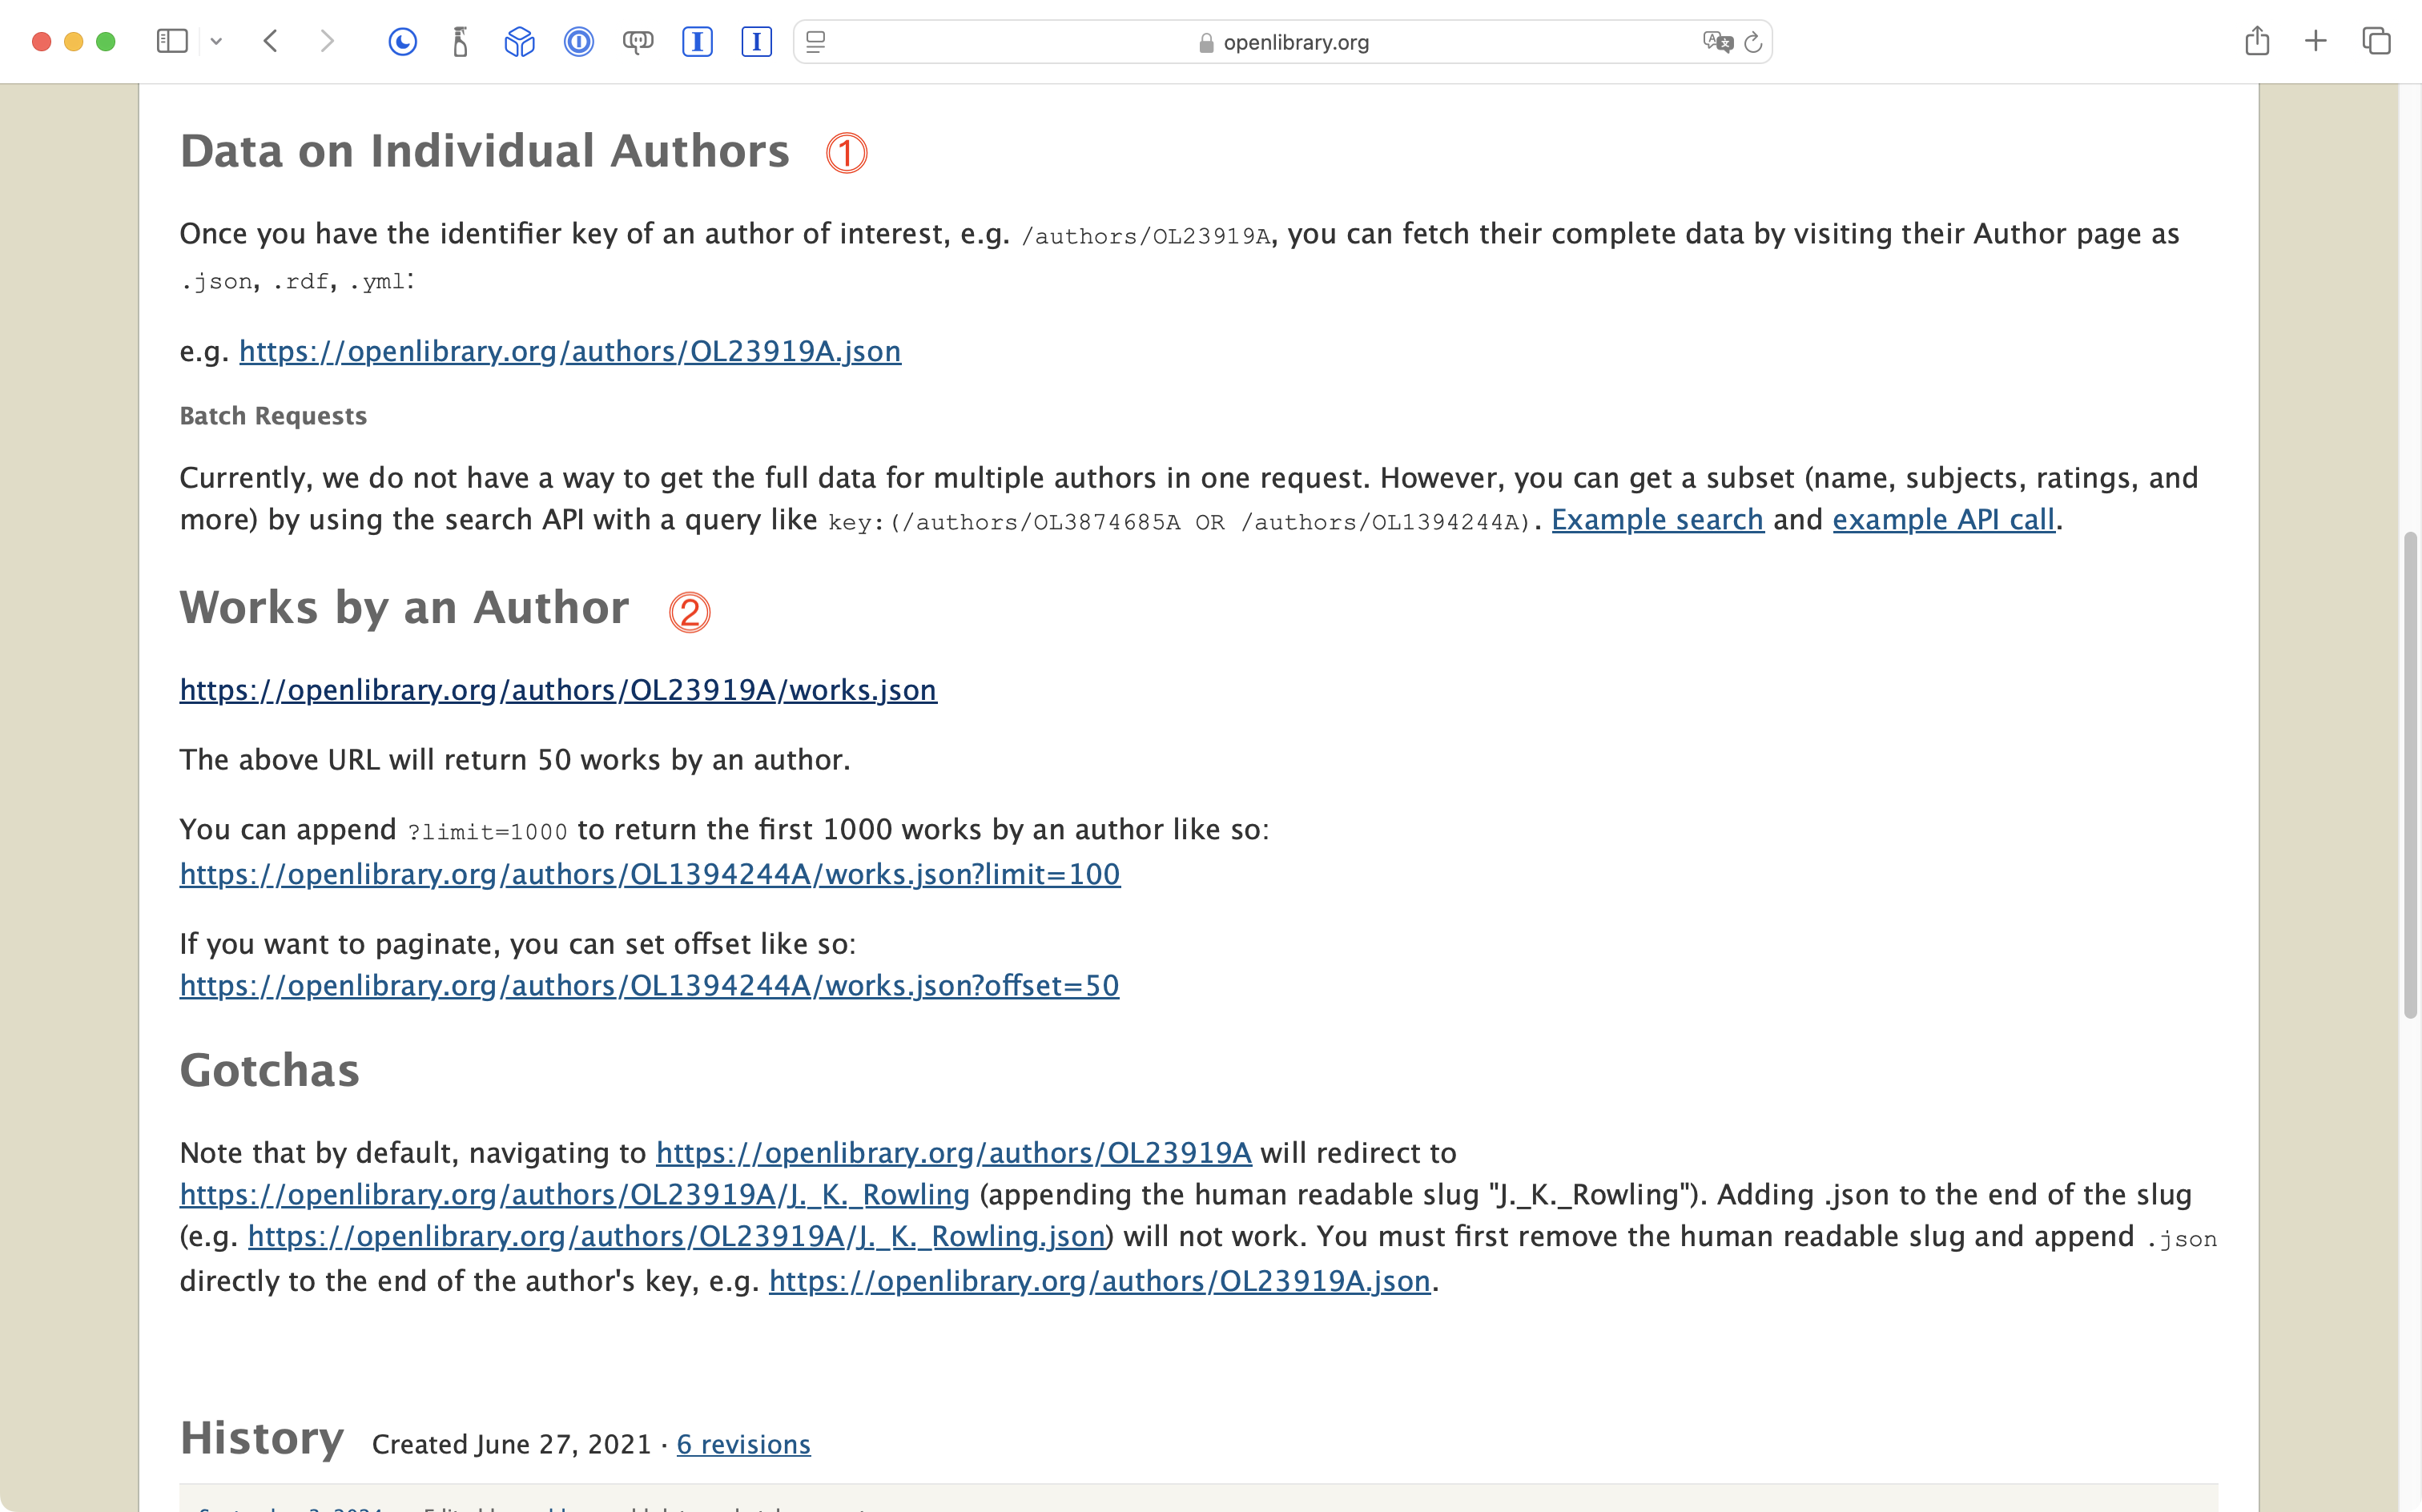
We can:
DISCUSSION
- Get data on individual authors using, for example, this endpoint for Margaret Atwood.
- Get data on the works of a given author using this endpoint, again using Margaret Atwood as an example.
In the case of both endpoints, we need to know the Open Library unique identifier for that author. Fortunately, we just obtained that with the code written to return a list of authors.
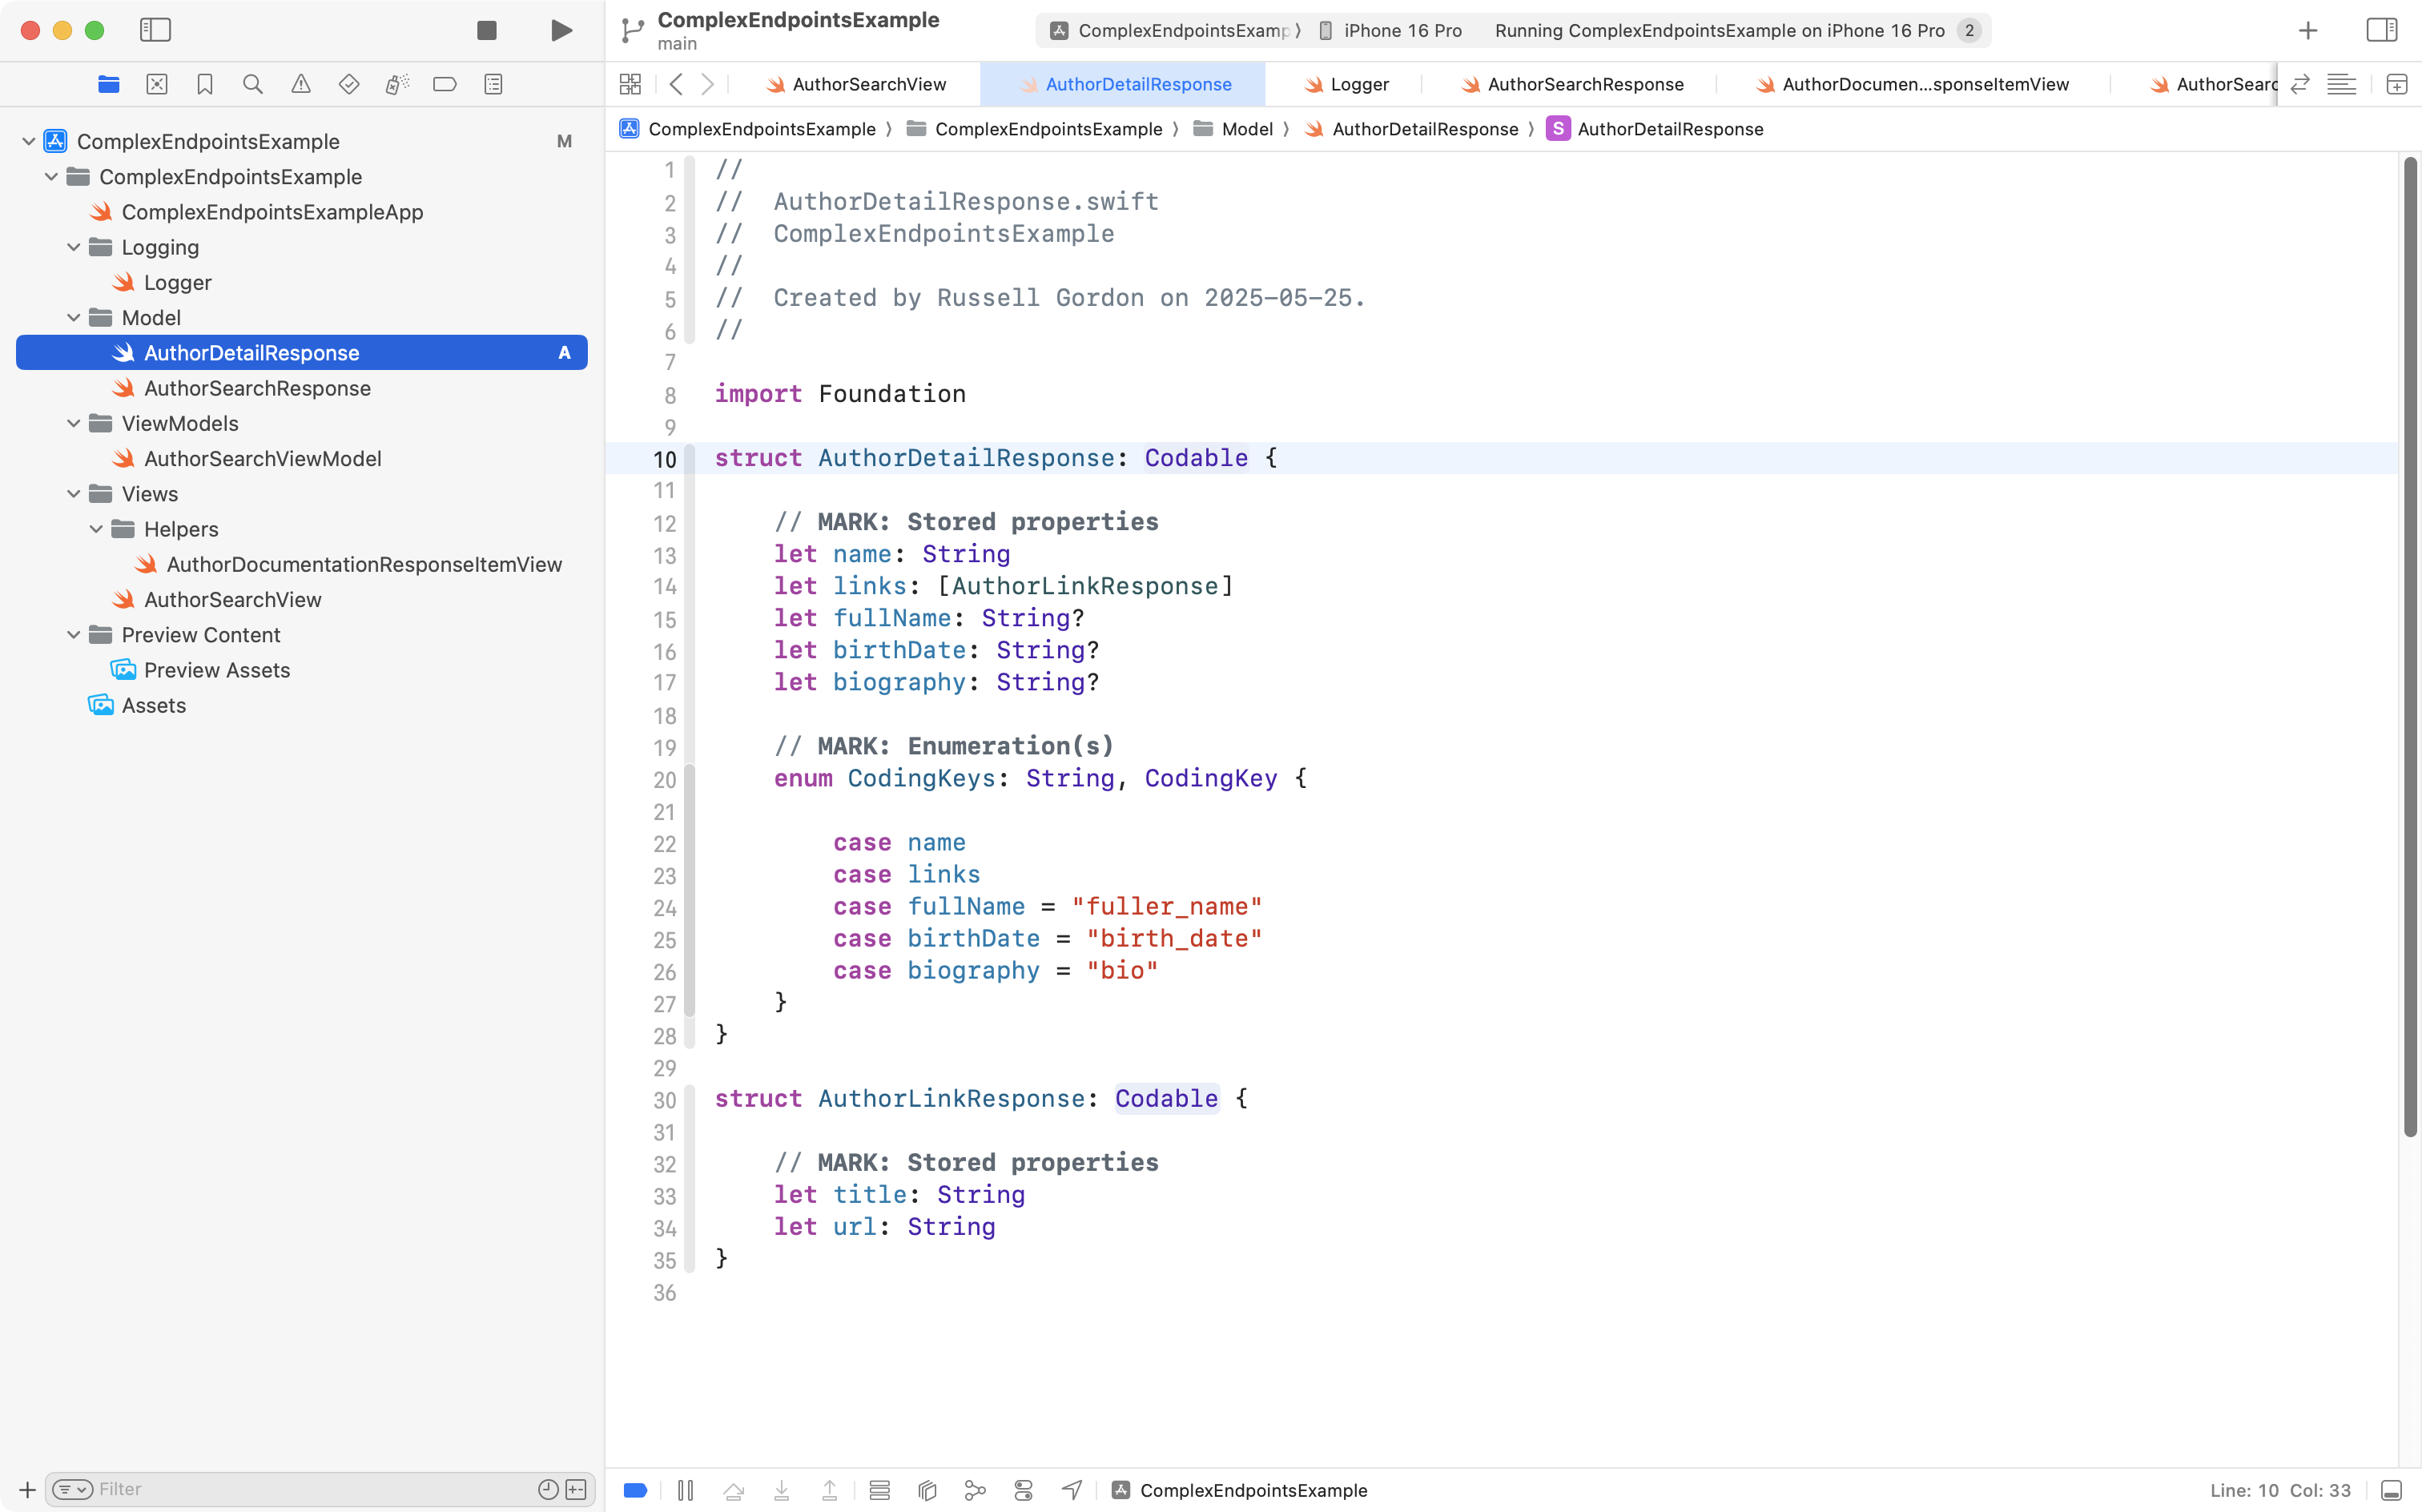
Another model
Let’s begin with the endpoint that will simply provide some additional information about an author.
As before, we identify properties we want to decode when retrieving information from the endpoint, omitting properties we don’t care about, and possibly adjusting the name of properties so they better match expected Swift programming language style conventions.
Here is a video where Mr. Gordon reviews the information available for an author and decides what to include in his model:
Here is the model Mr. Gordon ended up writing:
Another view model
Here is the view model Mr. Gordon developed to retrieve a response from the endpoint.
It is mostly the same, but not identical, to the previous view model that we authored.
The new view model code is:
Let’s review the interesting parts:
DISCUSSION
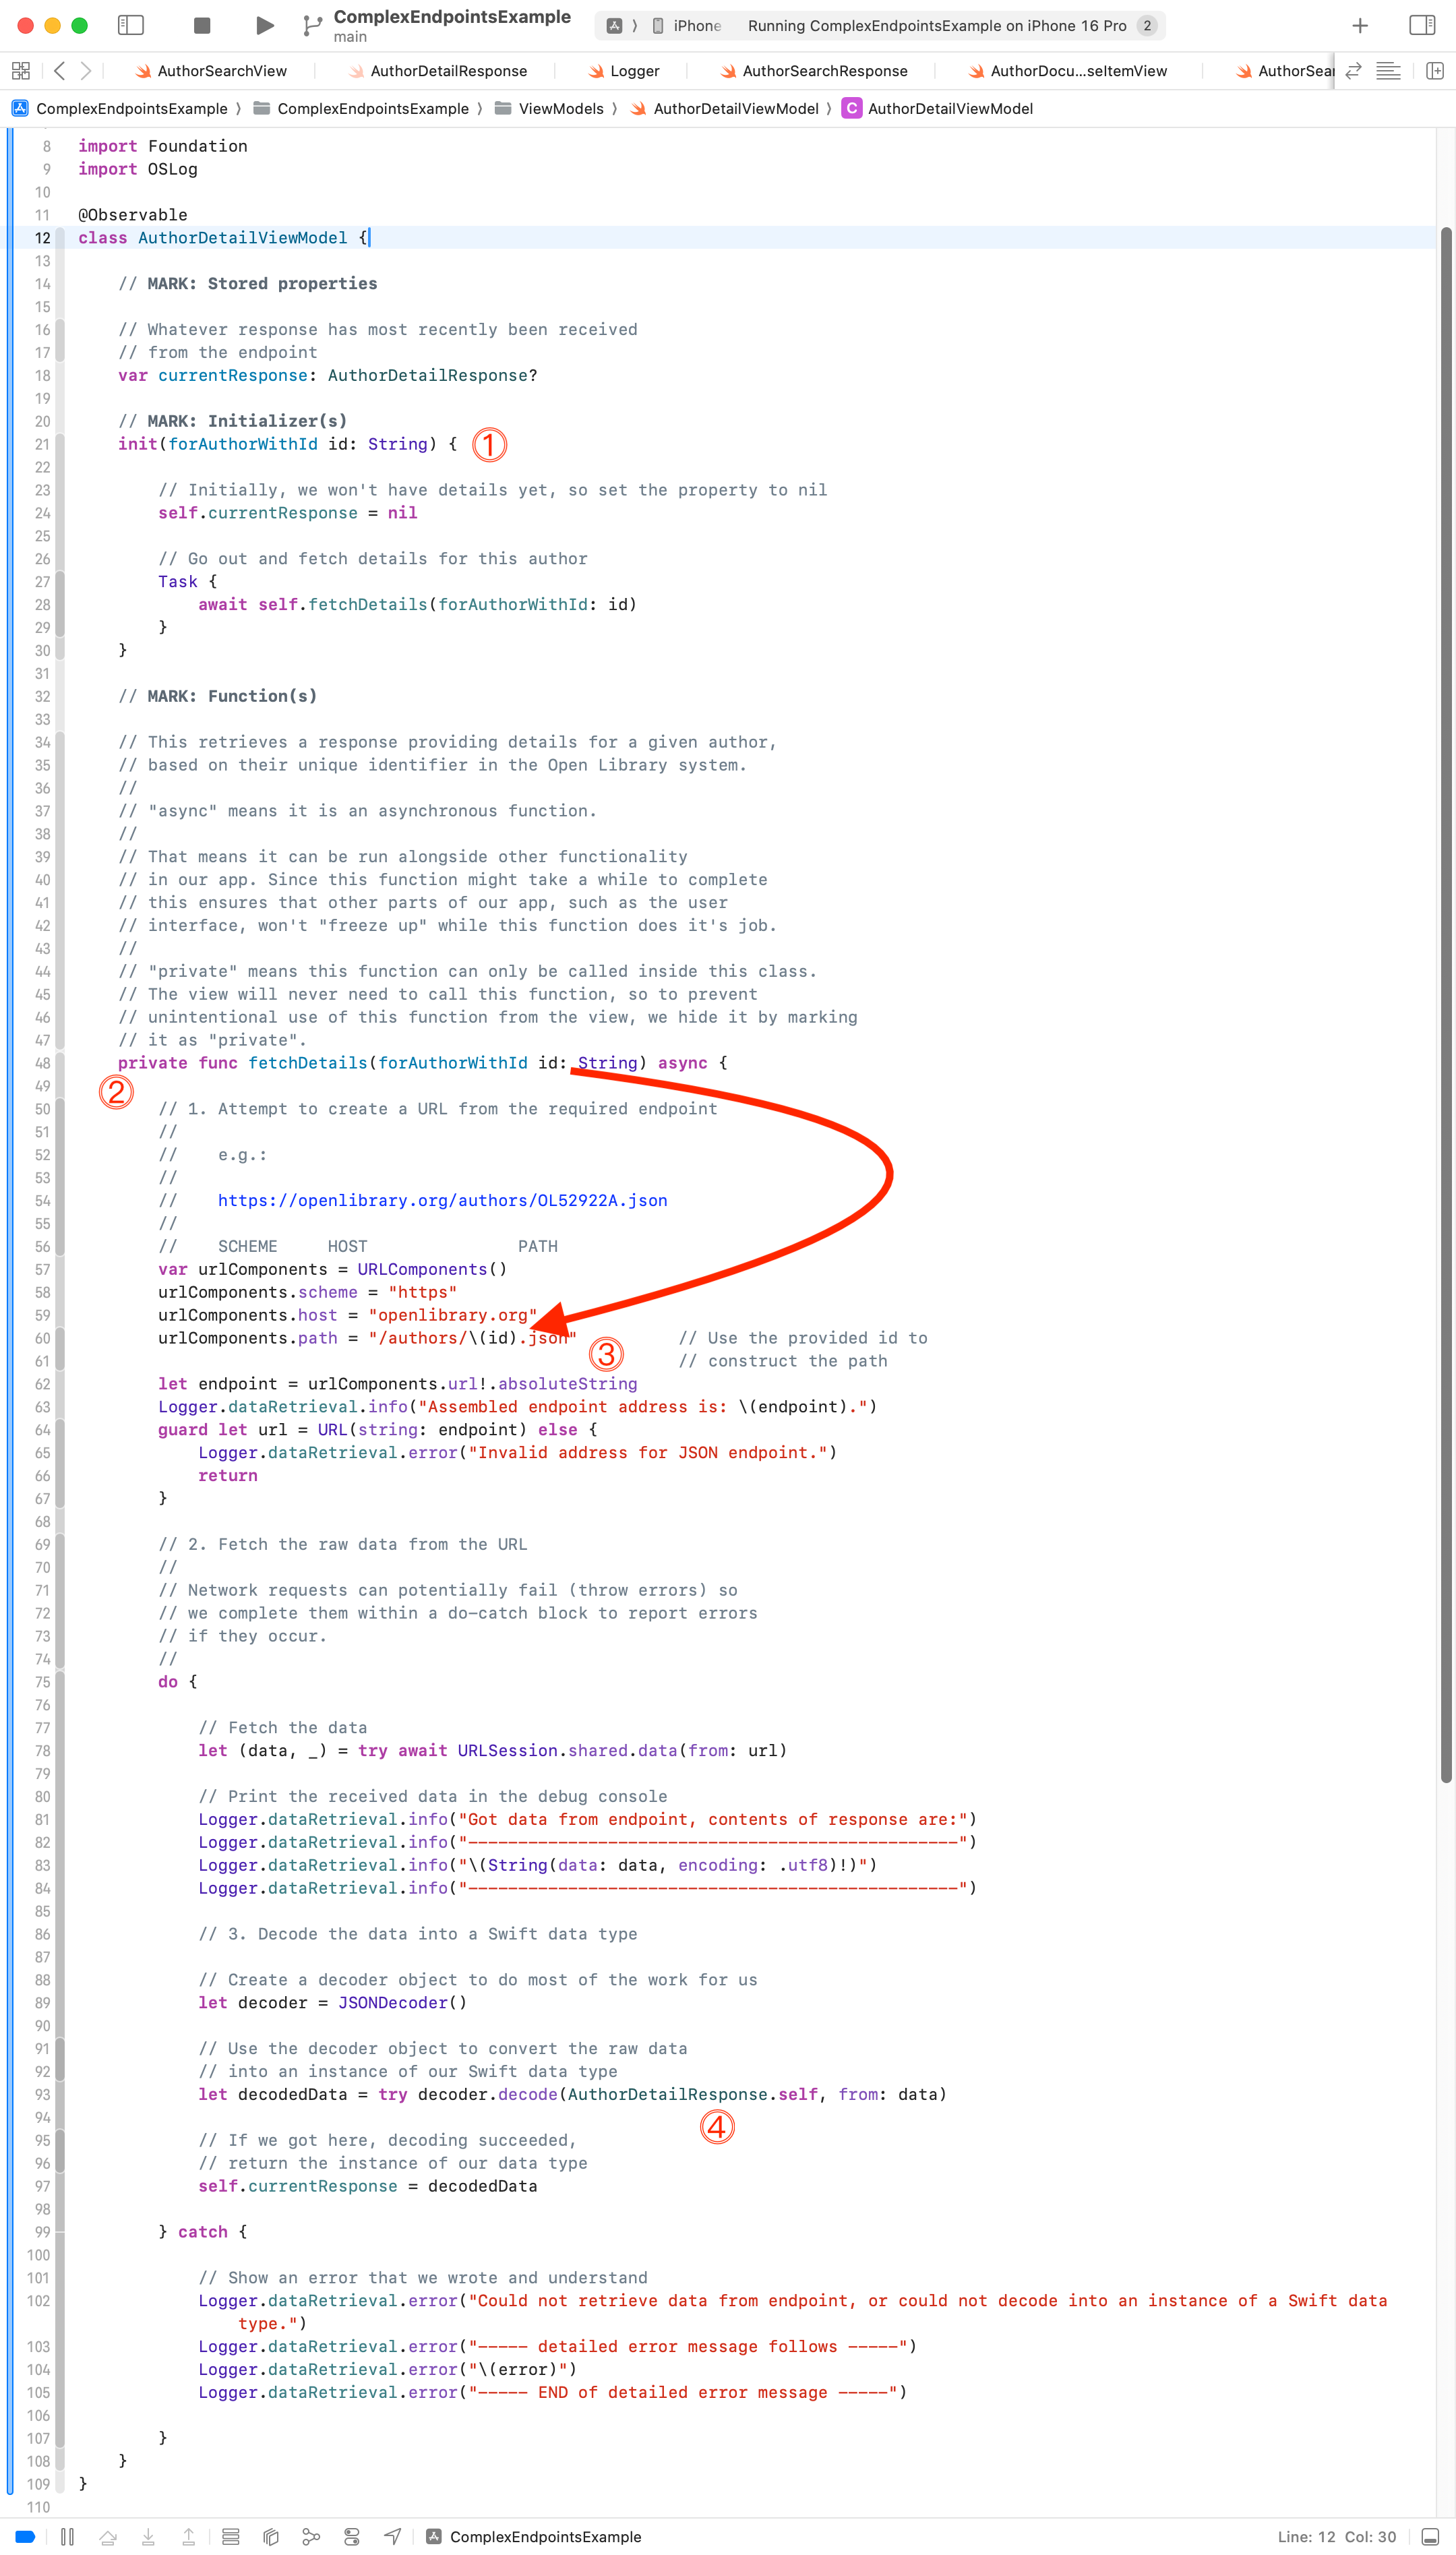
- The initializer receives the unique identifier of the author we want to get details for (more on how the view model is created and provided with this information when we build out the view). When the initializer runs,
currentResponseis initially set to be benilbecause we haven’t yet gone out over the Internet to get a response from the endpoint. We then (lines 27 to 29) invoke the function defined further down in this view model to go out and get the author details.- We define a function named
fetchDetailsthat does the work of speaking to the endpoint and getting details for a given author. It’s marked as private, which means we can only call it from somewhere else inside this class – we can’t call this function directly from the view.- We construct the URL for the endpoint. Notice how the
idpassed in to this function is used to construct the endpoint URL. 👀- Everything else about this view model is identical to the other one; the only remaining part that’s different is we decode the response from the endpoint into a data type of
AuthorDetailResponse(instead ofAuthorSearchResponselike in the first view model).
Another view
We need a view to show the information held by the view model.
Here one possible way to write that view:
Reviewing key details…
DISCUSSION
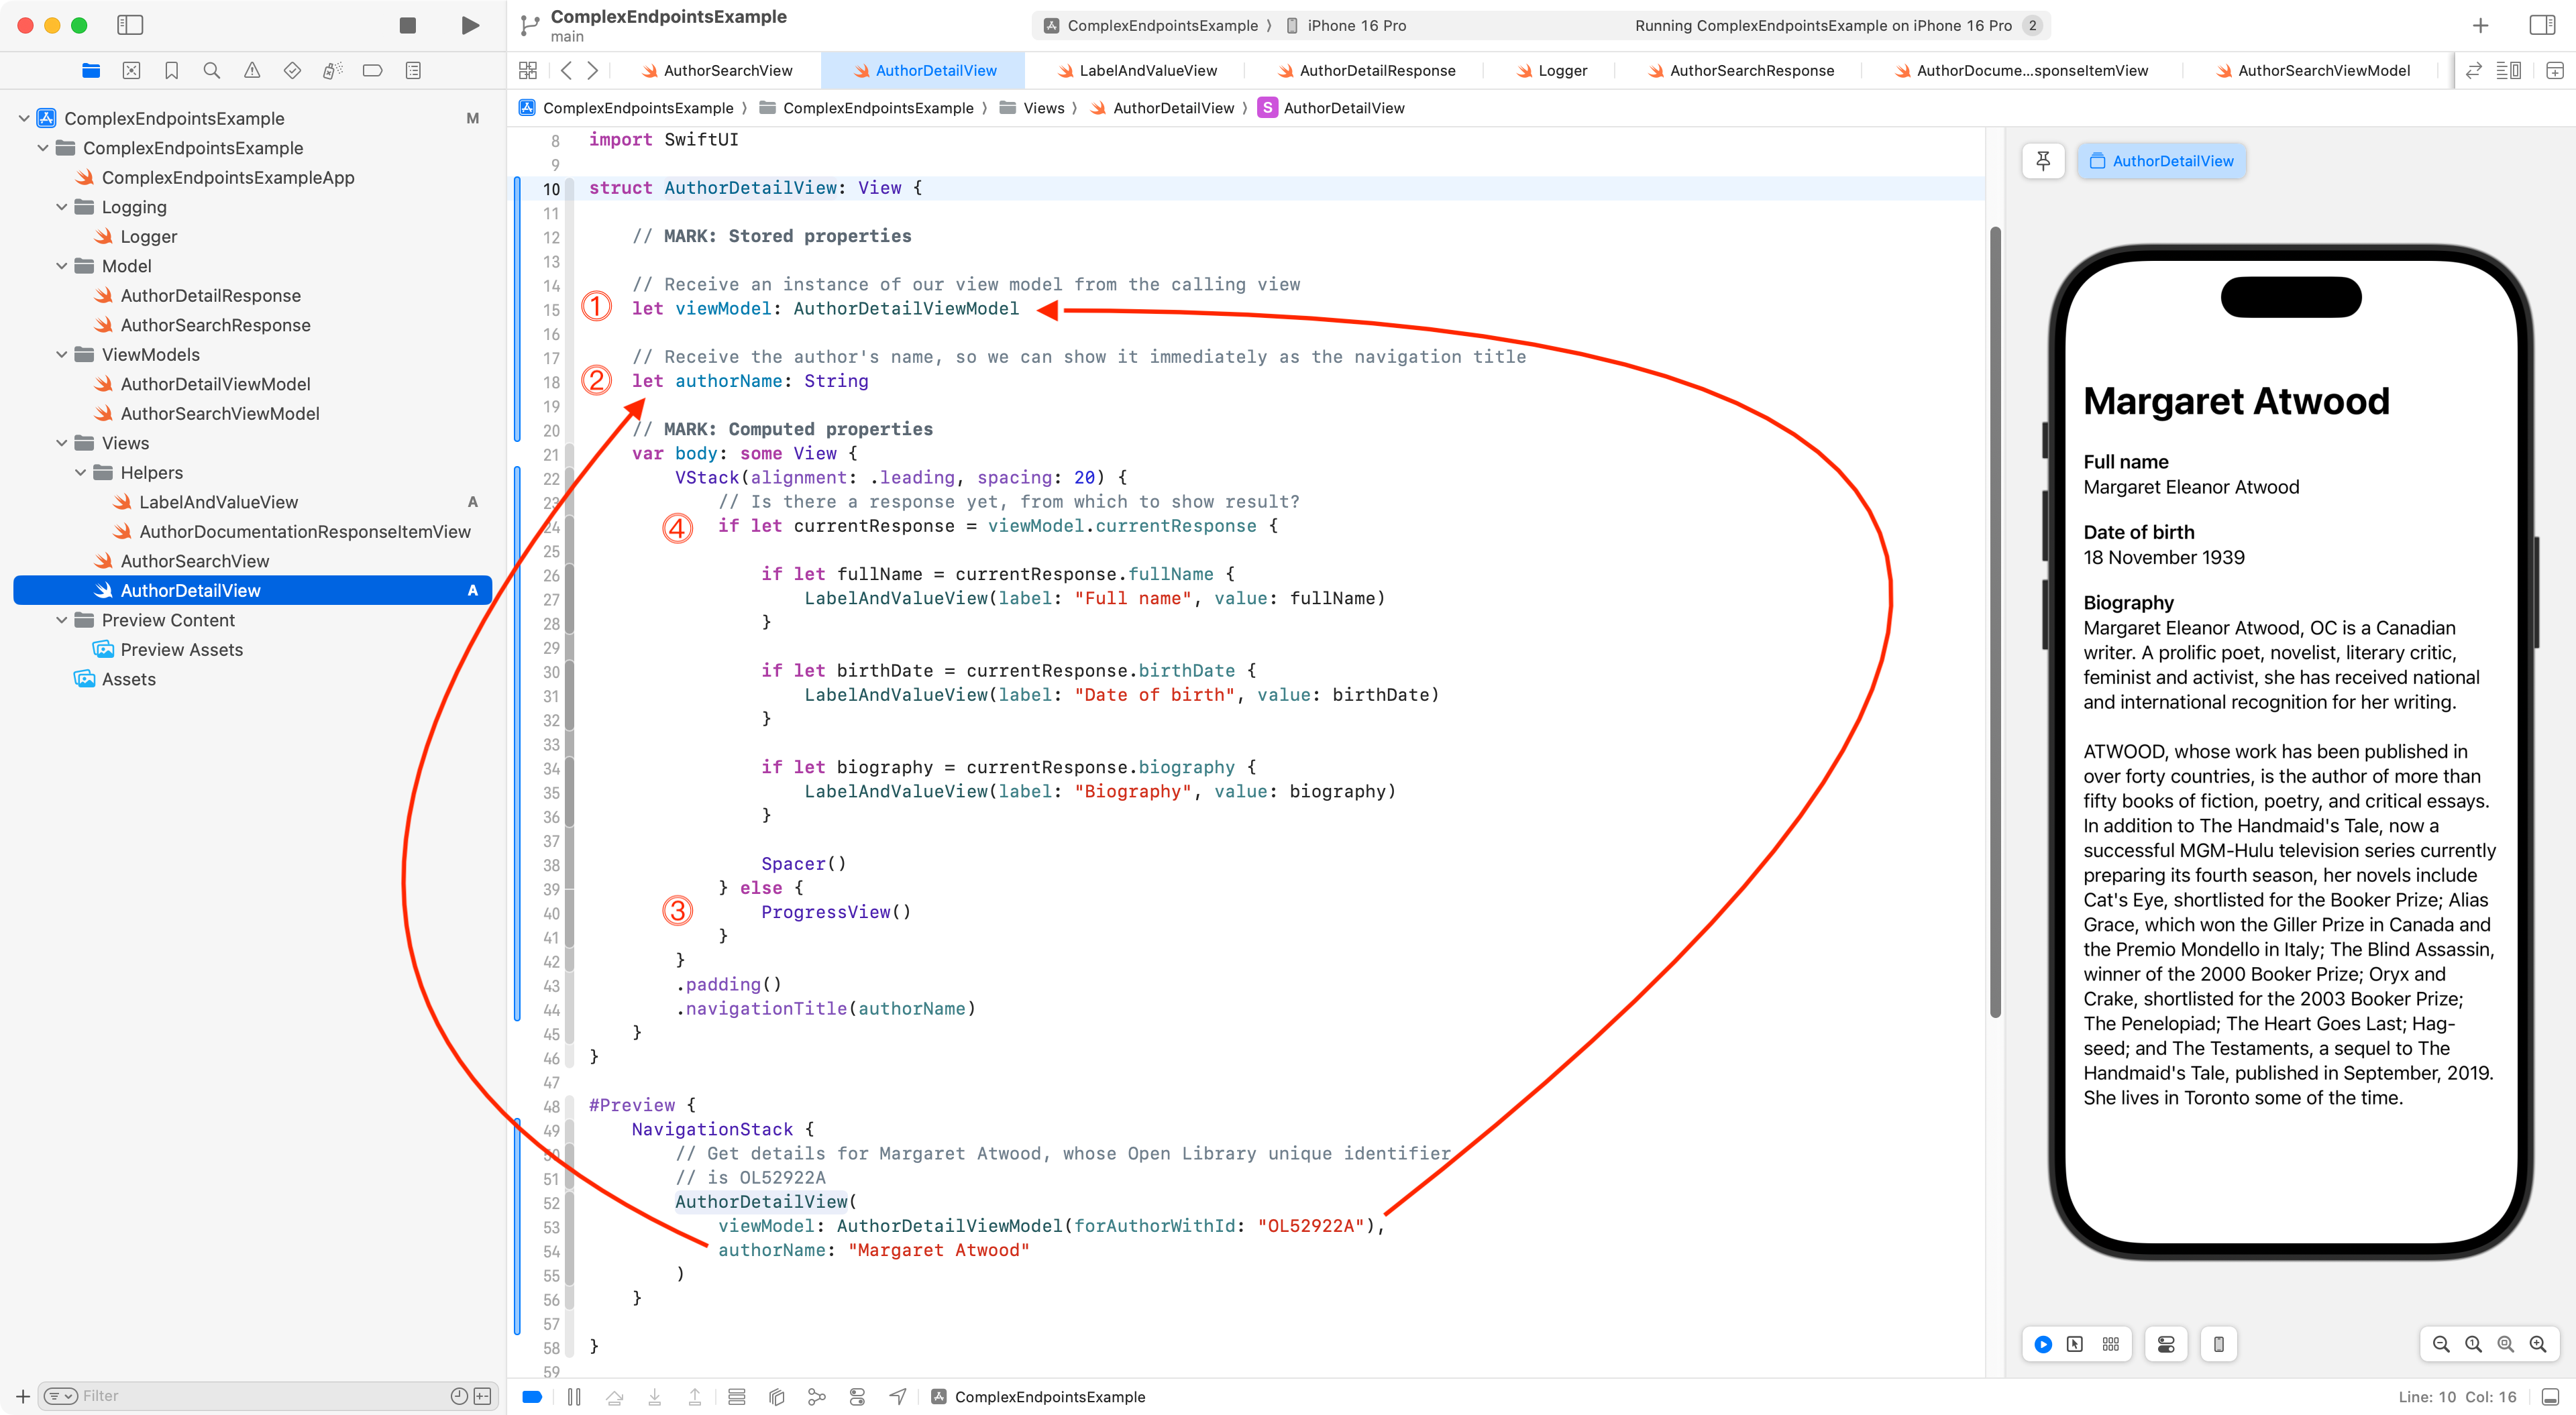
- This view does not create it’s own view model. Instead, it receives its view model from the calling view. An explanation for why this is done will be provided momentarily.
- The view also receives the name of the author from the calling view. This is so that we can use the author’s name as the navigation title.
- Initially there will be no response to show from the
AuthorDetailViewModel, as it takes a little while for the endpoint to provide one. When there is no response, thecurrentResponseproperty from the view model isnil. When this is true, we show a spinner to indicate that the app is in fact doing something for us as the user.- Once a response has been received, we show details. This makes use of a helper view named
LabelAndValueView, since the layout of showing each individual property is the same – a label that is bolded and then the actual information to be shown.
Applying some abstraction, we have also created a helper view, which is shown here:
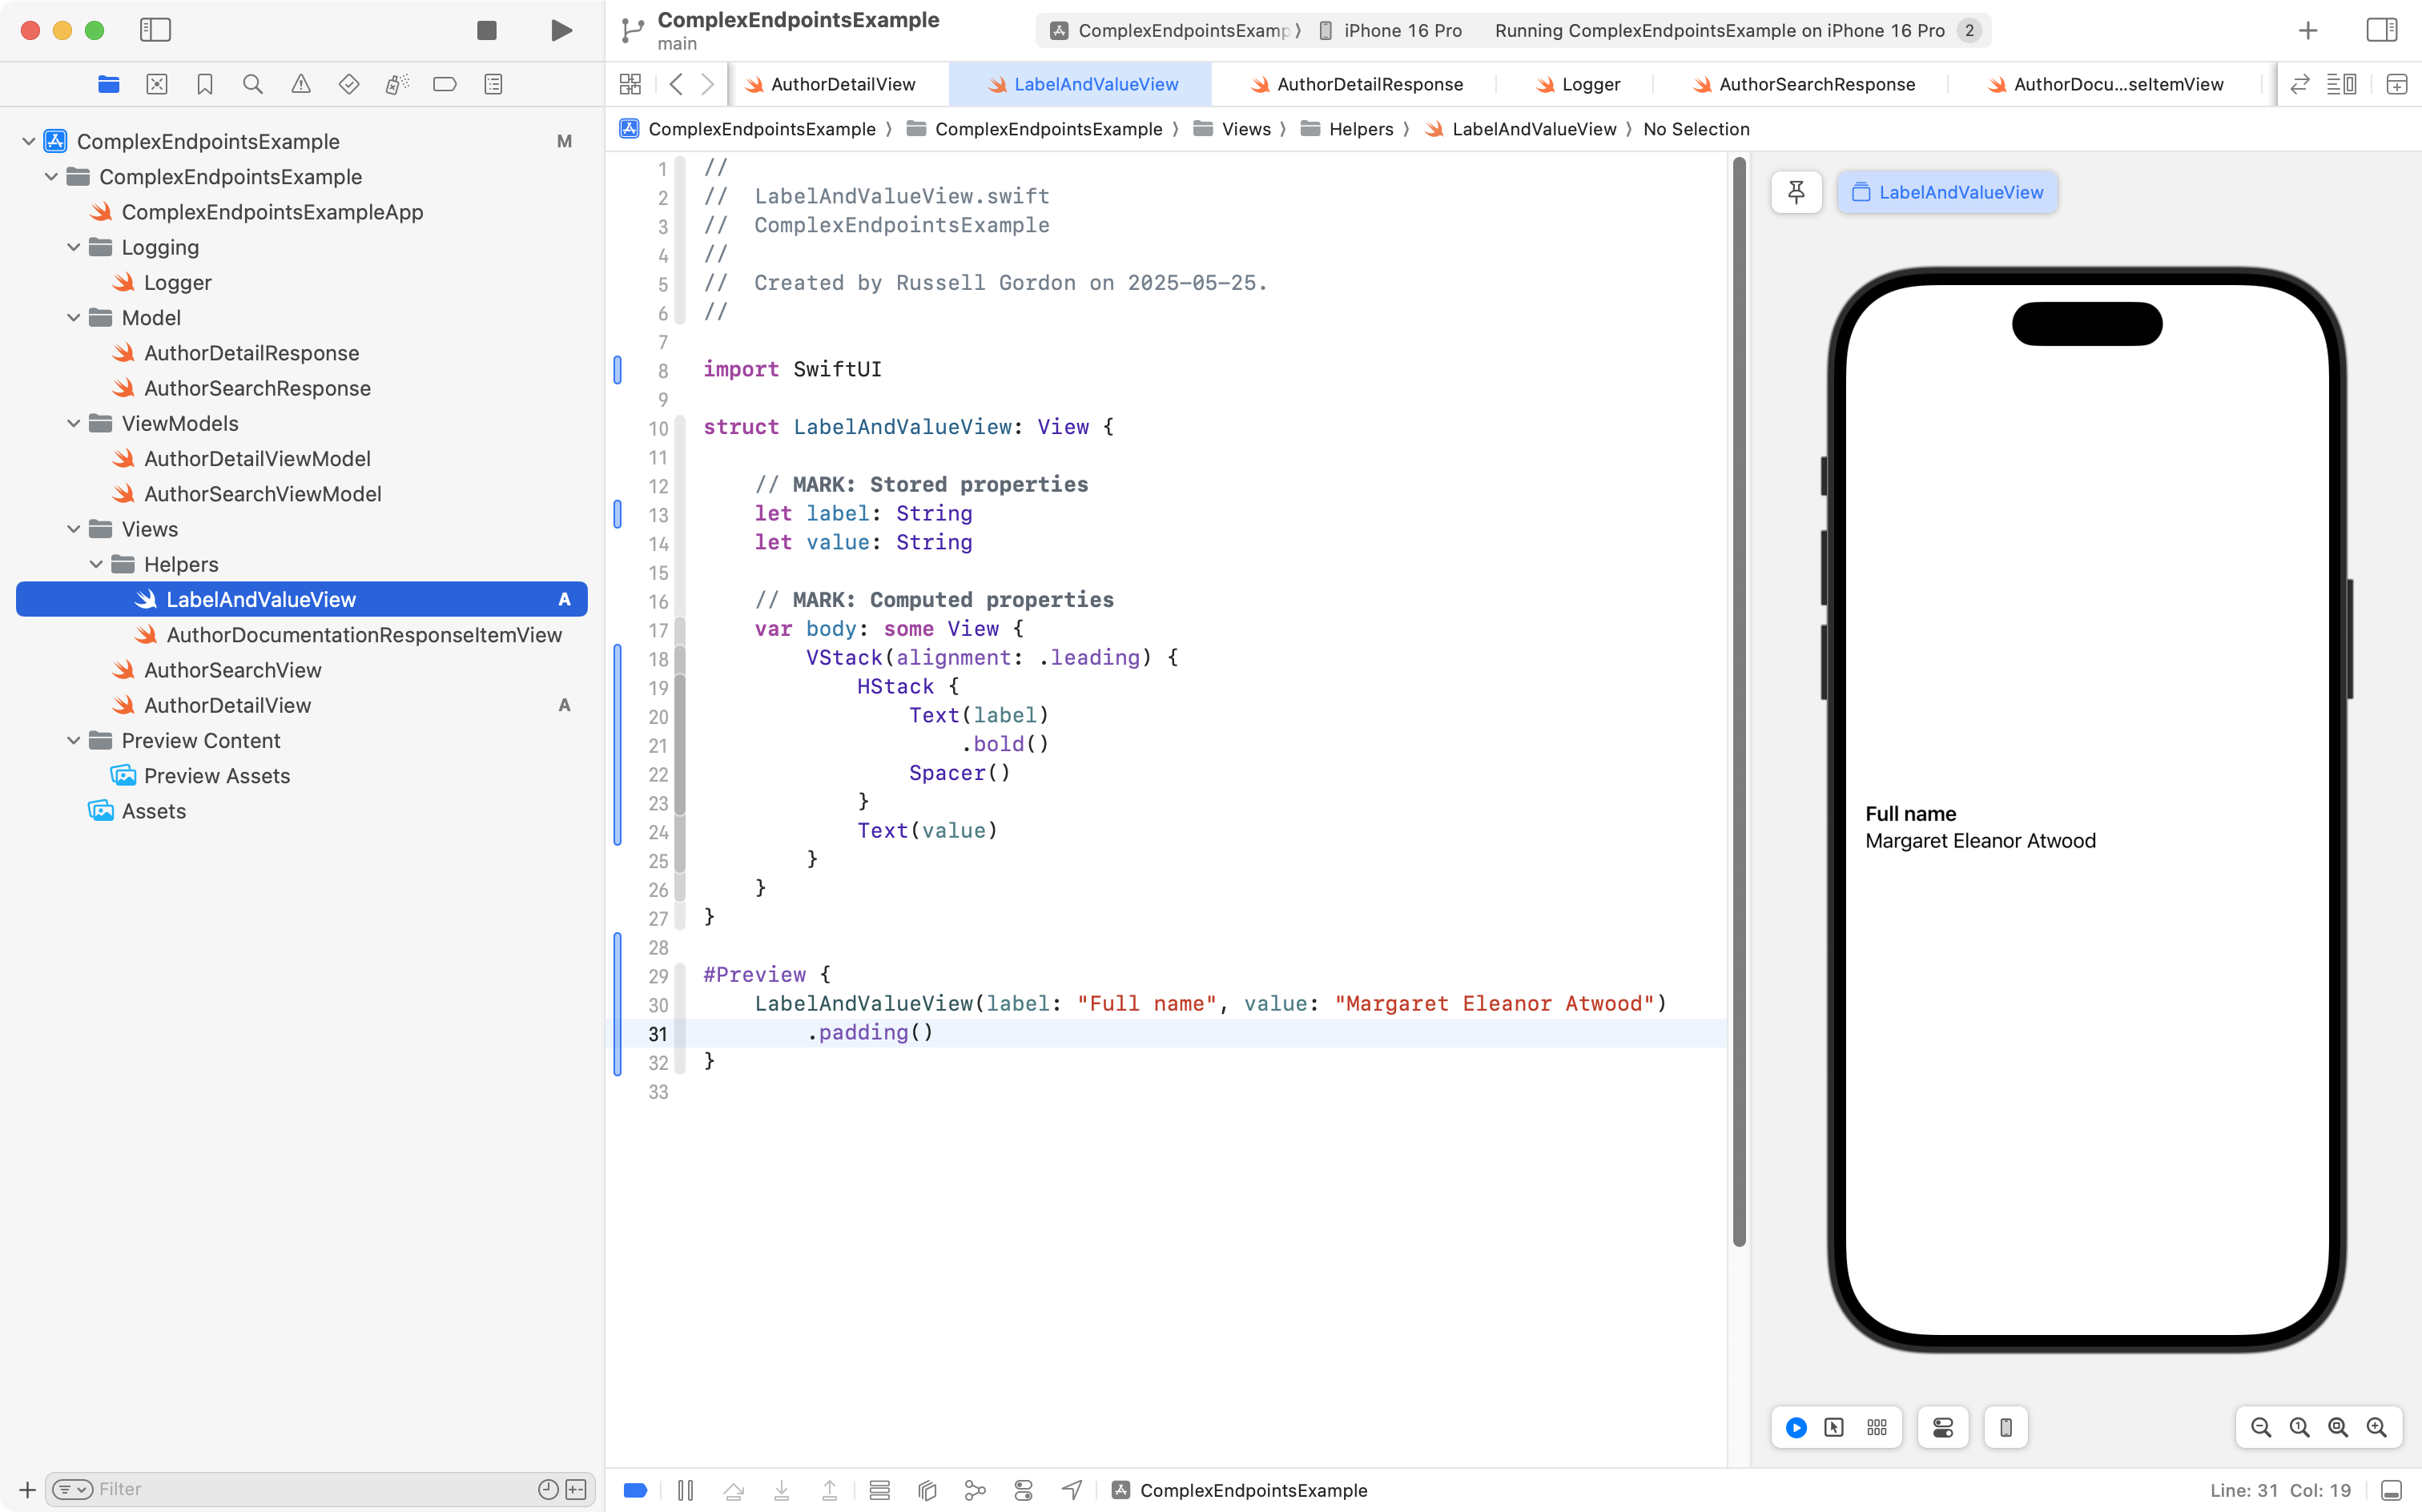
How this helper view works should be self-explanatory at this point.
Finally, we need to make use of this detail view, calling it from AuthorSearchView, so, let’s make that modification.
Right now, AuthorSearchView just shows a scrollable list of authors that match the search term:
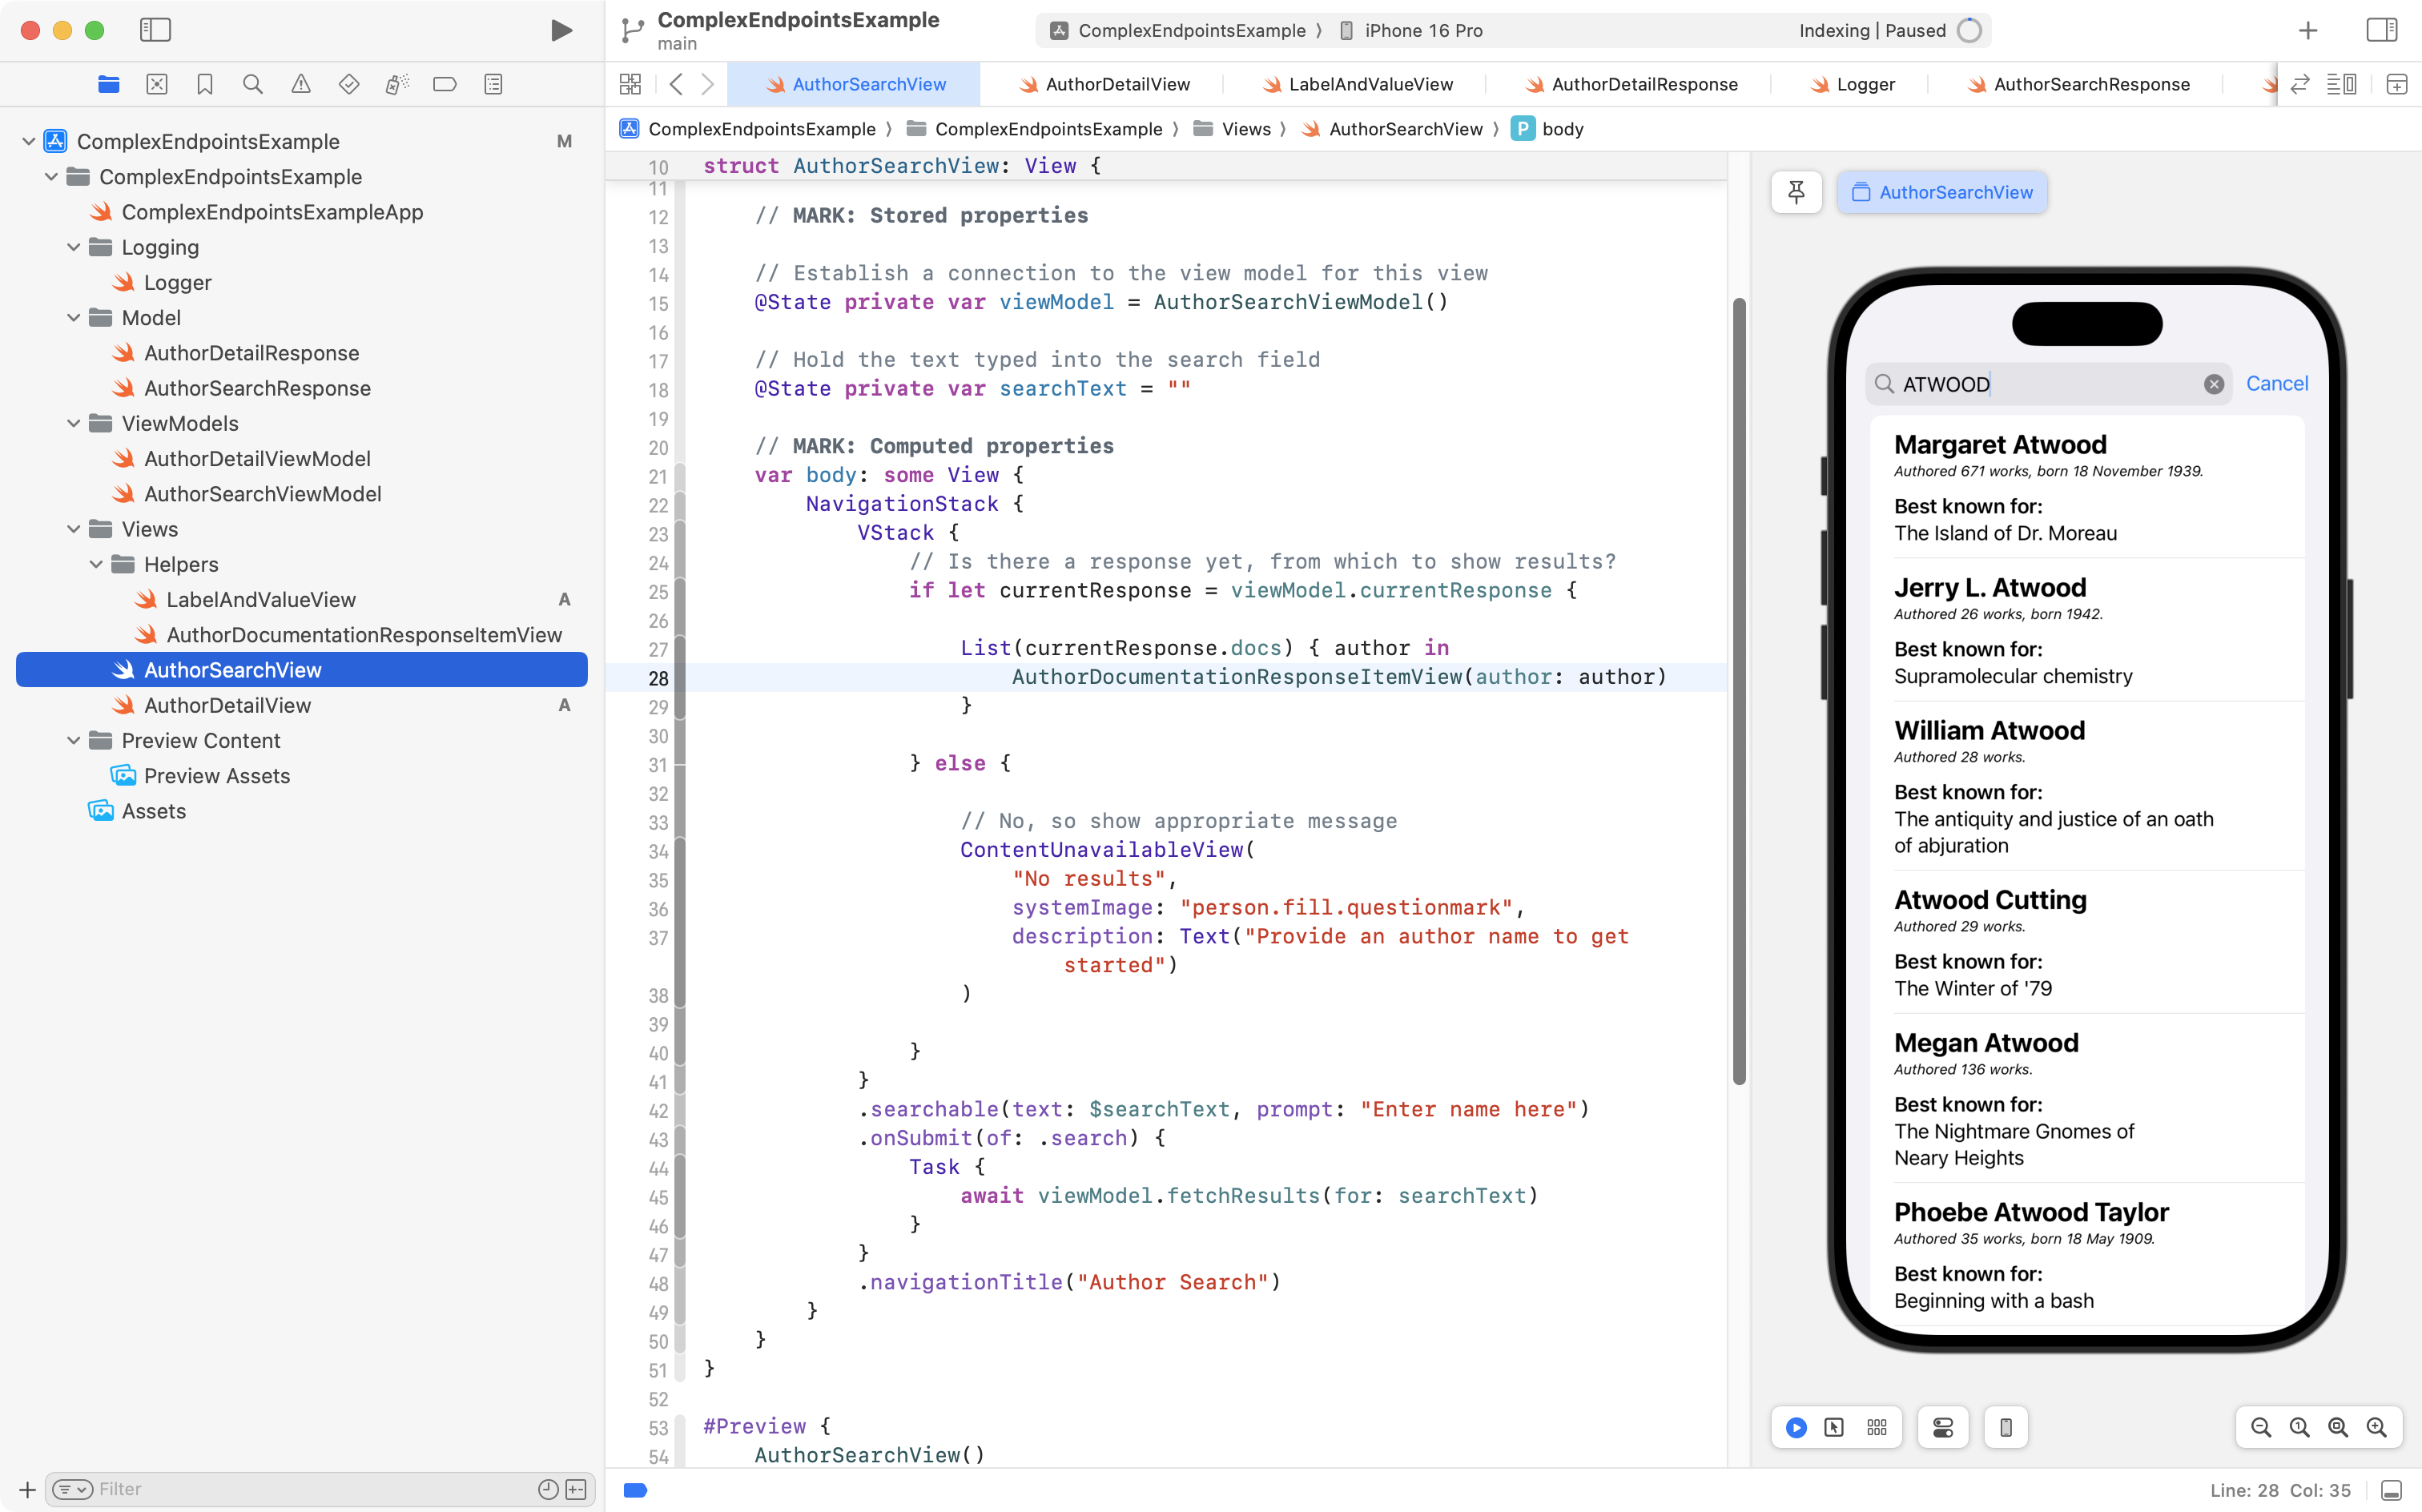
We change the code around line 28 to show a NavigationLink instead of just an instance of AuthorDocumentationResponseItemView.
Now the label for the navigation link is AuthorDocumentationResponseItemView and the user navigates down to AuthorDetailView:

Reviewing important details:
DISCUSSION
- When the app navigates down to the detail view, it passes an instance of
AuthorDetailViewModelinto the detail view. We know the details of a given author within the scope of theListstructure (lines 27 to 37) and we pass the unique identifier of the current author in to the initializer of the view model.- The author’s name is also passed to the detail view to be shown as the navigation title.
Here is how the app works at this point in time:
TIP
As you saw in the video, it’s pretty common to encounter challenges when receiving information from a remote endpoint.
Mr. Gordon found that:
- The format of the value for a “bio” or biography for an author changes. Sometimes it is sent as a simple string – sometimes as another JSON object. Mr. Gordon chose to simply comment out the parts of his code that show author biographies, for now.
- Links are not always provided for every author, so, Mr. Gordon made that property of his model optional.
Images
Mr. Gordon found the following note in the Open Library API documentation:
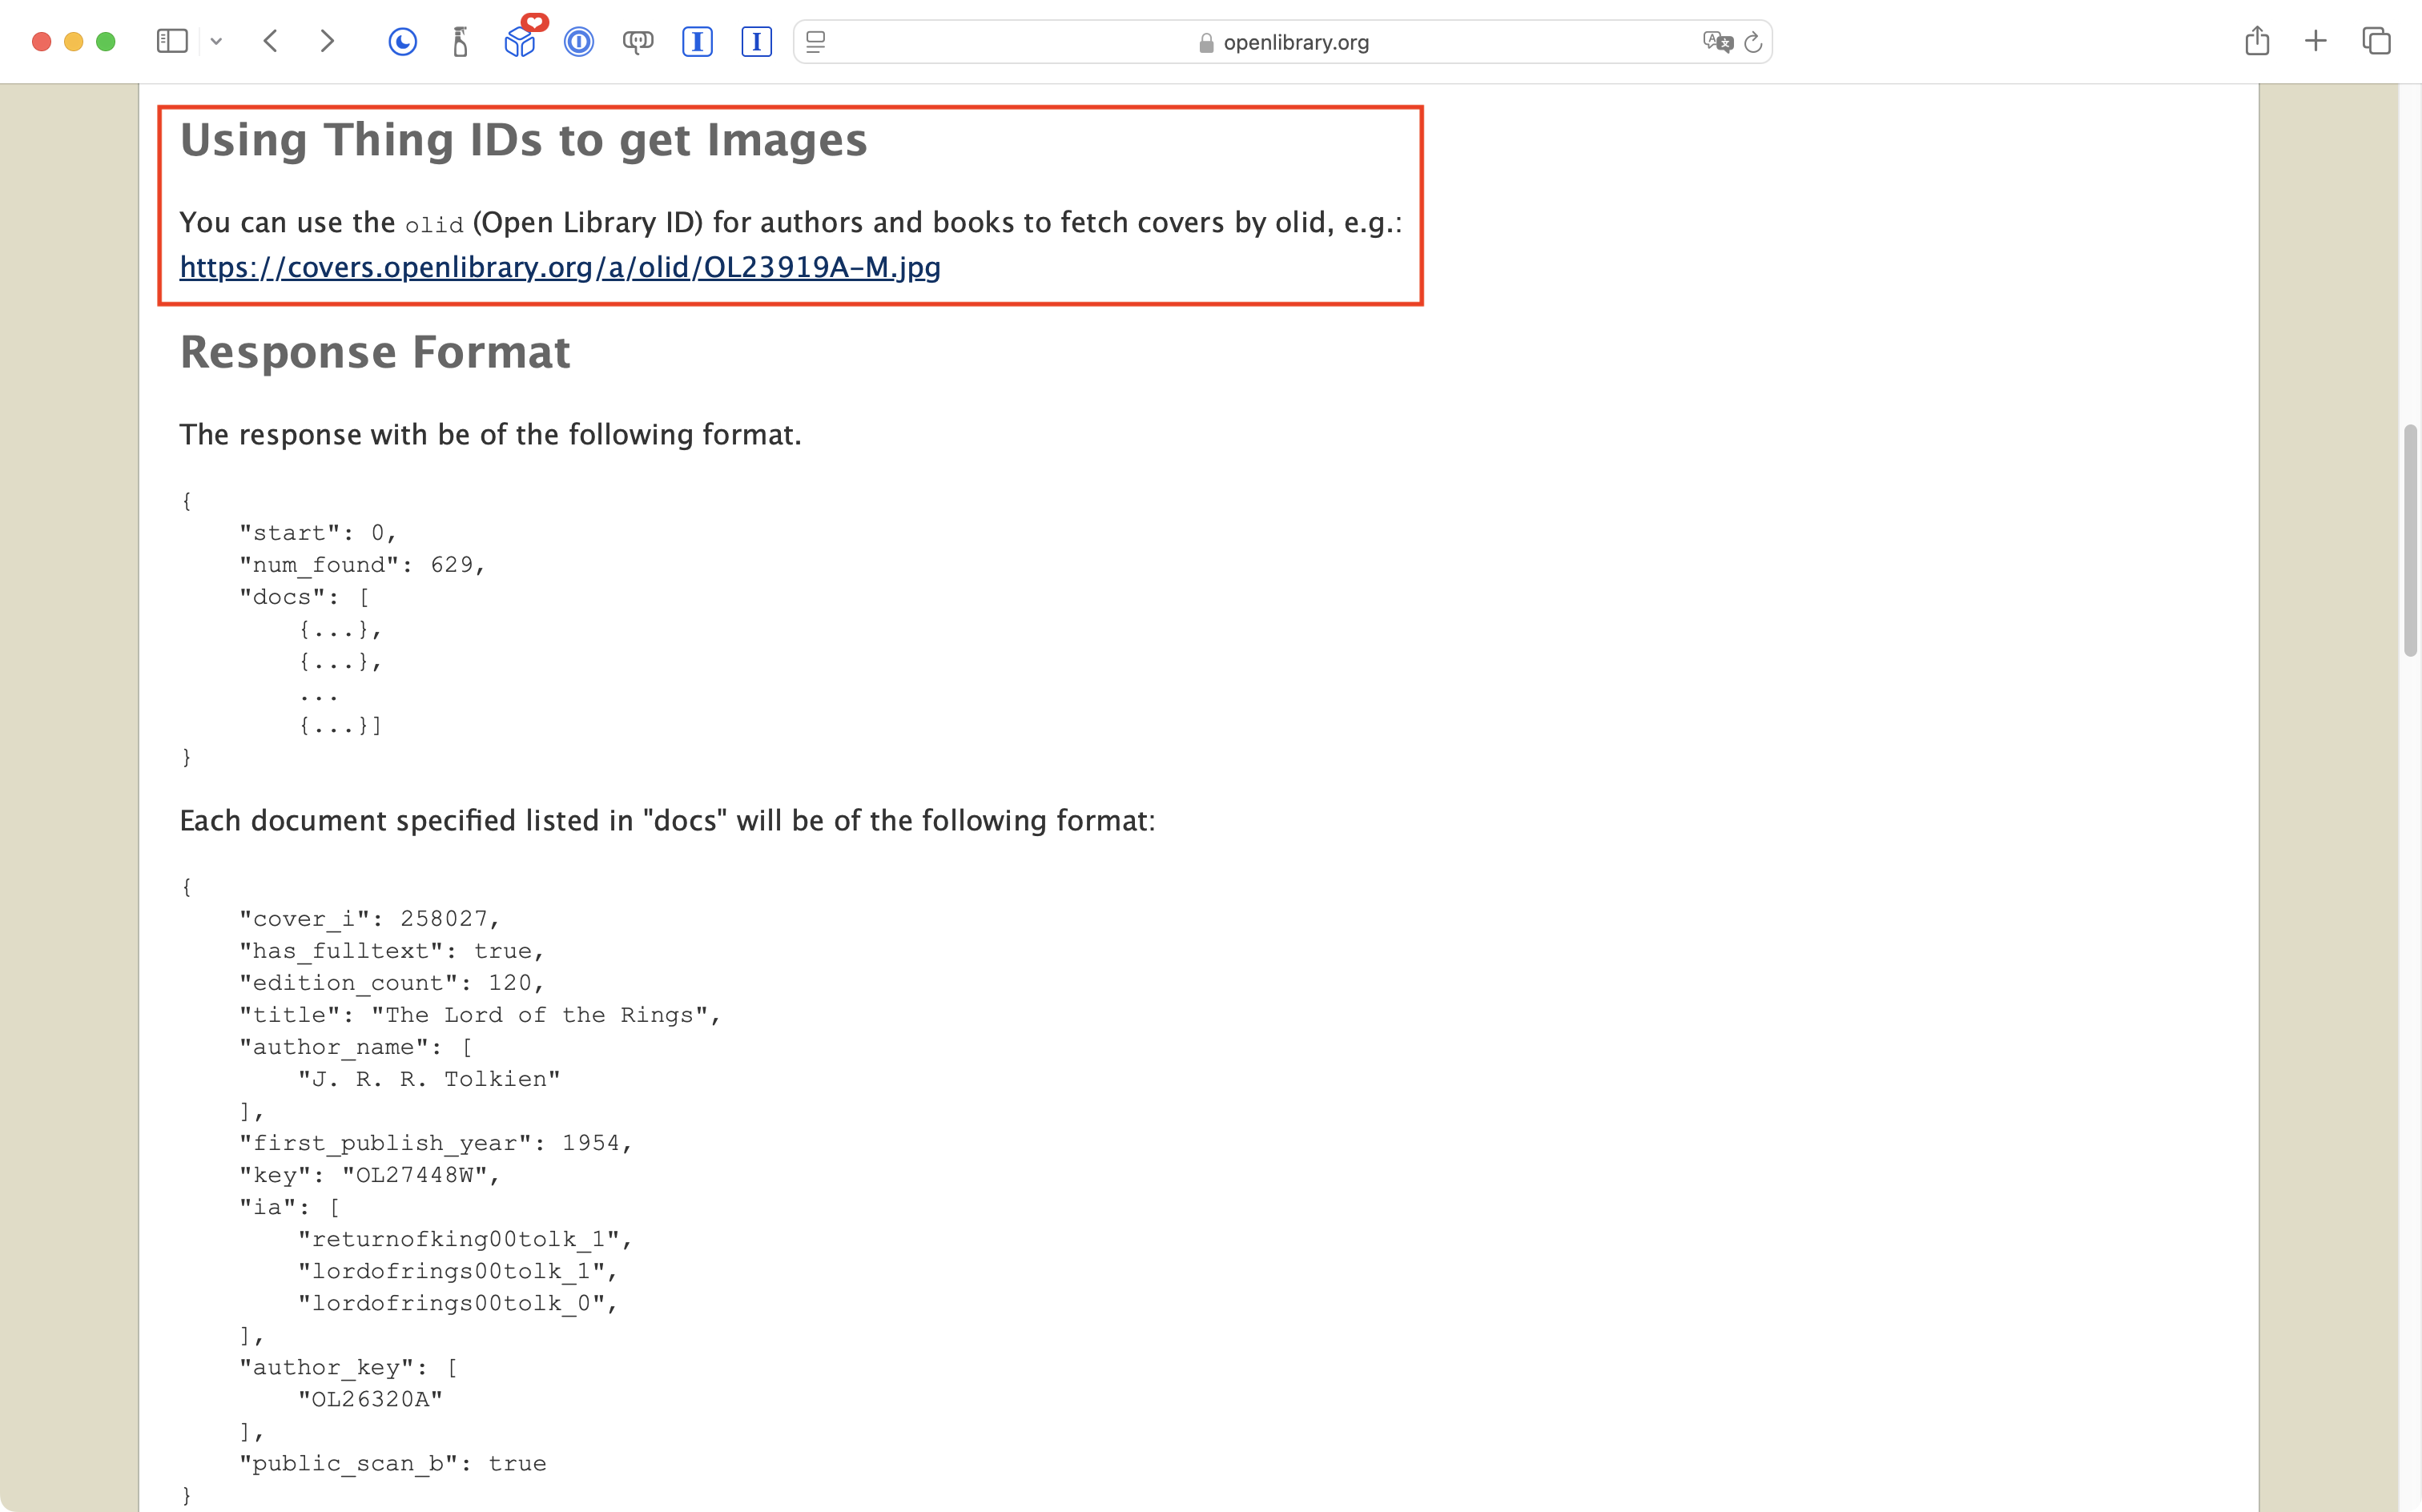
What he thinks this means is that, if you know the unique identifier for an author or a book, you can get an image of the author or book using a URL like this:
https://covers.openlibrary.org/a/olid/OL52922A-M.jpg
… and that seems to be true! For example:
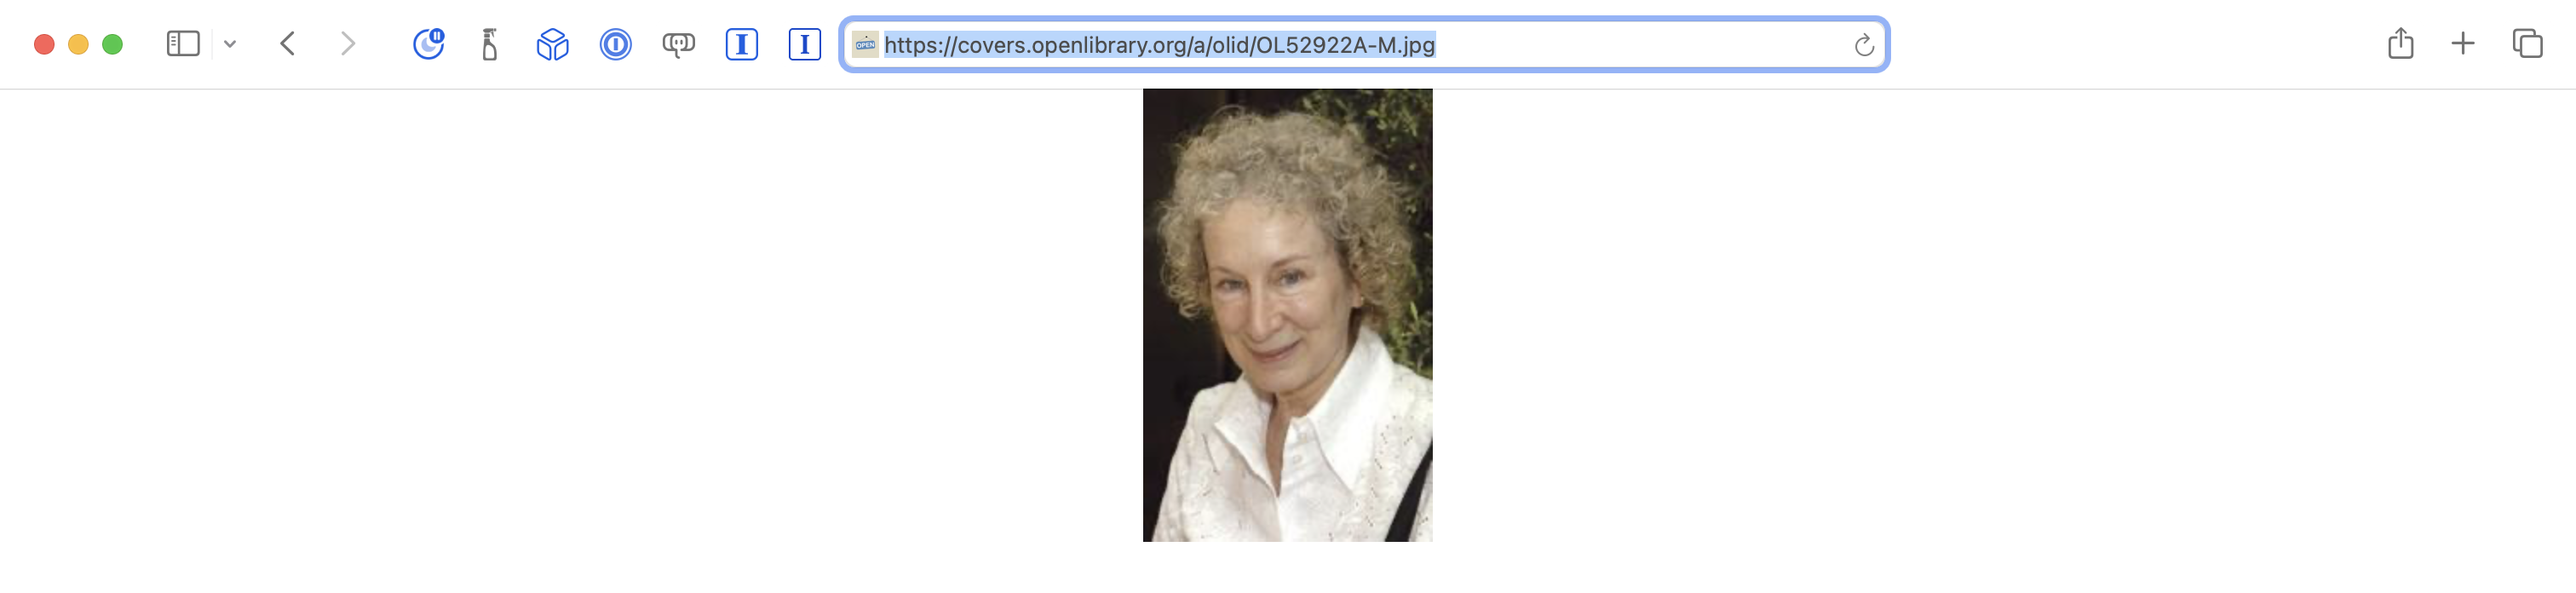
However, in testing some code changes to retrieve those images, he found that some (perhaps most) authors don’t have photos.
So… if he programmed the app to always attempt to show an author’s image using a URL following the pattern described above, most of the time, he’d end up with a blank space where the image should appear.
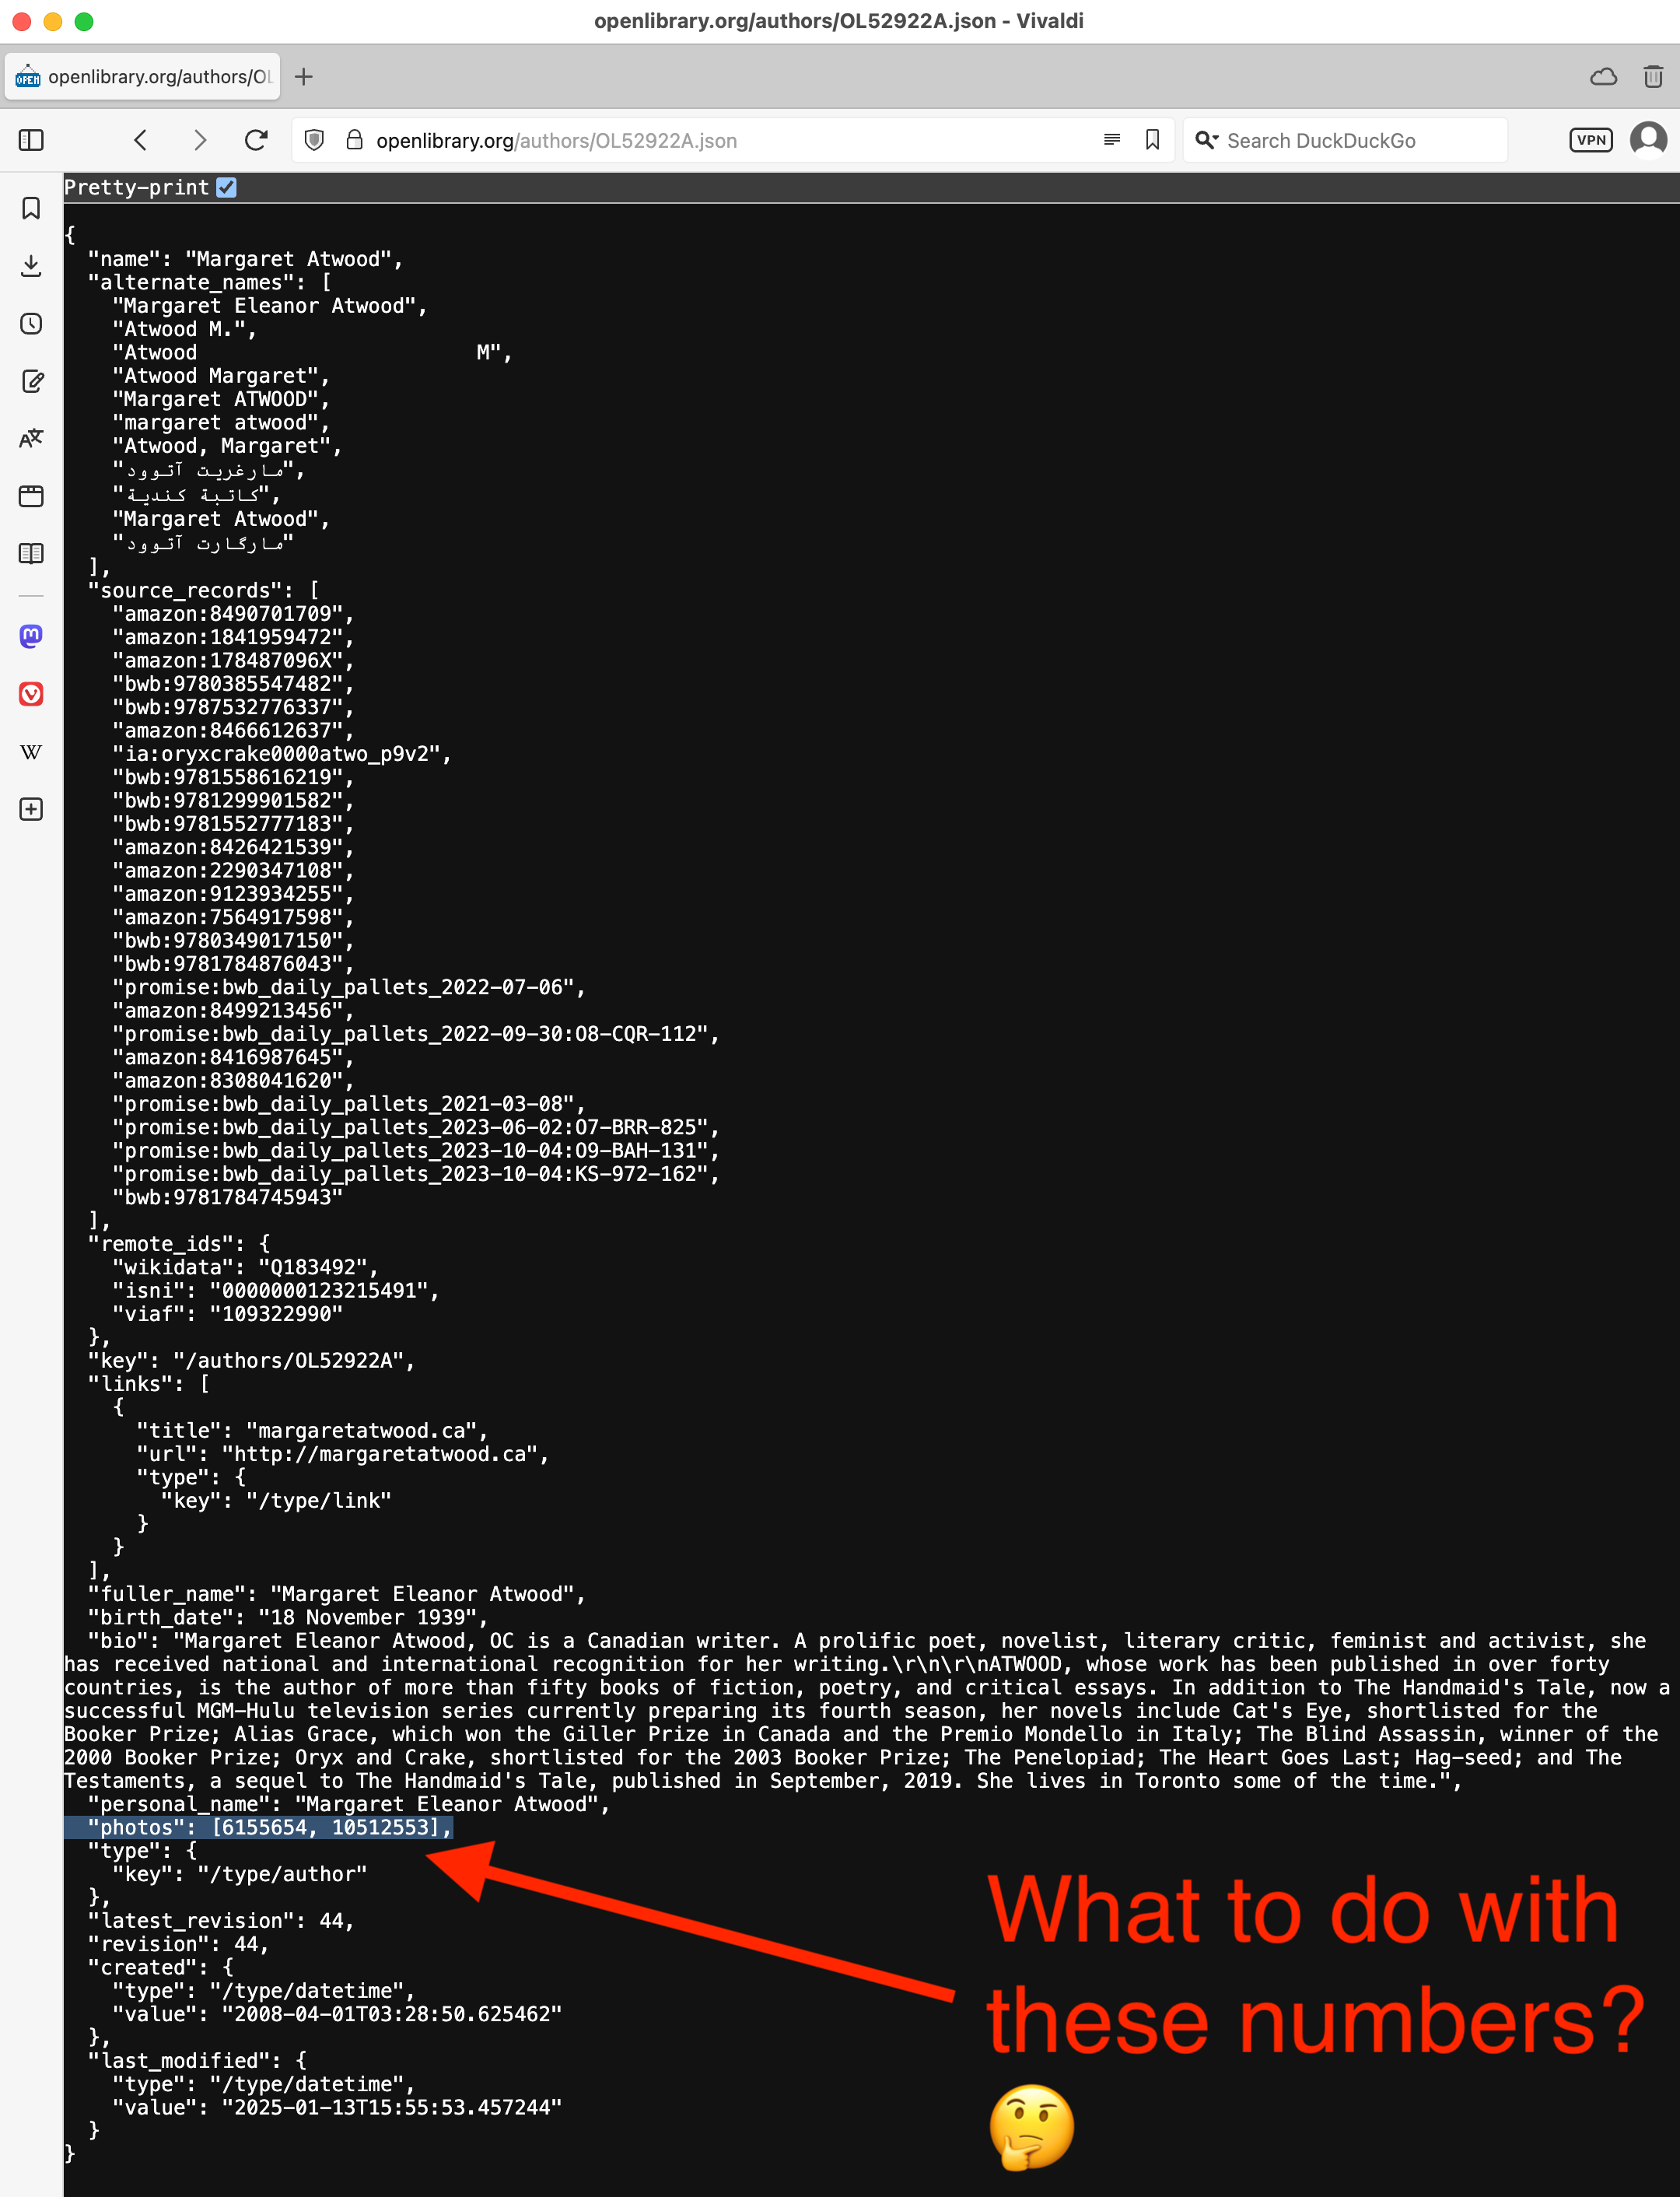
Mr. Gordon then remembered that the original response for a given author had a photos property:
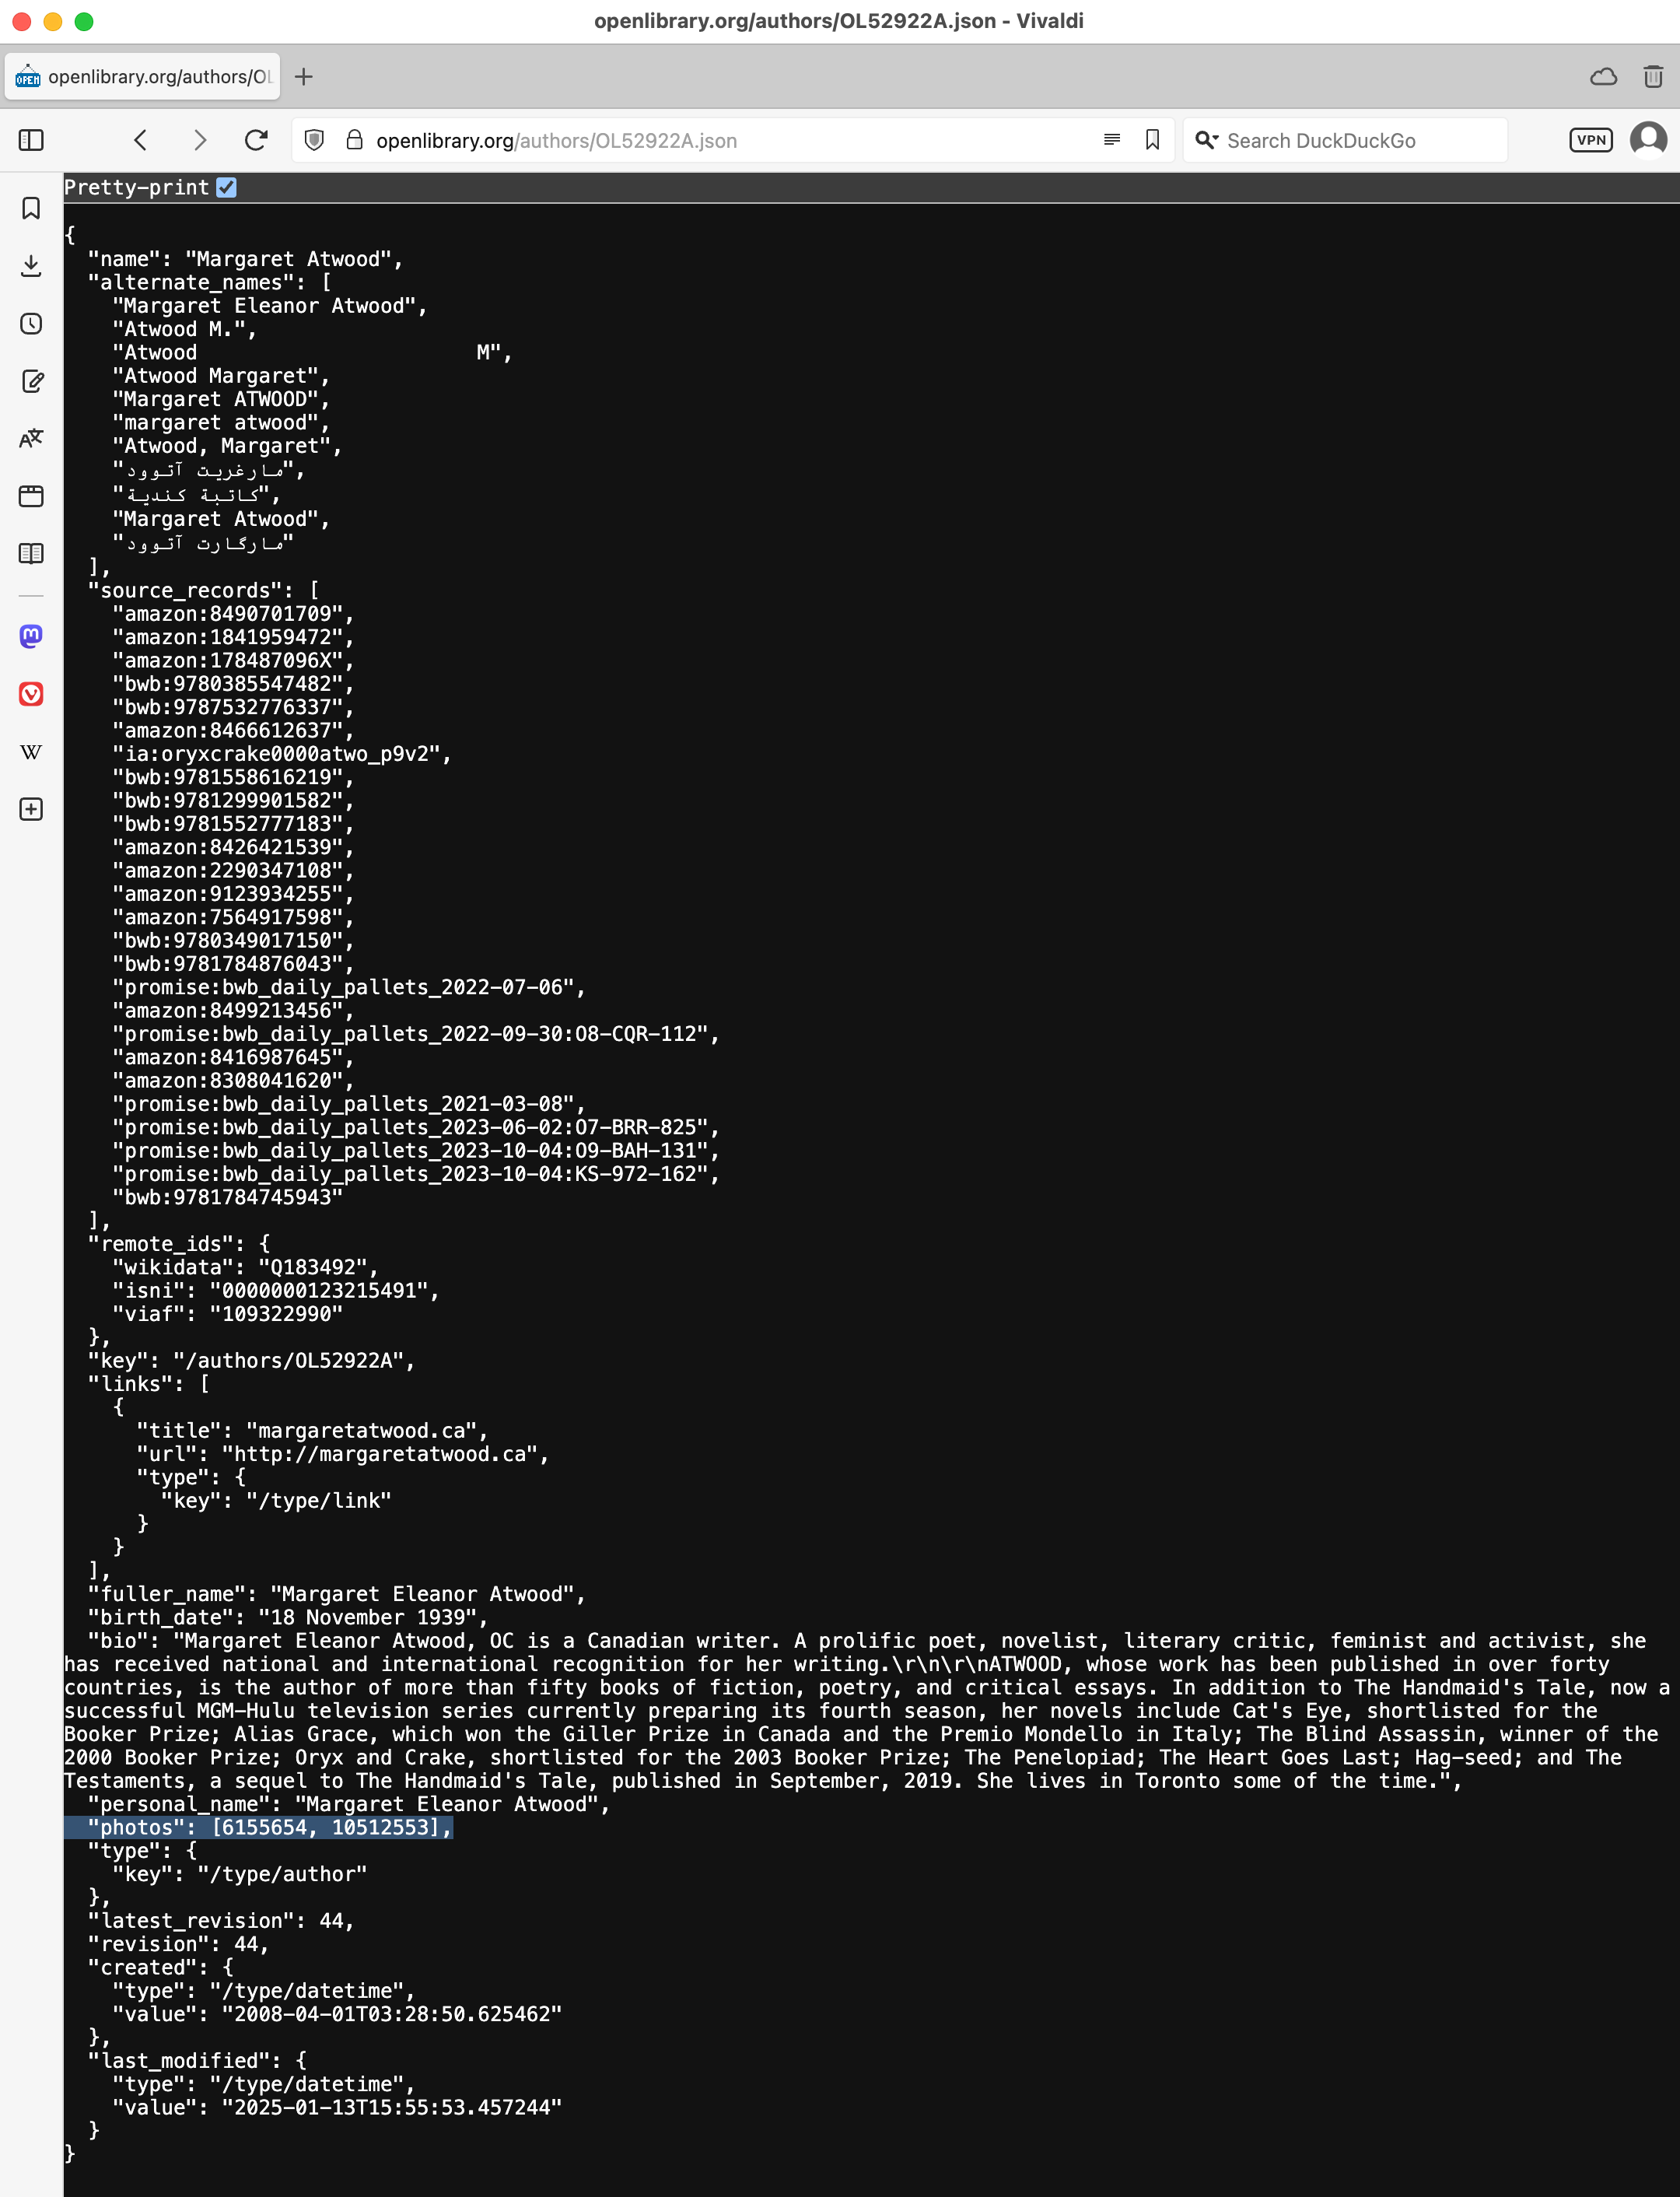
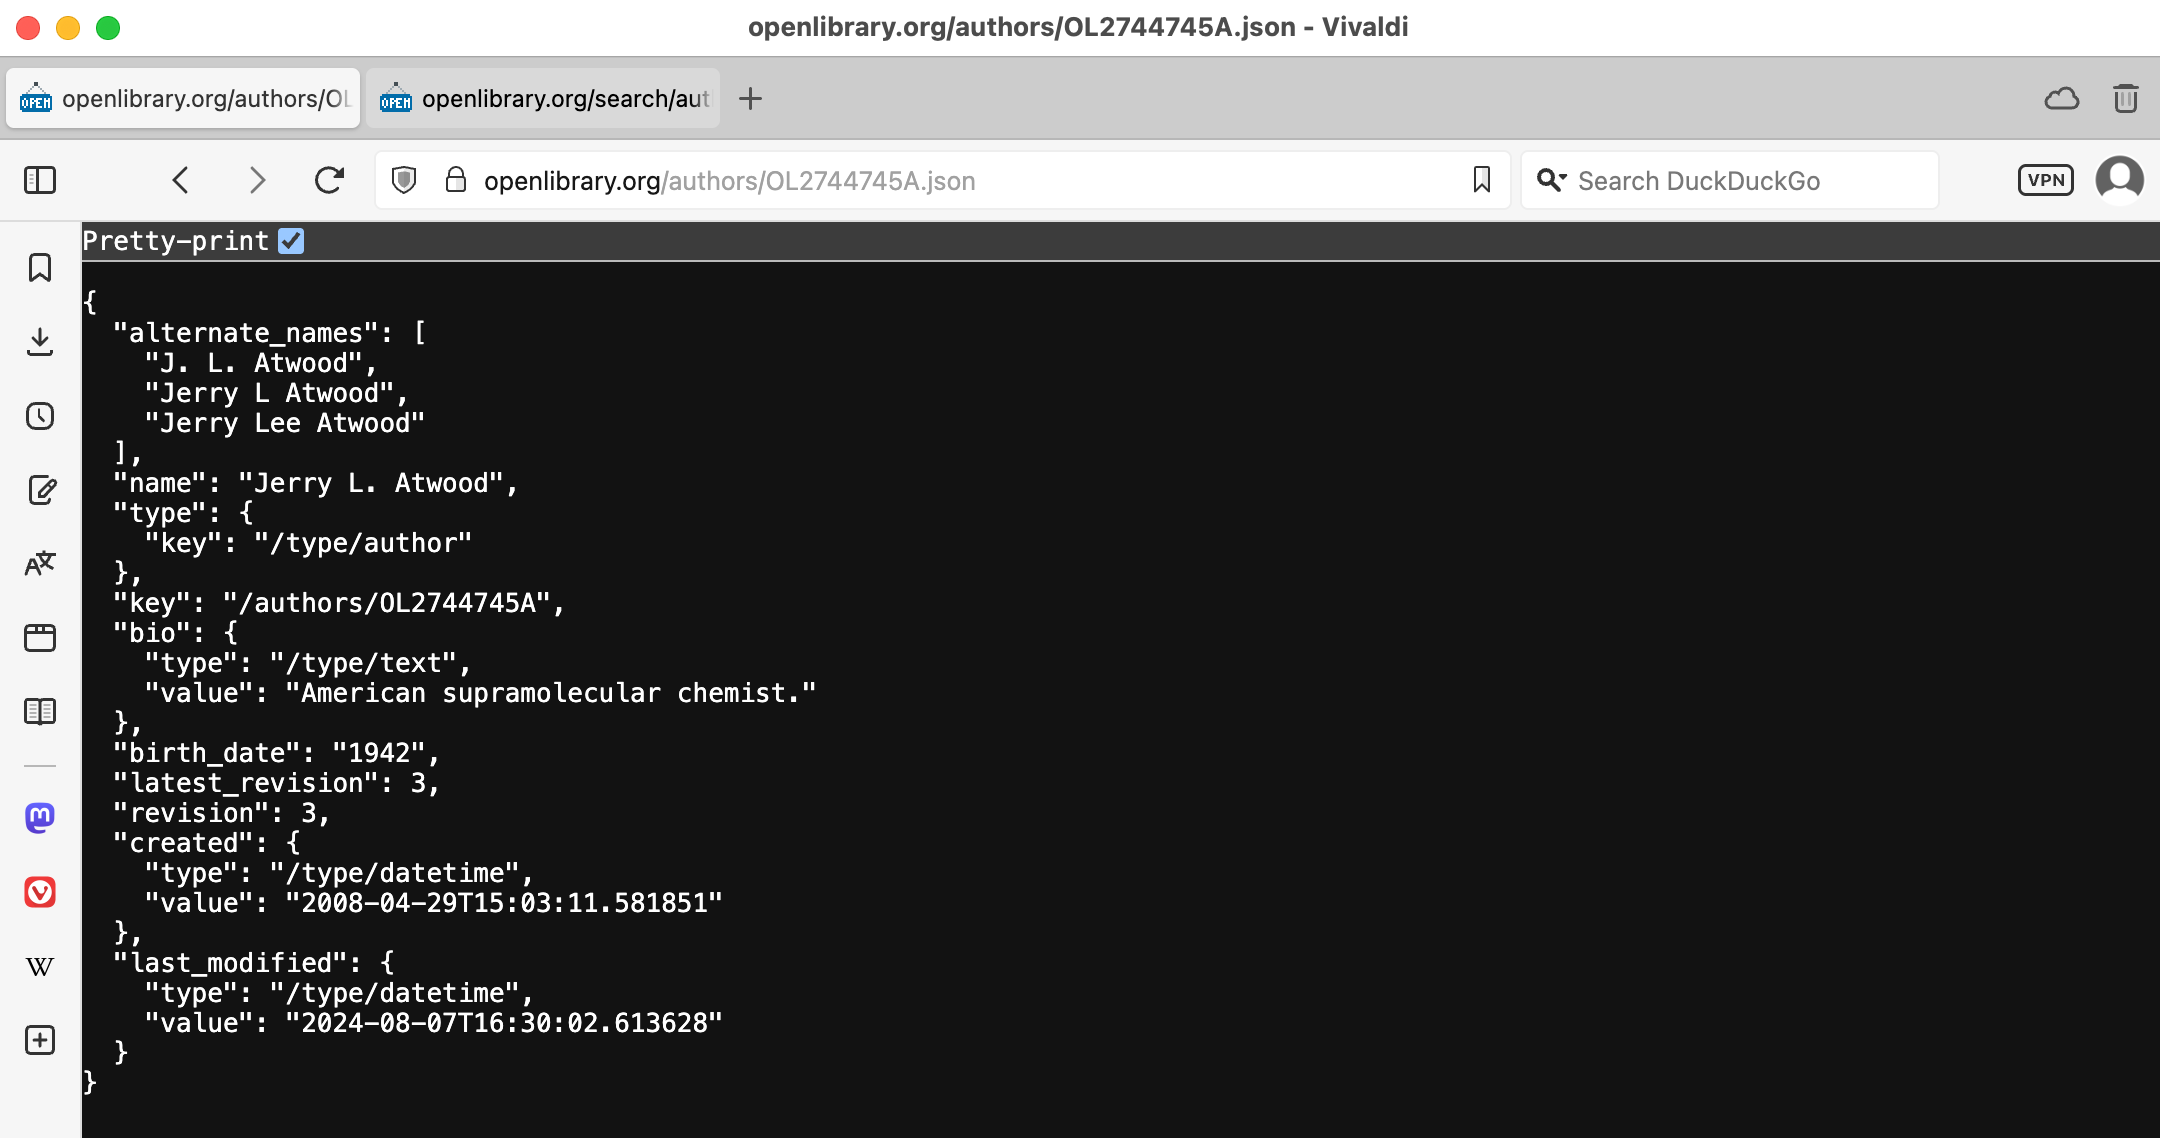
Even better, for authors where there are no photos available, that property is not returned in the response:
So, Mr. Gordon made these changes to the AuthorDetailResponse structure:

Note that the photos property is defined as an optional value – so that if no photos information is provided by the remote endpoint – the property will contain a nil value.
However, Mr. Gordon wasn’t entirely sure how to use the integers listed in the array returned as the value for the photos property:
So, he asked ChatGPT about this, briefly.
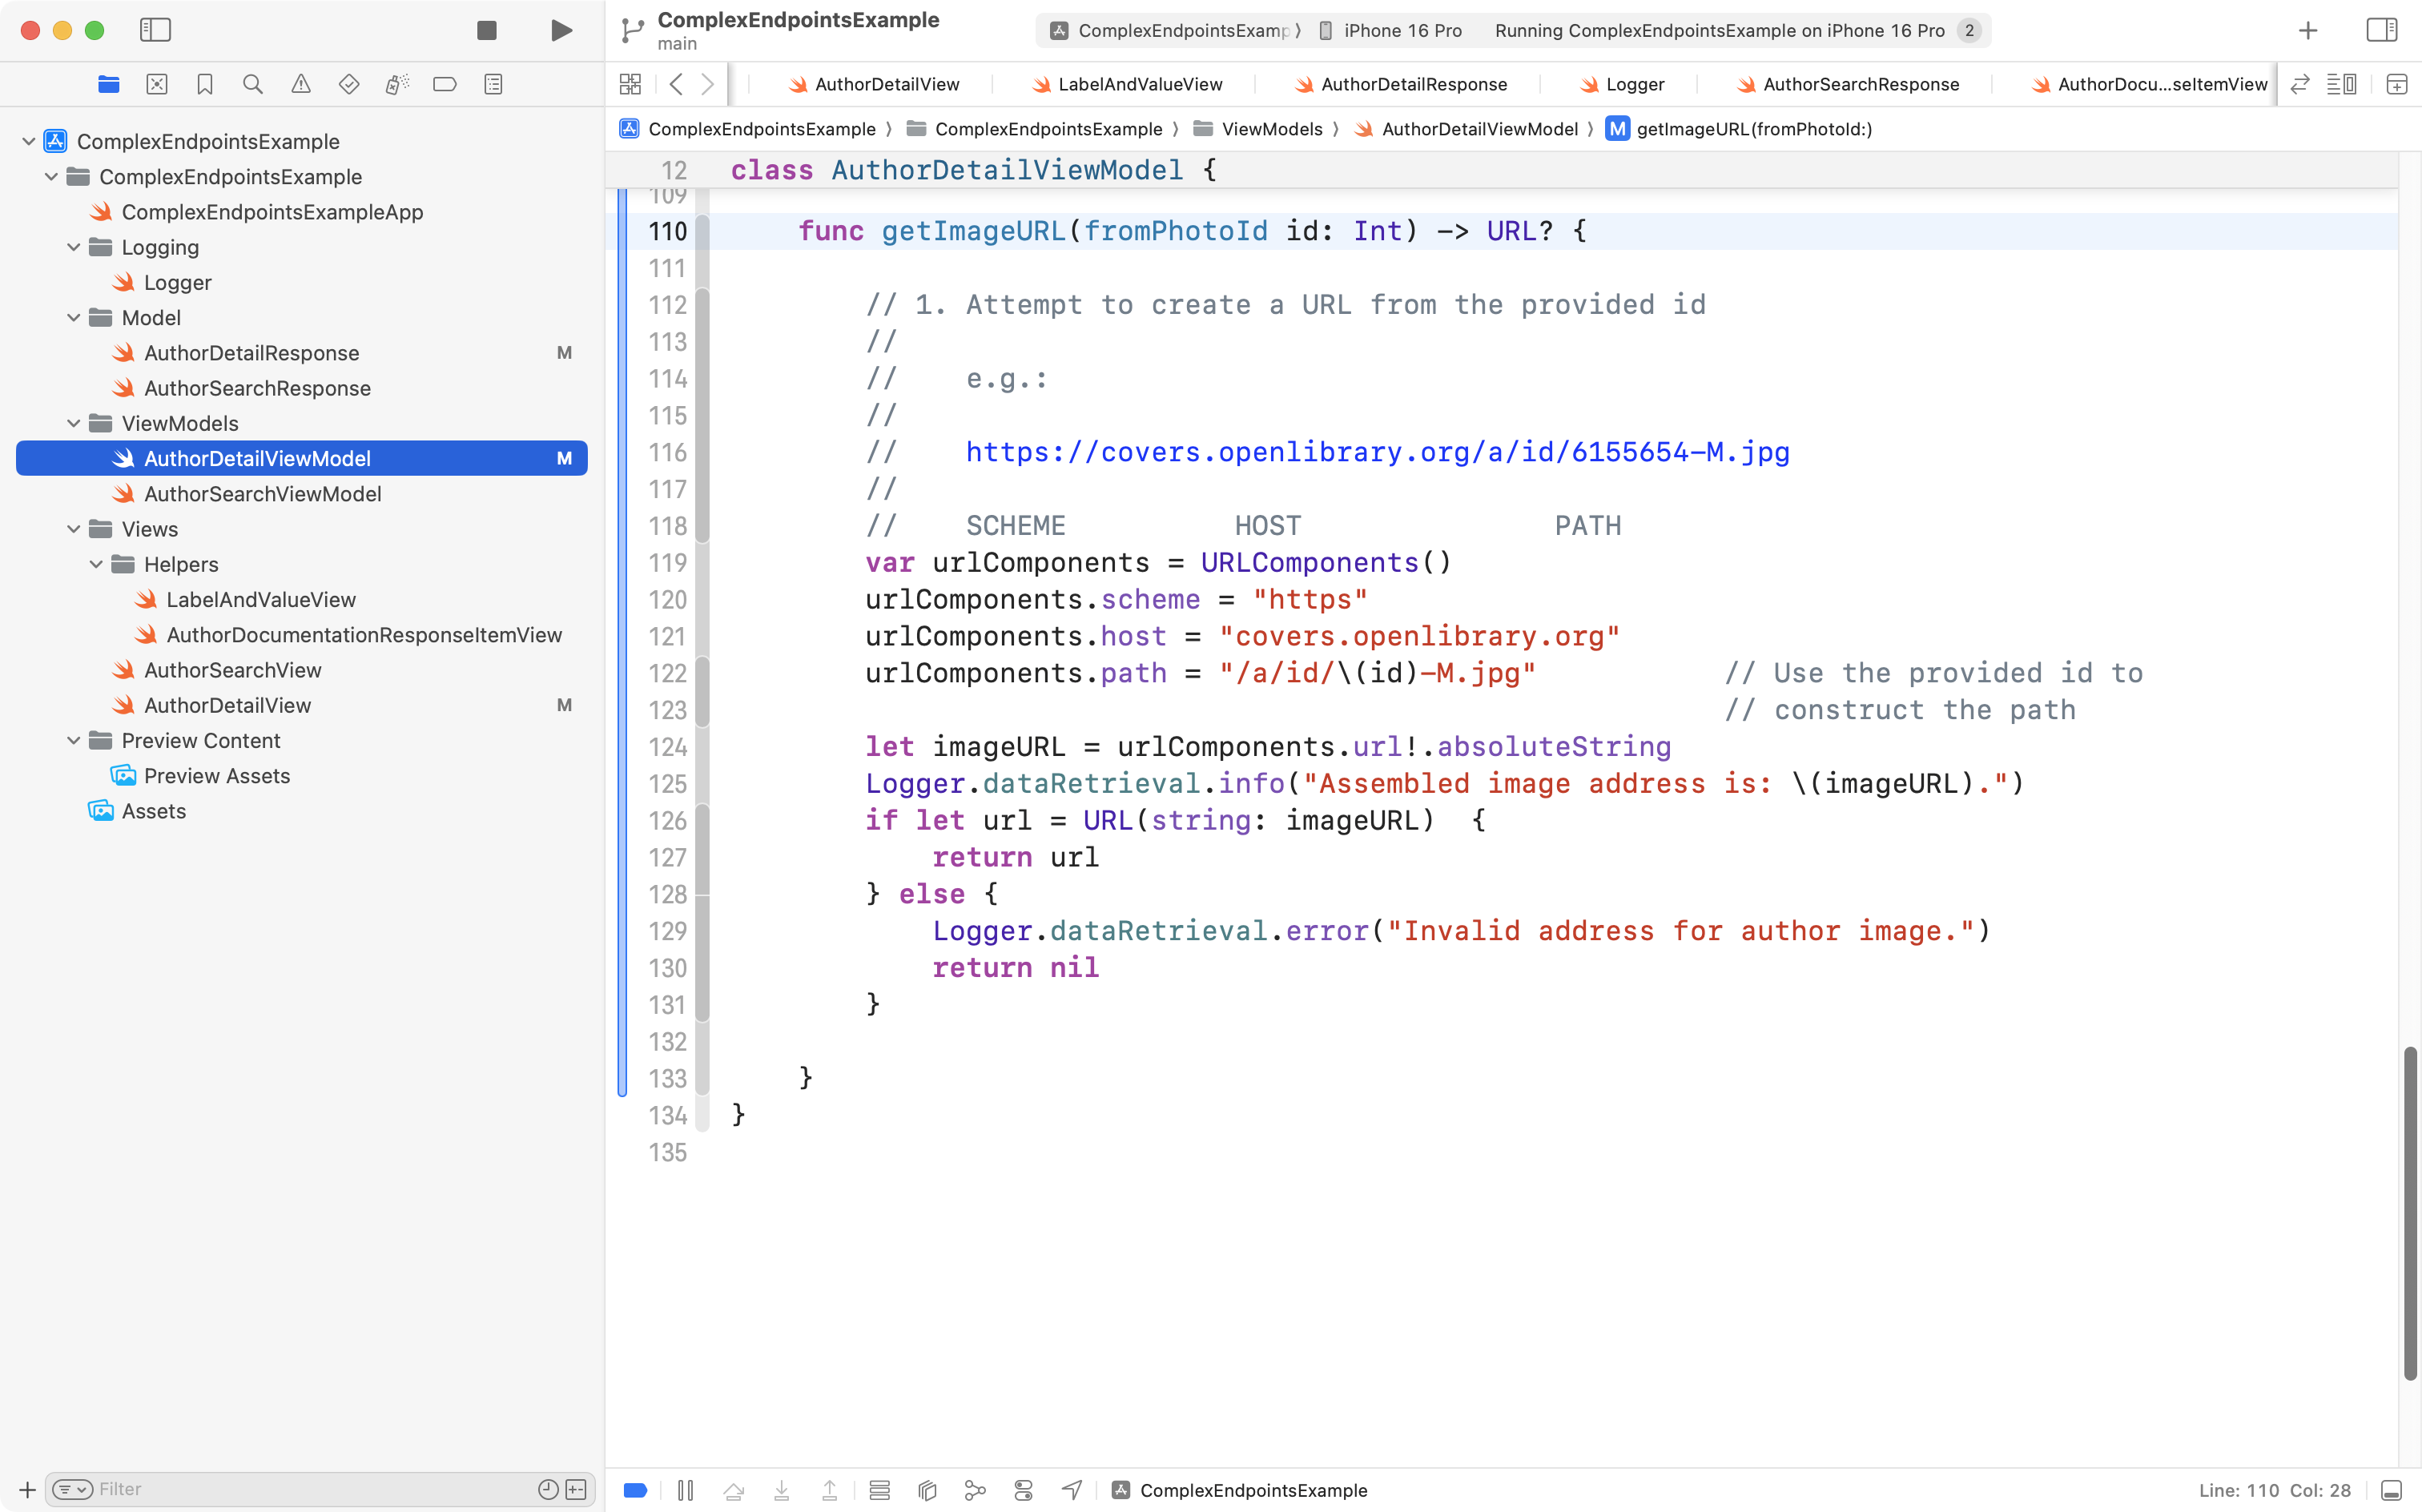
That conversation confirmed that Mr. Gordon only needed to make these changes to the view model – he added a function that, given a photo’s id, provides the URL to that image:
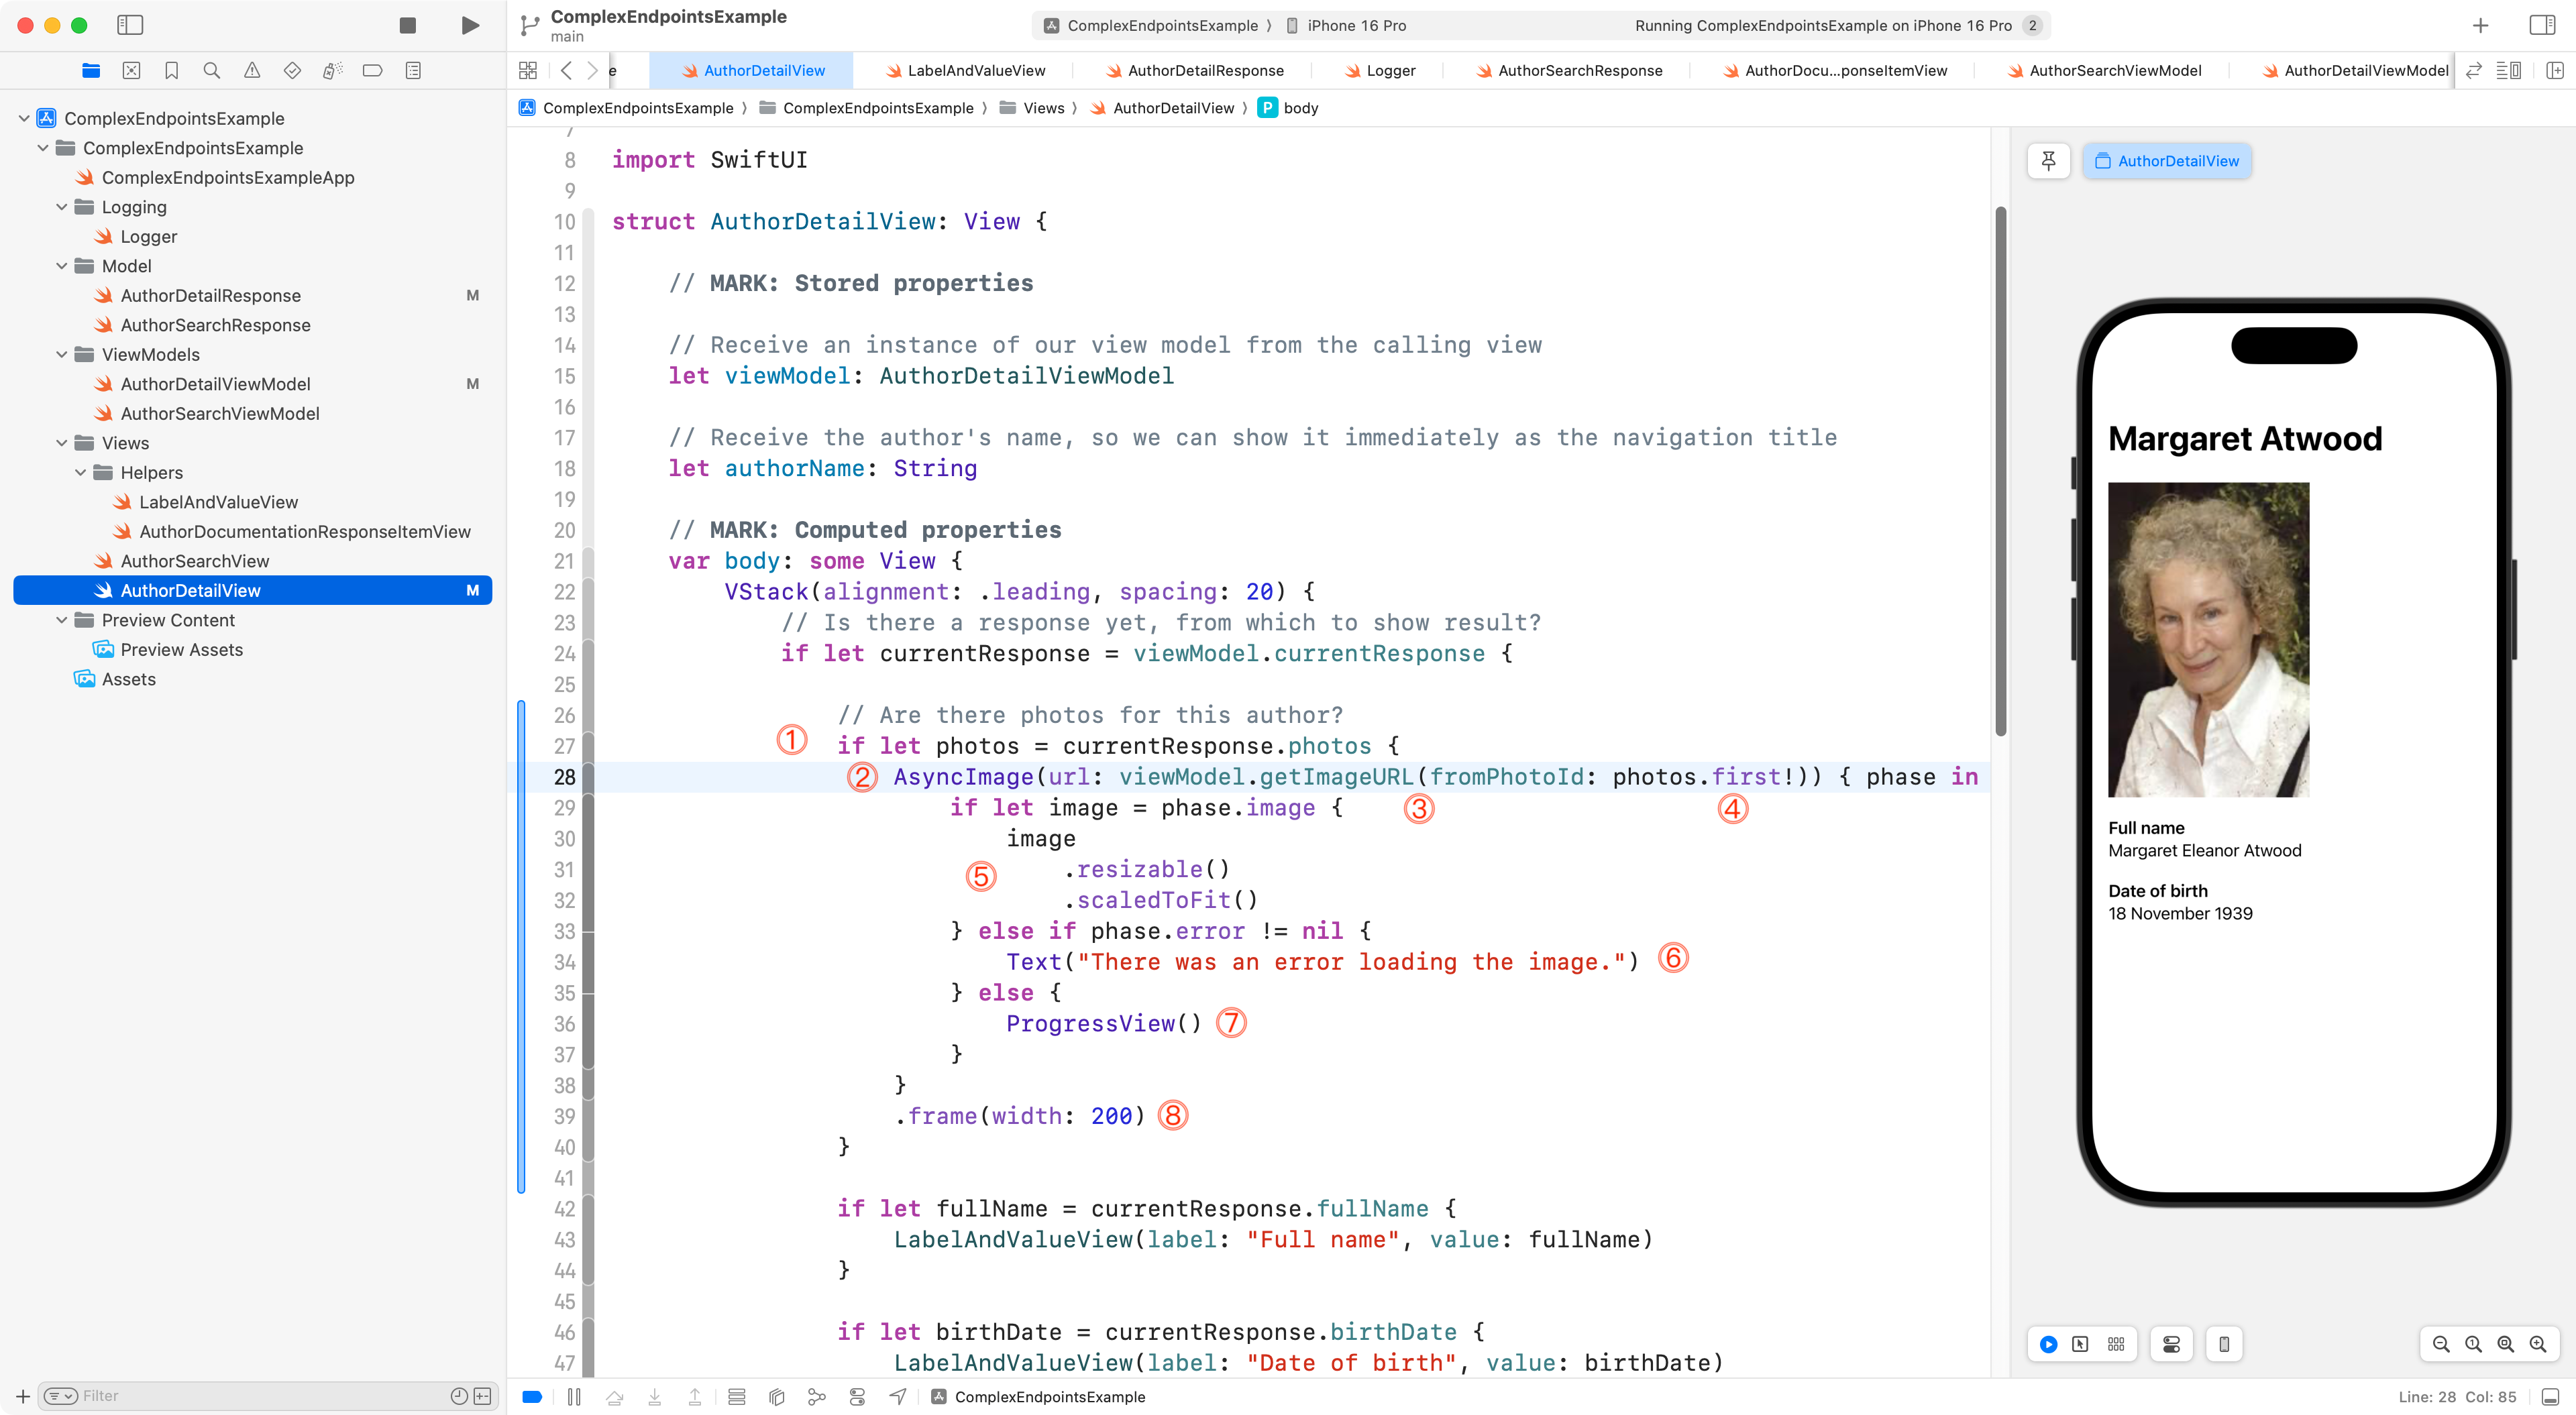
Then he made these changes to the view:
That deserves some explanation, so let’s review…
DISCUSSION
- So long as the
photosproperty of the response received providing details of an author is not nil, let’s try to show the photo…- Use the
AsyncImagestructure that is provided by the SwiftUI framework to go out across the Internet and fetch the image from the provided URL. Paul Hudson has a nice summary of the different ways to useAsyncImage.- We call the
getImageURLfunction we just defined a moment ago on the view model.- We pass in the ID of the first photo in the array provided in the response from the remote endpoint.
- When a photo is loaded, several phases will occur. Once an image has finished being loaded, we’ll display it using the code in this block.
- If any kind of error occurred while loading the image, we’ll show an error message in the view.
- While
AsyncImageis going out and getting the author’s image, we’ll display a progress view, or spinner.- Finally, we ensure that every image will have the same width (the height may vary).